# Community Edition setup and operations
Detailed installation, configuration, API, and deployment instructions. For the shorter five-step path, start with the [README quickstart](../README.md#quickstart). This guide retains separate image-pull and container-start steps, so its installation sequence has six steps.
## Contents
- [Install](#install)
- [Restarts, upgrades, and backups](#restarts-upgrades-and-backups)
- [Starter kits](#starter-kits)
- [What it is](#what-it-is)
- [Why self-host](#why-self-host)
- [The Unified Harness Protocol](#the-unified-harness-protocol)
- [Configuration](#configuration)
- [Using the API](#using-the-api)
- [Putting it on a public URL](#putting-it-on-a-public-url)
- [Moving to the hosted service](#moving-to-the-hosted-service)
- [Architecture](#architecture)
- [Resources](#resources)
- [License](#license)
## Install
Six steps, and at the end of them you have a running instance, a signed-in console, and an agent
that has answered you.
You need Docker, about 4 GB of disk, and an API key from a model provider. There is no account to
create and nothing to sign up for. You also set a local Console password after the first sign-in.
Model requests use the provider and credentials you configure.
### 1. Pull the image
```bash
docker pull harnessrouter/harnessrouter
```
About 700 MB to download.
Pinning a version instead of latest
`latest` tracks the current release. Pulling downloads an image but does not update an existing
container; follow [the upgrade steps](#restarts-upgrades-and-backups). Use a version tag for a
specific release, or an image digest when you need the exact same image. Releases are listed on
[Docker Hub](https://hub.docker.com/r/harnessrouter/harnessrouter/tags).
### 2. Run it
Copy this as it is. Nothing in it is a placeholder — no provider key, no password.
```bash
docker run -d --name harnessrouter \
-p 127.0.0.1:3000:3000 \
-v harnessrouter:/data \
harnessrouter/harnessrouter
```
If port 3000 is already busy, change only the left-hand number (`-p 127.0.0.1:3100:3000`), because
the container always listens on 3000 inside.
What each part of that line does
`-p 127.0.0.1:3000:3000` keeps the console reachable only from this machine. That is what makes it
safe to start on a default login and change it afterwards.
`-v harnessrouter:/data` is where everything durable lives: the database, your files, and the agent
CLIs installed on the first start. Keeping that volume is what makes every later start fast.
No provider key, because you connect a provider from the console in step 5. That is the shorter
road: a key pasted into a form cannot be misspelled into a shell history, and changing it later does
not mean recreating the container.
No password, because the instance starts on a default login that step 4 gives you and asks you to
change.
Do not add --user: the container starts as root and drops privileges itself
The container must start as root, and from 0.8.2 it refuses to start any other way, with one line
saying so. This is not the usual "runs as root" shortcut; it is the opposite. Root is needed for
exactly one thing: every agent CLI runs as its own per-session user, which owns that session's
workspace and nothing else. The entrypoint and Runner retain root to manage those users. The
Console and Gateway run as an unprivileged user; each agent process runs under its session user.
What that buys you, inside one container serving many sessions:
- An agent cannot read or write another session's files, the databases, the blob store or the
secret store. Not "is told not to": cannot, because those paths belong to other users.
- A file an agent saves to the wrong place fails at the write, while the model is still there to
correct itself, instead of silently disappearing outside the collected workspace.
- An agent process carries none of the product's secrets in its environment.
No extra privilege is granted to get there: no `--privileged`, no `--cap-add`, no custom seccomp
profile. Docker's default capability set already includes what a root process needs to switch to
another user, and that is all that is used.
If you run with `--user` today (or `user:` in a compose file), remove it before upgrading. The
documented command above never set one, and a volume from any earlier version is adopted in place
on the first start.
Choosing your own username and password at docker run
Two optional variables. Set them and they replace the defaults; the console never shows you the
default login again.
```bash
docker run -d --name harnessrouter \
-p 127.0.0.1:3000:3000 \
-v harnessrouter:/data \
-e HR_AUTH_USER=you \
-e HR_AUTH_PASSWORD=the-password-you-chose \
harnessrouter/harnessrouter
```
Whatever you put after `HR_AUTH_PASSWORD=` **is** the password — sign in with exactly that in step
4. You do not need this to get started, and changing the password from the profile page later works
just as well; it exists for a box built by a script, where nobody is going to open a browser.
Using Docker Compose instead
Run these commands from a checkout of the repository root, where `docker-compose.yml` and
`.env.example` live. Before starting, change the published port in
[`docker-compose.yml`](../docker-compose.yml) from `3000:3000` to `127.0.0.1:3000:3000`.
Then copy `.env.example` to `.env` and run `docker compose up -d`.
### 3. Wait for it to say it is ready
**Do not open the browser yet.** `docker run` gives your prompt back in about a second, but the
console needs roughly another half a minute, and until then refuses the
connection. That is the first start still working, not a broken container.
```bash
docker logs -f harnessrouter
```
Wait for `ready on :3000`, then open the browser:
```
[harnessrouter] installing Claude Code (Anthropic's terms apply)…
[harnessrouter] installing opencode (MIT)…
[harnessrouter] installing Qwen Code (Apache-2.0)…
[harnessrouter] installing Gemini CLI (Apache-2.0)…
[harnessrouter] installing Cline (Apache-2.0)…
[harnessrouter] installing Codex (Apache-2.0)…
[harnessrouter] installing Pi (MIT) and its MCP adapter (MIT)…
[harnessrouter] installing Oh My Pi (MIT)…
[harnessrouter] installing goose (Apache-2.0)…
[harnessrouter] installing DeepSeek Harness (MIT, developer preview — version-pinned)…
[harnessrouter] installing Hermes (check its upstream license before use)…
[harnessrouter] data=/data backends available: claude codex hermes pi dsh opencode qwen gemini cline omp goose kimi
[harnessrouter] ready on :3000
```
Installed CLIs are cached on the volume, so later starts are usually faster. New or previously
failed backends can still trigger installation work. Press **Ctrl+C** to stop following logs;
this does not stop the container. If the Console is not reachable immediately after the ready
line, retry after a few seconds while its server finishes starting.
The other lines, and why the first start is the slow one
`backends available:` lists what actually installed, so a backend that failed is named rather than
silently missing, and the others still work.
You will also see this line, and it comes back on every start until you change the password in step
4. On a loopback-only instance it is a reminder rather than a problem:
```
[harnessrouter] WARNING: using the DEFAULT password. Set HR_AUTH_PASSWORD, or change it from the profile page, before exposing this instance.
```
The enabled agent CLIs are fetched from upstream on first start rather than bundled in the image.
Each remains subject to its upstream license and terms; this repository's Apache 2.0 license does
not replace them. Review [NOTICE](../NOTICE) and each tool's terms before use. The running
instance's catalog reflects the backends that are actually available.
### 4. Sign in
Open , or the host port you chose in step 2, and sign in with:
| | |
|---|---|
| Username | `harnessrouter` |
| Password | `harnessrouter` |
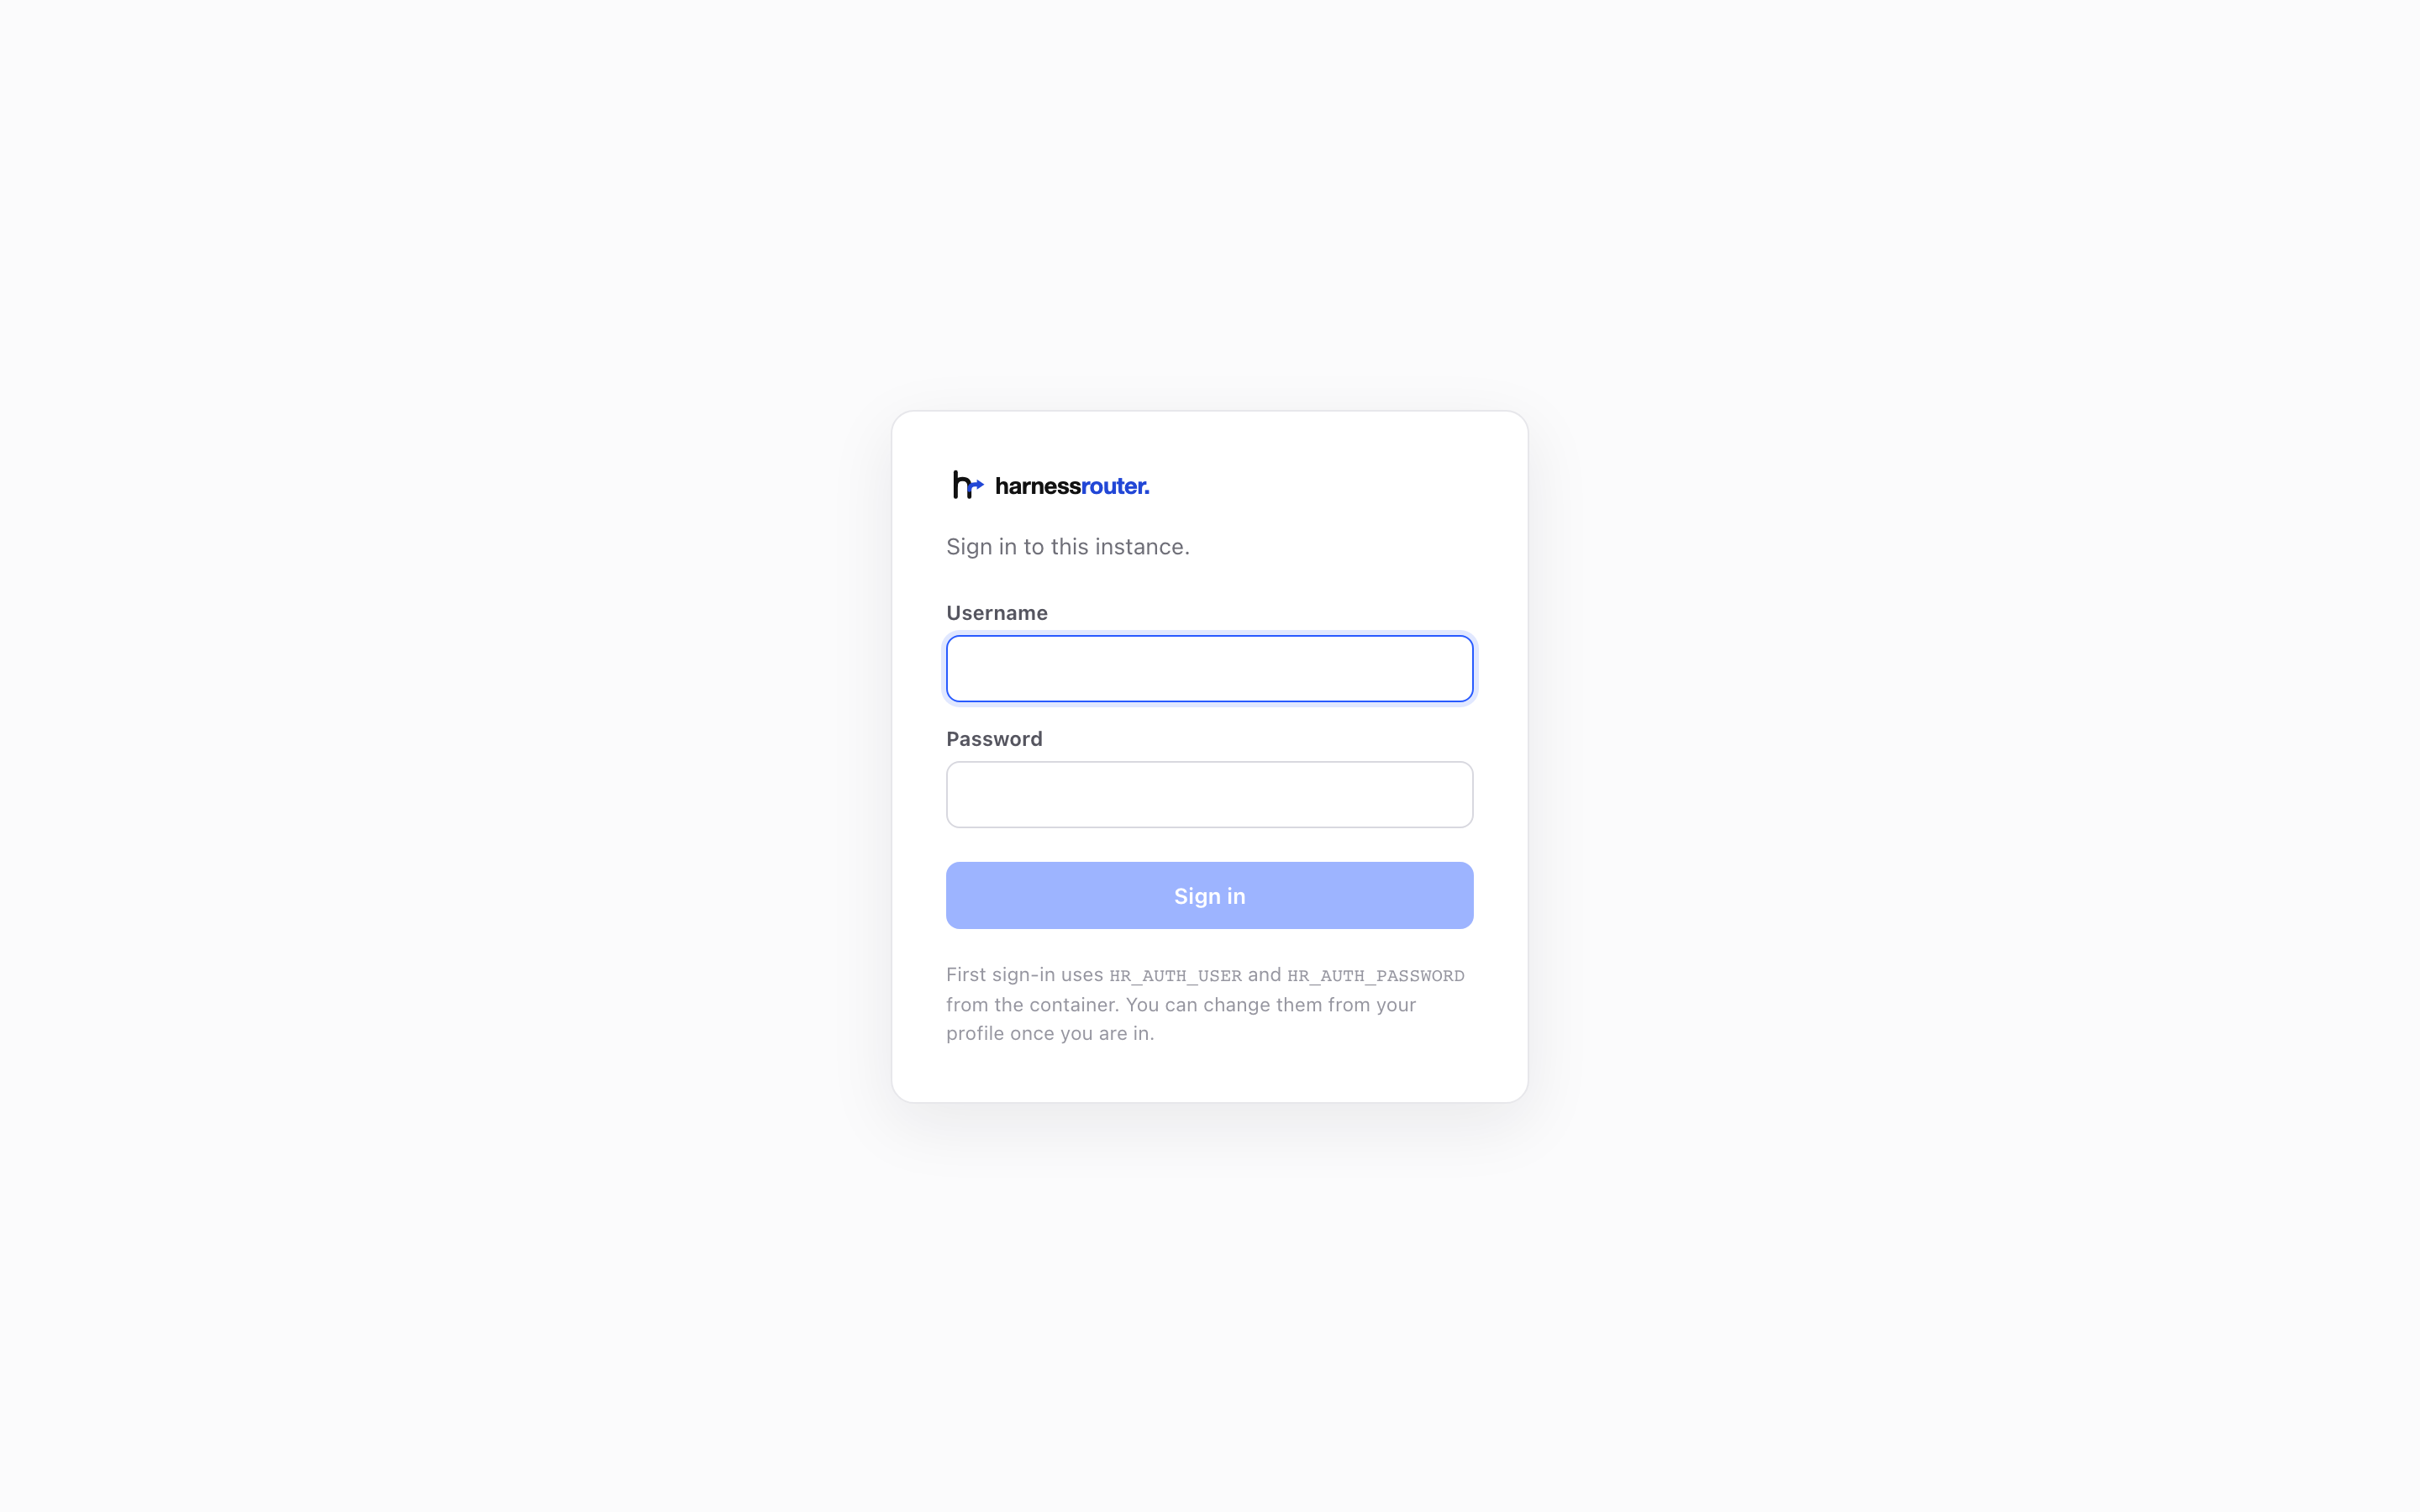
**Change the password now**, from **Profile** in the account menu. Saving briefly restarts
the Console.
If you set `HR_AUTH_USER` or `HR_AUTH_PASSWORD` at `docker run`, sign in with those instead — the
defaults are then refused.
These credentials sign you into the Console. You do not need a HarnessRouter API key to run tasks
there. Create one later when [integrating your product backend](#using-the-api).
Where the password lives, and what to do if you forget it
Printing the defaults here is what makes them a placeholder rather than a secret, which is why the
container warns about the password on every start until you change it.
The profile page asks for the current password as well as the new one, so an unattended tab cannot
be used to take over the instance. New credentials are stored on the data volume
(`/data/selfhost-auth.json`: a username, a salt and a hash, never the password) and take precedence
over the environment from then on — an `HR_AUTH_PASSWORD` set at `docker run` months ago cannot
quietly undo a password change. After one, the start-up line changes to say where the real password
came from:
```
[harnessrouter] sign in as 'harnessrouter' (credentials set from the profile page)
```
Saving also signs out every other browser. Yours stays signed in.
Forgot it? There is no reset email to send, so delete `/data/selfhost-auth.json` and restart. The
instance falls back to `HR_AUTH_USER` / `HR_AUTH_PASSWORD`.
### 5. Connect a model provider
**Nothing runs until you do this.** There is no bundled model, no trial key, and no free tier
hiding in the image.
Open **Bring Your Own Key** in the sidebar (the Integrations page) and press **Add Integration**. It asks three things: a name, the provider,
and that provider's API key. This key authorizes model requests; it is not a HarnessRouter API key.
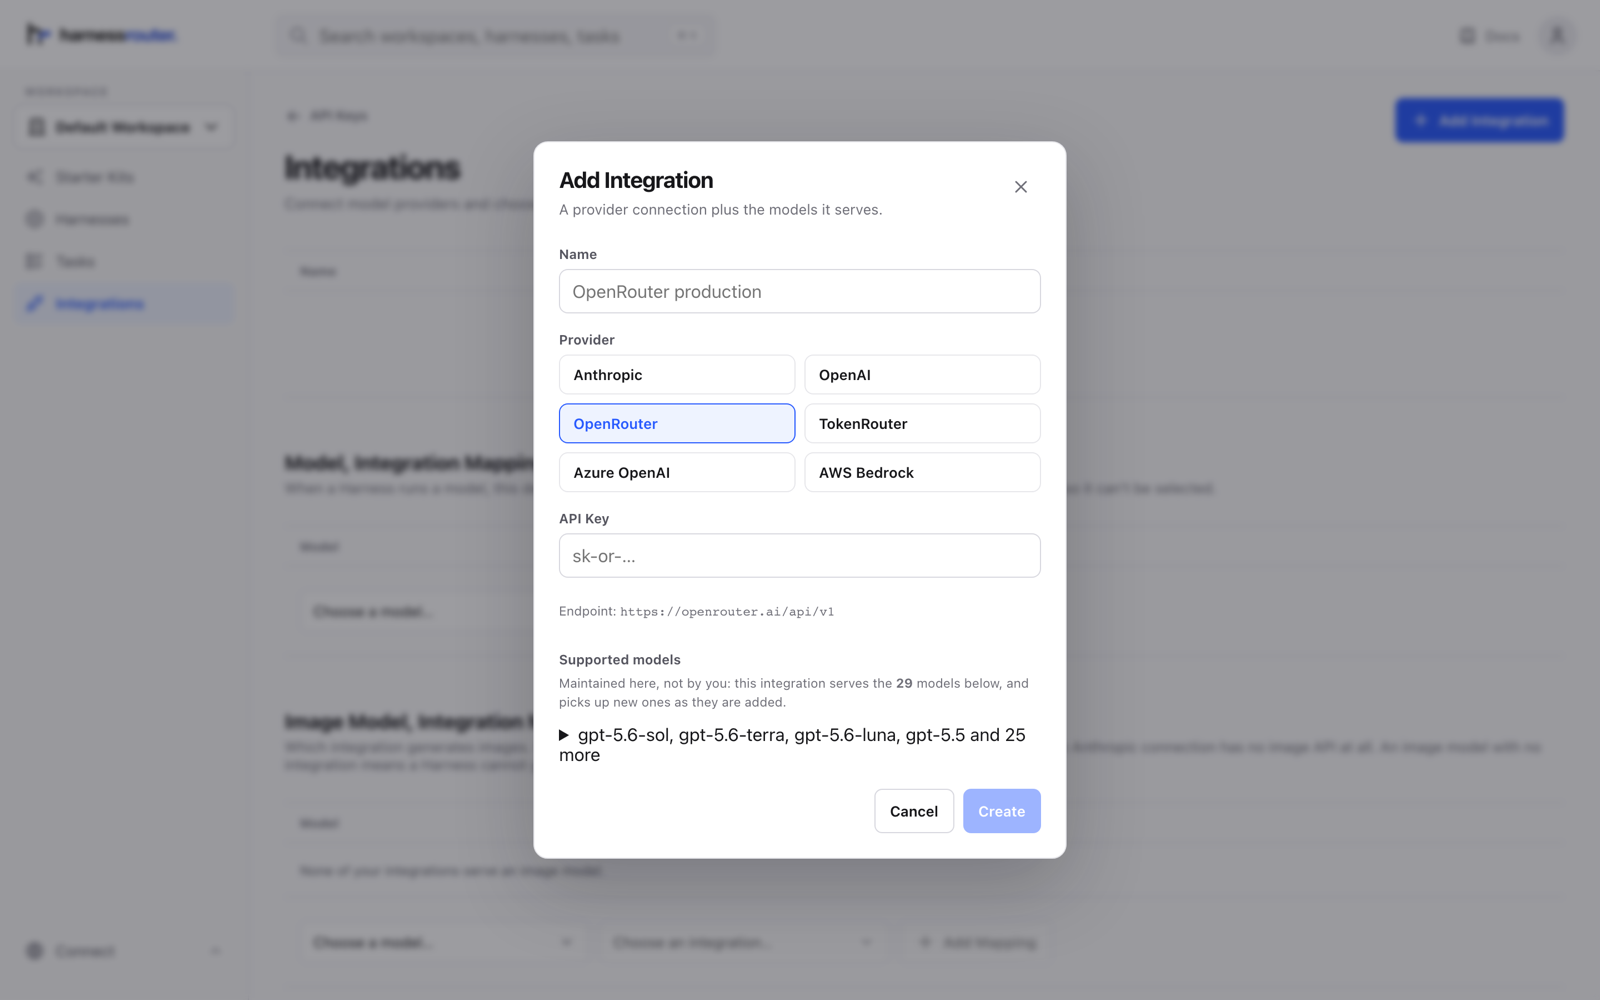
Which models that provider serves is not your problem to configure: the product keeps that list and
adds to it as providers ship models. Pick the provider, paste the key, and the models it covers
appear on the row.
Running more than one provider
The mappings underneath the integrations decide which one serves a given model. With a single
integration there is nothing to set.
Your own endpoint: a proxy or a gateway that names its models its own way
Pick the **Custom** provider. It asks for the API format the endpoint speaks (OpenAI Chat
Completions, OpenAI Responses for Codex, or Anthropic Messages), the endpoint URL, the key, and
the **models** it serves. Each model row pairs the id a harness picks (the same ids every other
provider uses, `gpt-5.5`, `claude-opus-4.8`) with the name this endpoint wants on the wire. That
name is an arbitrary string per row and is sent verbatim: a bare vendor id, a deployment alias, a
versioned SKU. Leave it blank to send the model id as it is. No transform is applied, because the
name a proxy expects is a fact about that proxy and nothing else.
The mapping is a property of the connection, not of a harness: a harness picks a model by its id,
the connection decides how that id is written for its endpoint. Two harnesses that need different
vocabularies on one endpoint are two connections to it.
**Disabled built-in tools.** Some endpoints refuse an agent's built-in tools per model (a proxy
that answers `400 The following tool is not allowed for model 'gpt-5.5': web_search` to Codex).
Name those tools on the connection, comma-separated, and every turn through it runs without them;
for Codex's `web_search` that is a hard switch in its configuration, not a request. The same field
exists on each harness, for tools you want off regardless of the endpoint.
The same, from a script (the integrations document)
The console saves one document, and you can write it yourself. `PUT /v1/admin/integrations` with the
console's session (or a key of this instance) takes the whole document; `GET` reads it back with
keys redacted. Rows are matched by `name`, so a `PUT` with an existing name replaces that row.
```json
{
"integrations": [
{"name": "proxy-anthropic", "provider": "custom",
"config": {"api_format": "anthropic", "base_url": "https://proxy.internal/anthropic", "api_key": "…"},
"models": [{"canonical": "claude-opus-4.8", "provider_id": "anthropic--claude-4.8-opus"}]},
{"name": "proxy-openai", "provider": "custom",
"config": {"api_format": "responses", "base_url": "https://proxy.internal/openai/v1", "api_key": "…",
"disabled_tools": "web_search"},
"models": [{"canonical": "gpt-5.5", "provider_id": "gpt-5.5"},
{"canonical": "gpt-5.4", "provider_id": "prod-gpt-v2"}]}
],
"model_map": {"claude-opus-4.8": "proxy-anthropic", "gpt-5.5": "proxy-openai", "gpt-5.4": "proxy-openai"}
}
```
`models` on a custom row is the endpoint's whole list. On every other provider the list comes from
the product's own table for that vendor, and a `models` row there only changes the wire id of a
model that table already lists. `model_map` routes a model id to the integration that serves it;
a model with no route goes to the first integration that can serve it.
Setting it from the environment instead, for a scripted deploy
A connection names a provider and its credential; a policy says which connection a backend uses.
Useful when the box is built by a script and nobody is going to open a browser:
```bash
-e HR_SECRET_GLOBAL_HARNESS_CONN_ANTHROPIC='{"name":"anthropic","provider":"anthropic","api_key":"sk-ant-…"}'
-e HR_SECRET_GLOBAL_HARNESS_POLICY_CLAUDE='{"chain":["anthropic"]}'
```
There is one policy variable per backend: `…POLICY_CLAUDE`, `…POLICY_CODEX`, `…POLICY_HERMES`. An
OpenAI-compatible endpoint of your own takes the same pair with a `base_url` added, and
`"provider":"openai"` rather than the `"openai-api"` that `.env.example` still shows:
```bash
-e HR_SECRET_GLOBAL_HARNESS_CONN_LOCAL='{"name":"local","provider":"openai","api_key":"…","base_url":"https://api.example.com/v1"}'
-e HR_SECRET_GLOBAL_HARNESS_POLICY_CODEX='{"chain":["local"]}'
```
Not every provider fits every backend, and a pairing that does not fit fails quietly: the turn
comes back empty after a long wait rather than erroring. The Integrations page does not have this
problem, because it only offers you providers that work.
| Connection `provider` | Backends that can use it |
|---|---|
| `anthropic` | Claude Code, Hermes, Pi, DeepSeek Harness, OpenCode, Qwen Code, Cline, Oh My Pi, goose, Kimi Code CLI, Aider, OpenHands |
| `openai` | Codex, Hermes, Pi, DeepSeek Harness, OpenCode, Qwen Code, Cline, Oh My Pi, goose, Kimi Code CLI, Aider, OpenHands |
| `openrouter` | Codex, Hermes, Pi, DeepSeek Harness, OpenCode, Qwen Code, Cline, Oh My Pi, goose, Kimi Code CLI, Aider, OpenHands, System One |
| `azure-foundry` | Codex, Hermes, Pi, DeepSeek Harness, OpenCode, Qwen Code, Cline, Oh My Pi, goose, Kimi Code CLI, Aider, OpenHands |
| `google` | Hermes, Pi, DeepSeek Harness, OpenCode, Qwen Code, Gemini CLI, Cline, Oh My Pi, Kimi Code CLI, Aider, OpenHands |
| `typesafe` | System One (Jev on TypeSafe's own API: `jev-latest`, `jev-preview`) |
| `bedrock` | Claude Code, Hermes |
| `tokenrouter` | Claude Code, Codex, Hermes, Pi, DeepSeek Harness, OpenCode, Qwen Code, Gemini CLI, Cline, Oh My Pi, goose, Kimi Code CLI, Aider, OpenHands |
| `vercel` | Claude Code, Codex, Hermes, Pi, DeepSeek Harness, OpenCode, Qwen Code, Cline, Oh My Pi, goose, Kimi Code CLI, Aider, OpenHands |
| `llmtr` | Claude Code, Codex, Hermes, Pi, DeepSeek Harness, OpenCode, Qwen Code, Cline, Oh My Pi, goose, Kimi Code CLI, Aider, OpenHands |
| `custom` | Claude Code, Codex (Responses format), Hermes, Pi, DeepSeek Harness, OpenCode, Qwen Code, Cline, Oh My Pi, goose, Kimi Code CLI, Aider, OpenHands |
What a backend with nothing connected says
Forthcoming about it, which is what you get if you skip this step entirely:
```json
{"error":{"type":"invalid_request_error","code":"invalid_input","message":"no provider configured for backend 'codex'. Add an integration for a provider that serves 'gpt-5.4-mini', or configure a connection policy"}}
```
### 6. Give it something to do
**Agent harnesses → pick a harness → New task.** Every harness lists its own tasks; a fresh
draft opens with the caret in the box. Choose a model on the chip under the message, and type.
The turn streams back as it happens: every command the agent runs, every file it touches, and
the answer at the end.
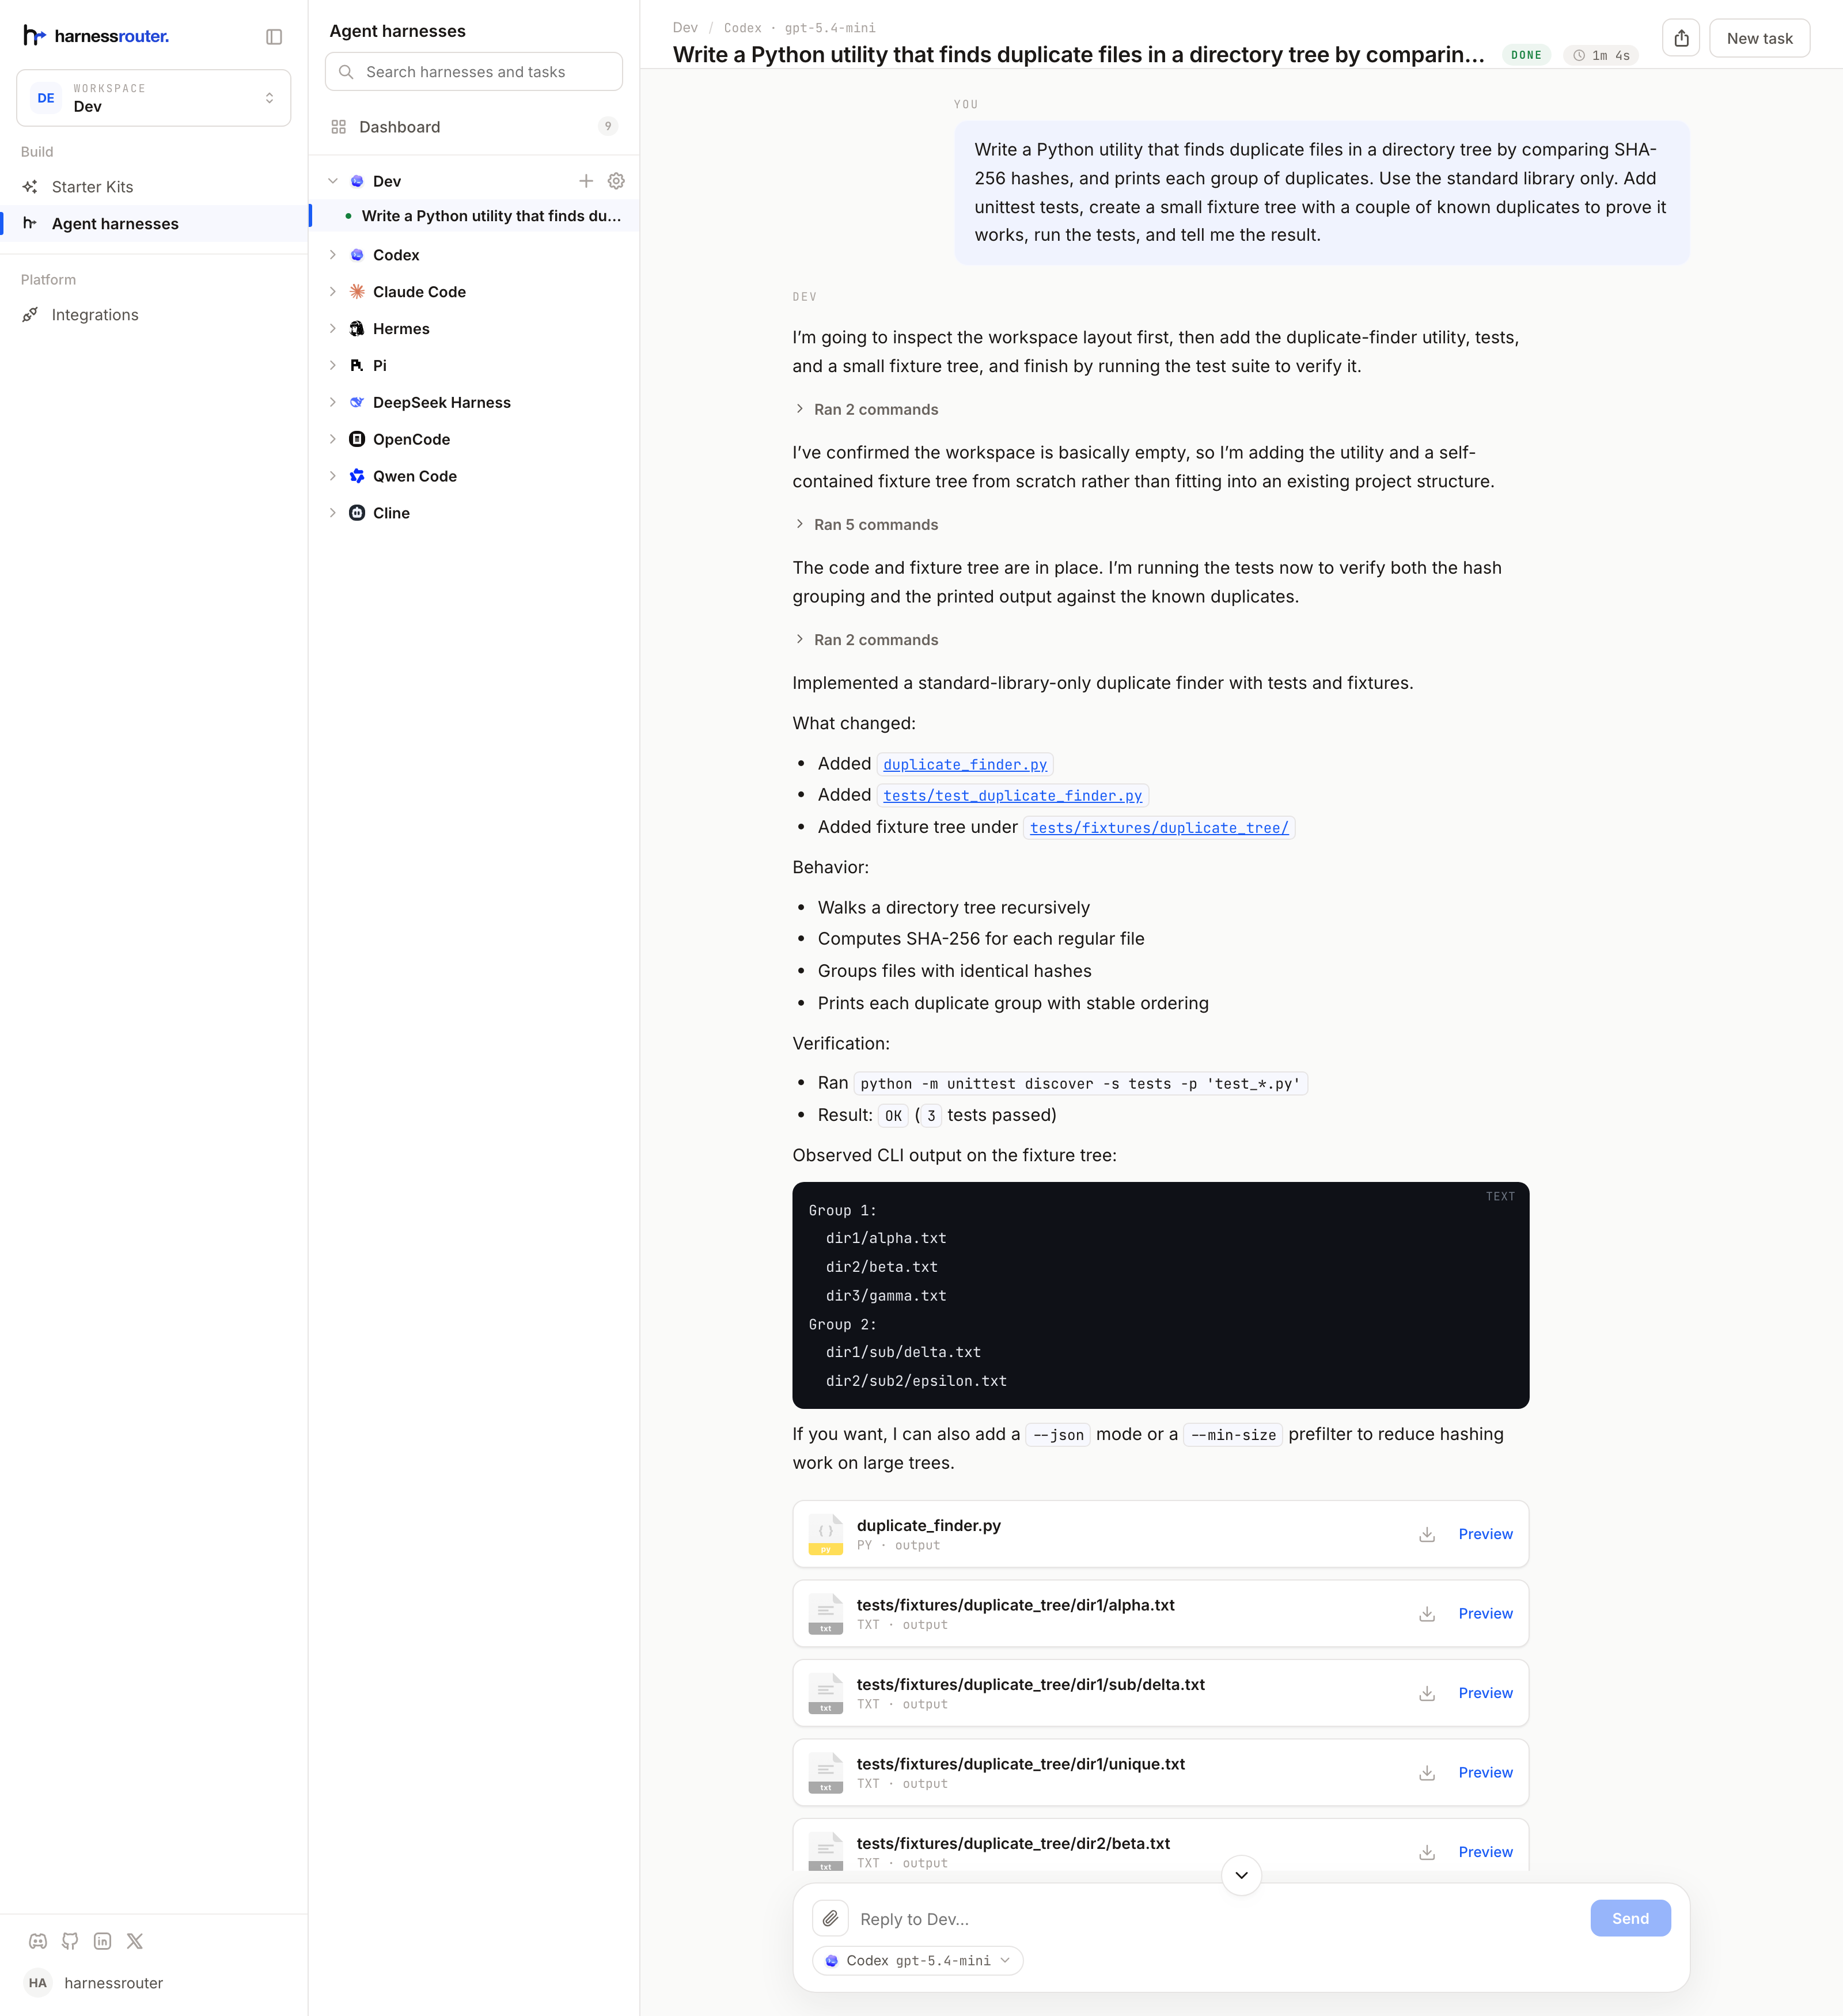
That is the whole install. State is SQLite and files on one Docker volume. Deleting that volume
deletes the instance's durable data. See [backups](#restarts-upgrades-and-backups) before moving it.
What is happening in that screenshot
That one asked for a small utility with tests. The agent wrote it, built a fixture tree with
duplicates planted in it, ran the suite, and came back with `OK (3 tests passed)`, which is an answer
you can check rather than one you have to trust. Everything it produced is on the transcript to
take away, a file at a time or the lot as a zip.
---
## Restarts, upgrades, and backups
For a stopped container, use `docker start harnessrouter`; to restart it, use
`docker restart harnessrouter`. Running the original `docker run` command again while a container
with that name exists gives a name conflict.
To upgrade, back up your data, pull the desired image, stop and remove only the old container, and
recreate it with the same volume, ports, and configuration. Keep `HR_SECRET_KEY` unchanged if used.
Do not delete the data volume. For Compose, use `docker compose pull` followed by
`docker compose up -d`; avoid `docker compose down -v`, which removes volumes.
Stop the container before copying the volume so the SQLite databases and files form a consistent
backup. Preserve the volume's permissions and keep any configured encryption key securely
alongside your deployment records. Restore the volume and the same configuration before starting
the replacement instance.
## Starter kits
Starter kits are worked examples, and they are here to show you what this can be pointed at.
Each one is a whole agent product rather than a snippet: an app, an agent configured to drive it,
and the skill that teaches that agent the format it writes. Use one, then read it: every kit is
available in the [Starter Kits repository](https://github.com/HarnessRouter/starter-kit), under its
[separate licensing terms](https://github.com/HarnessRouter/starter-kit#licensing). More arrive over
time; your instance lists the ones it has.
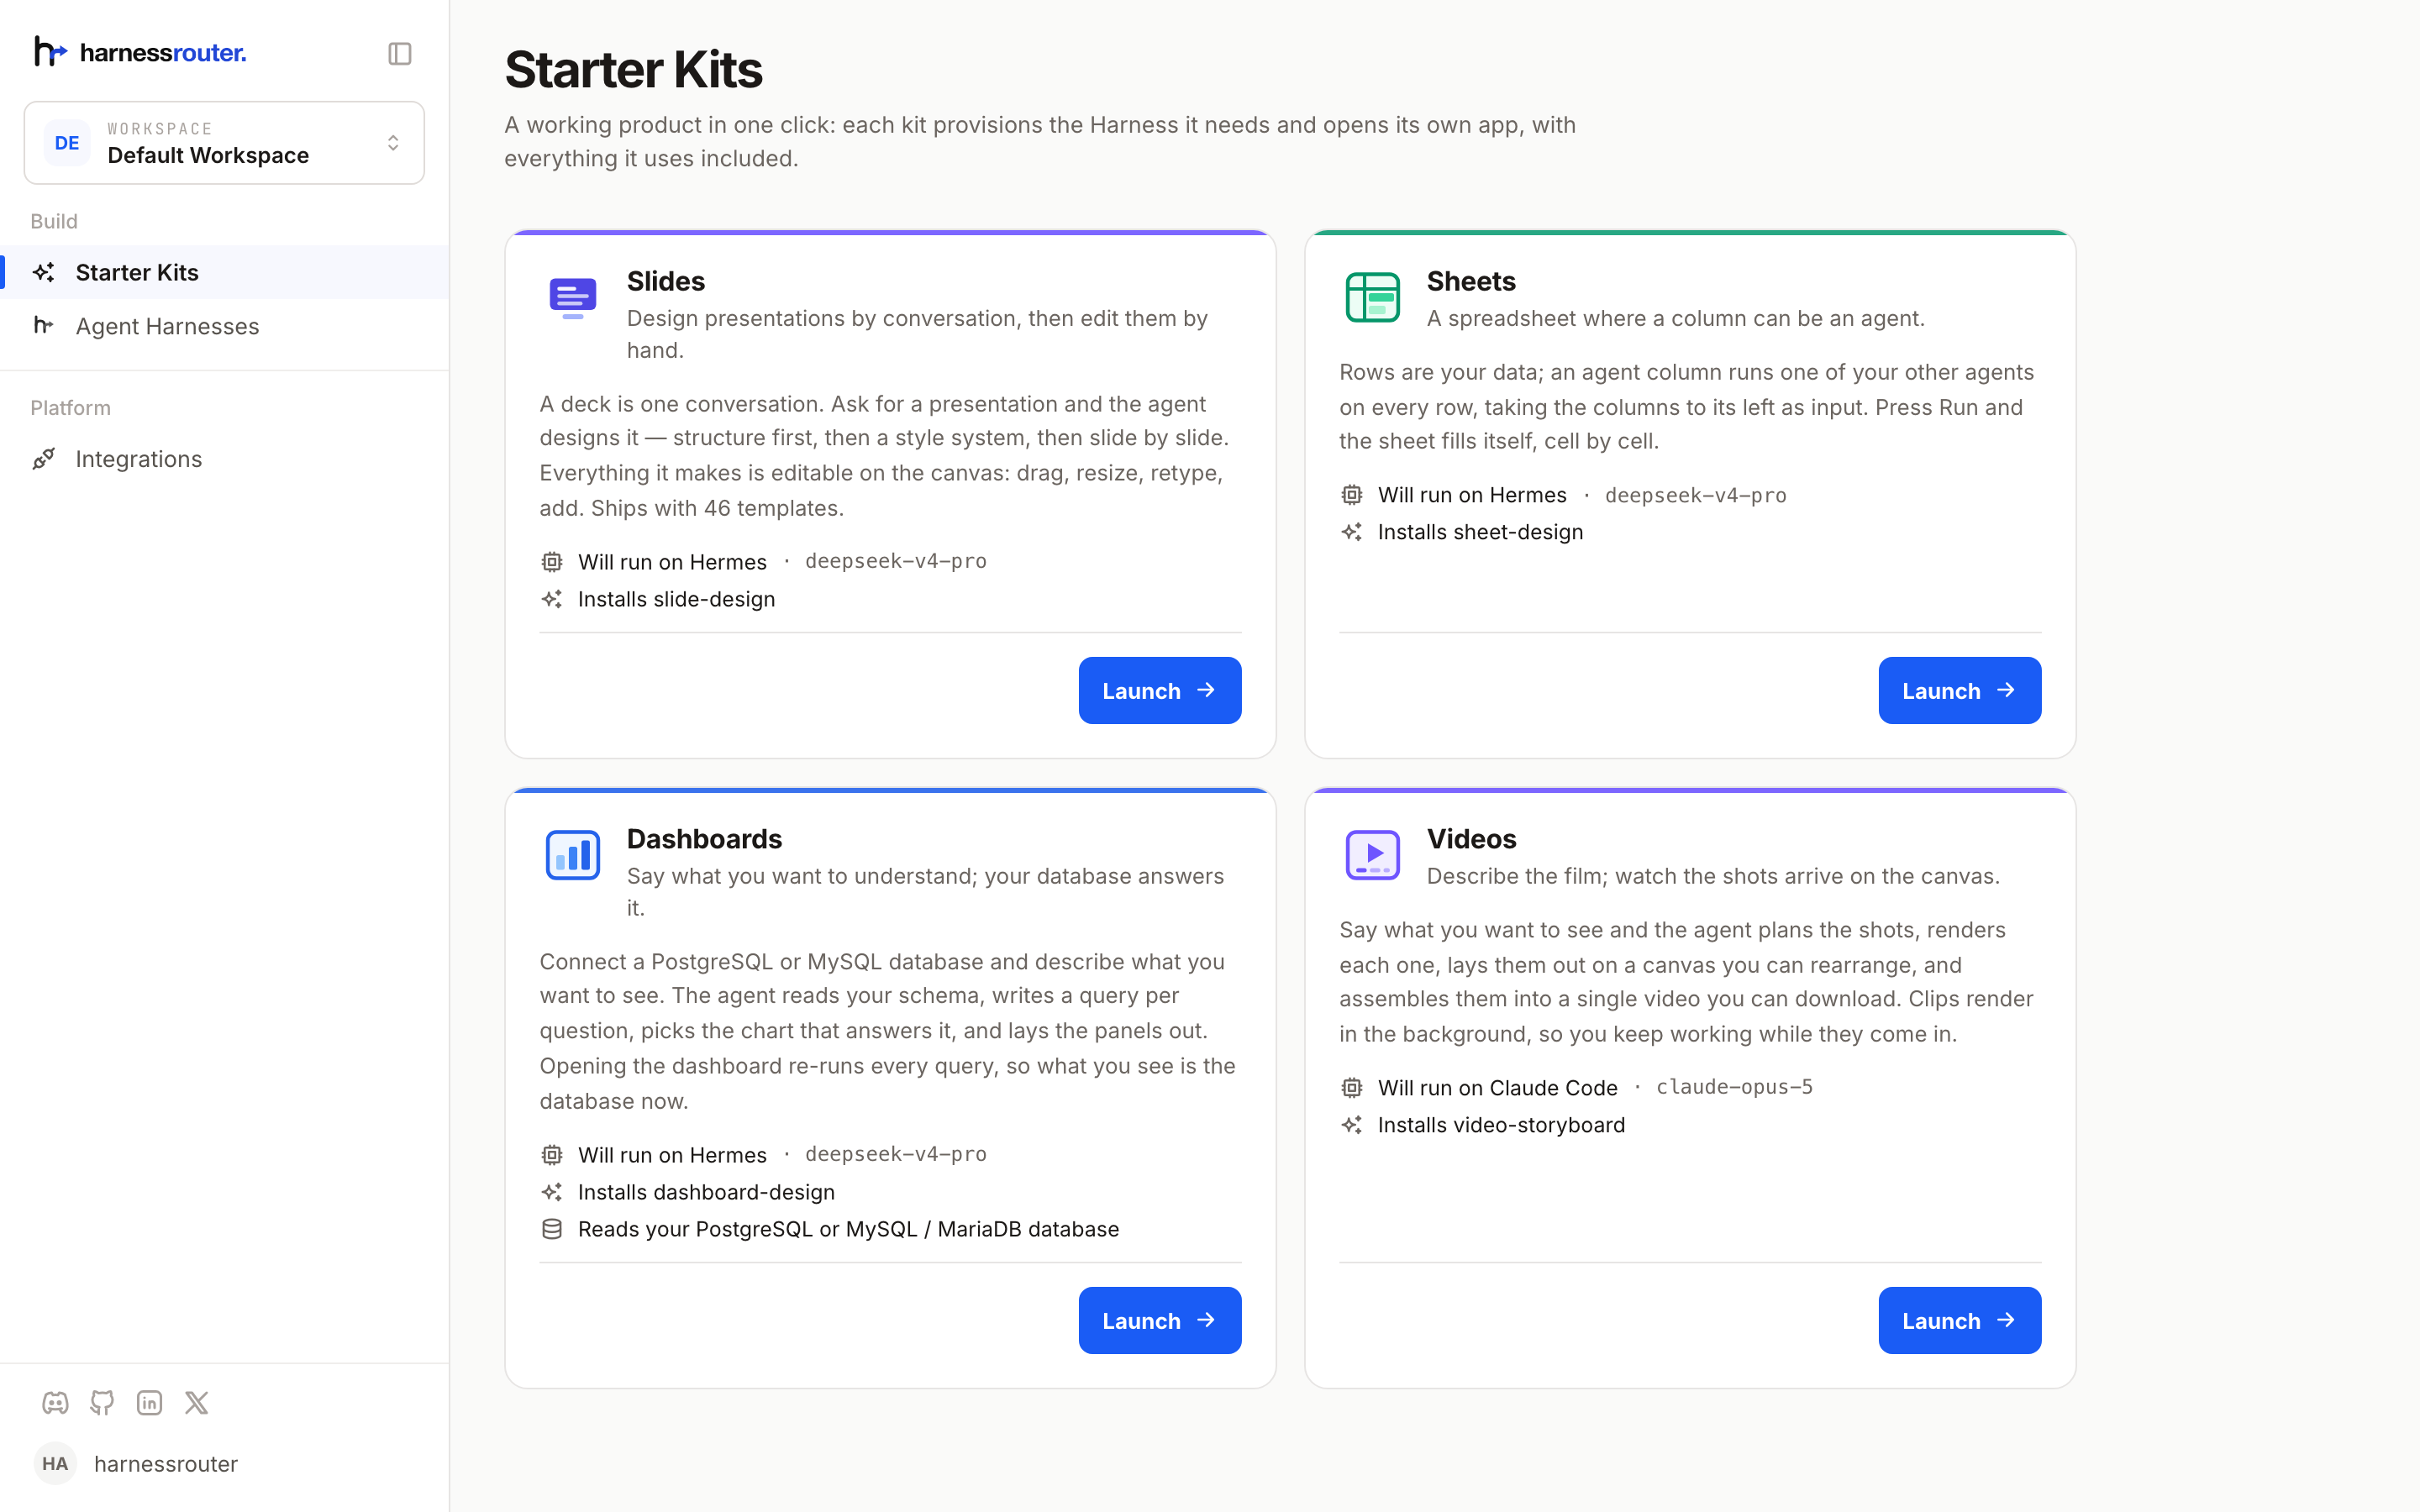
Launching asks one question: what to run it on.
What the launch dialog is telling you
Each card names the base and the model it will run on before you launch it, so you can see what a
kit is about to spend before it spends it. What it names depends on the keys you gave it in step 5:
the screenshot above is an instance with three providers connected, and an instance with one will
recommend that one on every card.
The runtimes you have no key for are listed but disabled, with the reason on them:
> Hermes · `deepseek-v4-pro` · Not connected. Add a provider that serves this model to use it.
What the dialog recommends is a suggestion you can overrule, not a default you have to accept.
### Slides
A deck is one conversation. Ask for a presentation and the agent designs it: structure first, then
a style system, then slide by slide. Slides appear while it works, so when the shape is wrong you
can say so while there are two slides to change instead of twenty.
The deck below came from one sentence: *"A 5-slide deck explaining what a container image is, for
new engineers."*
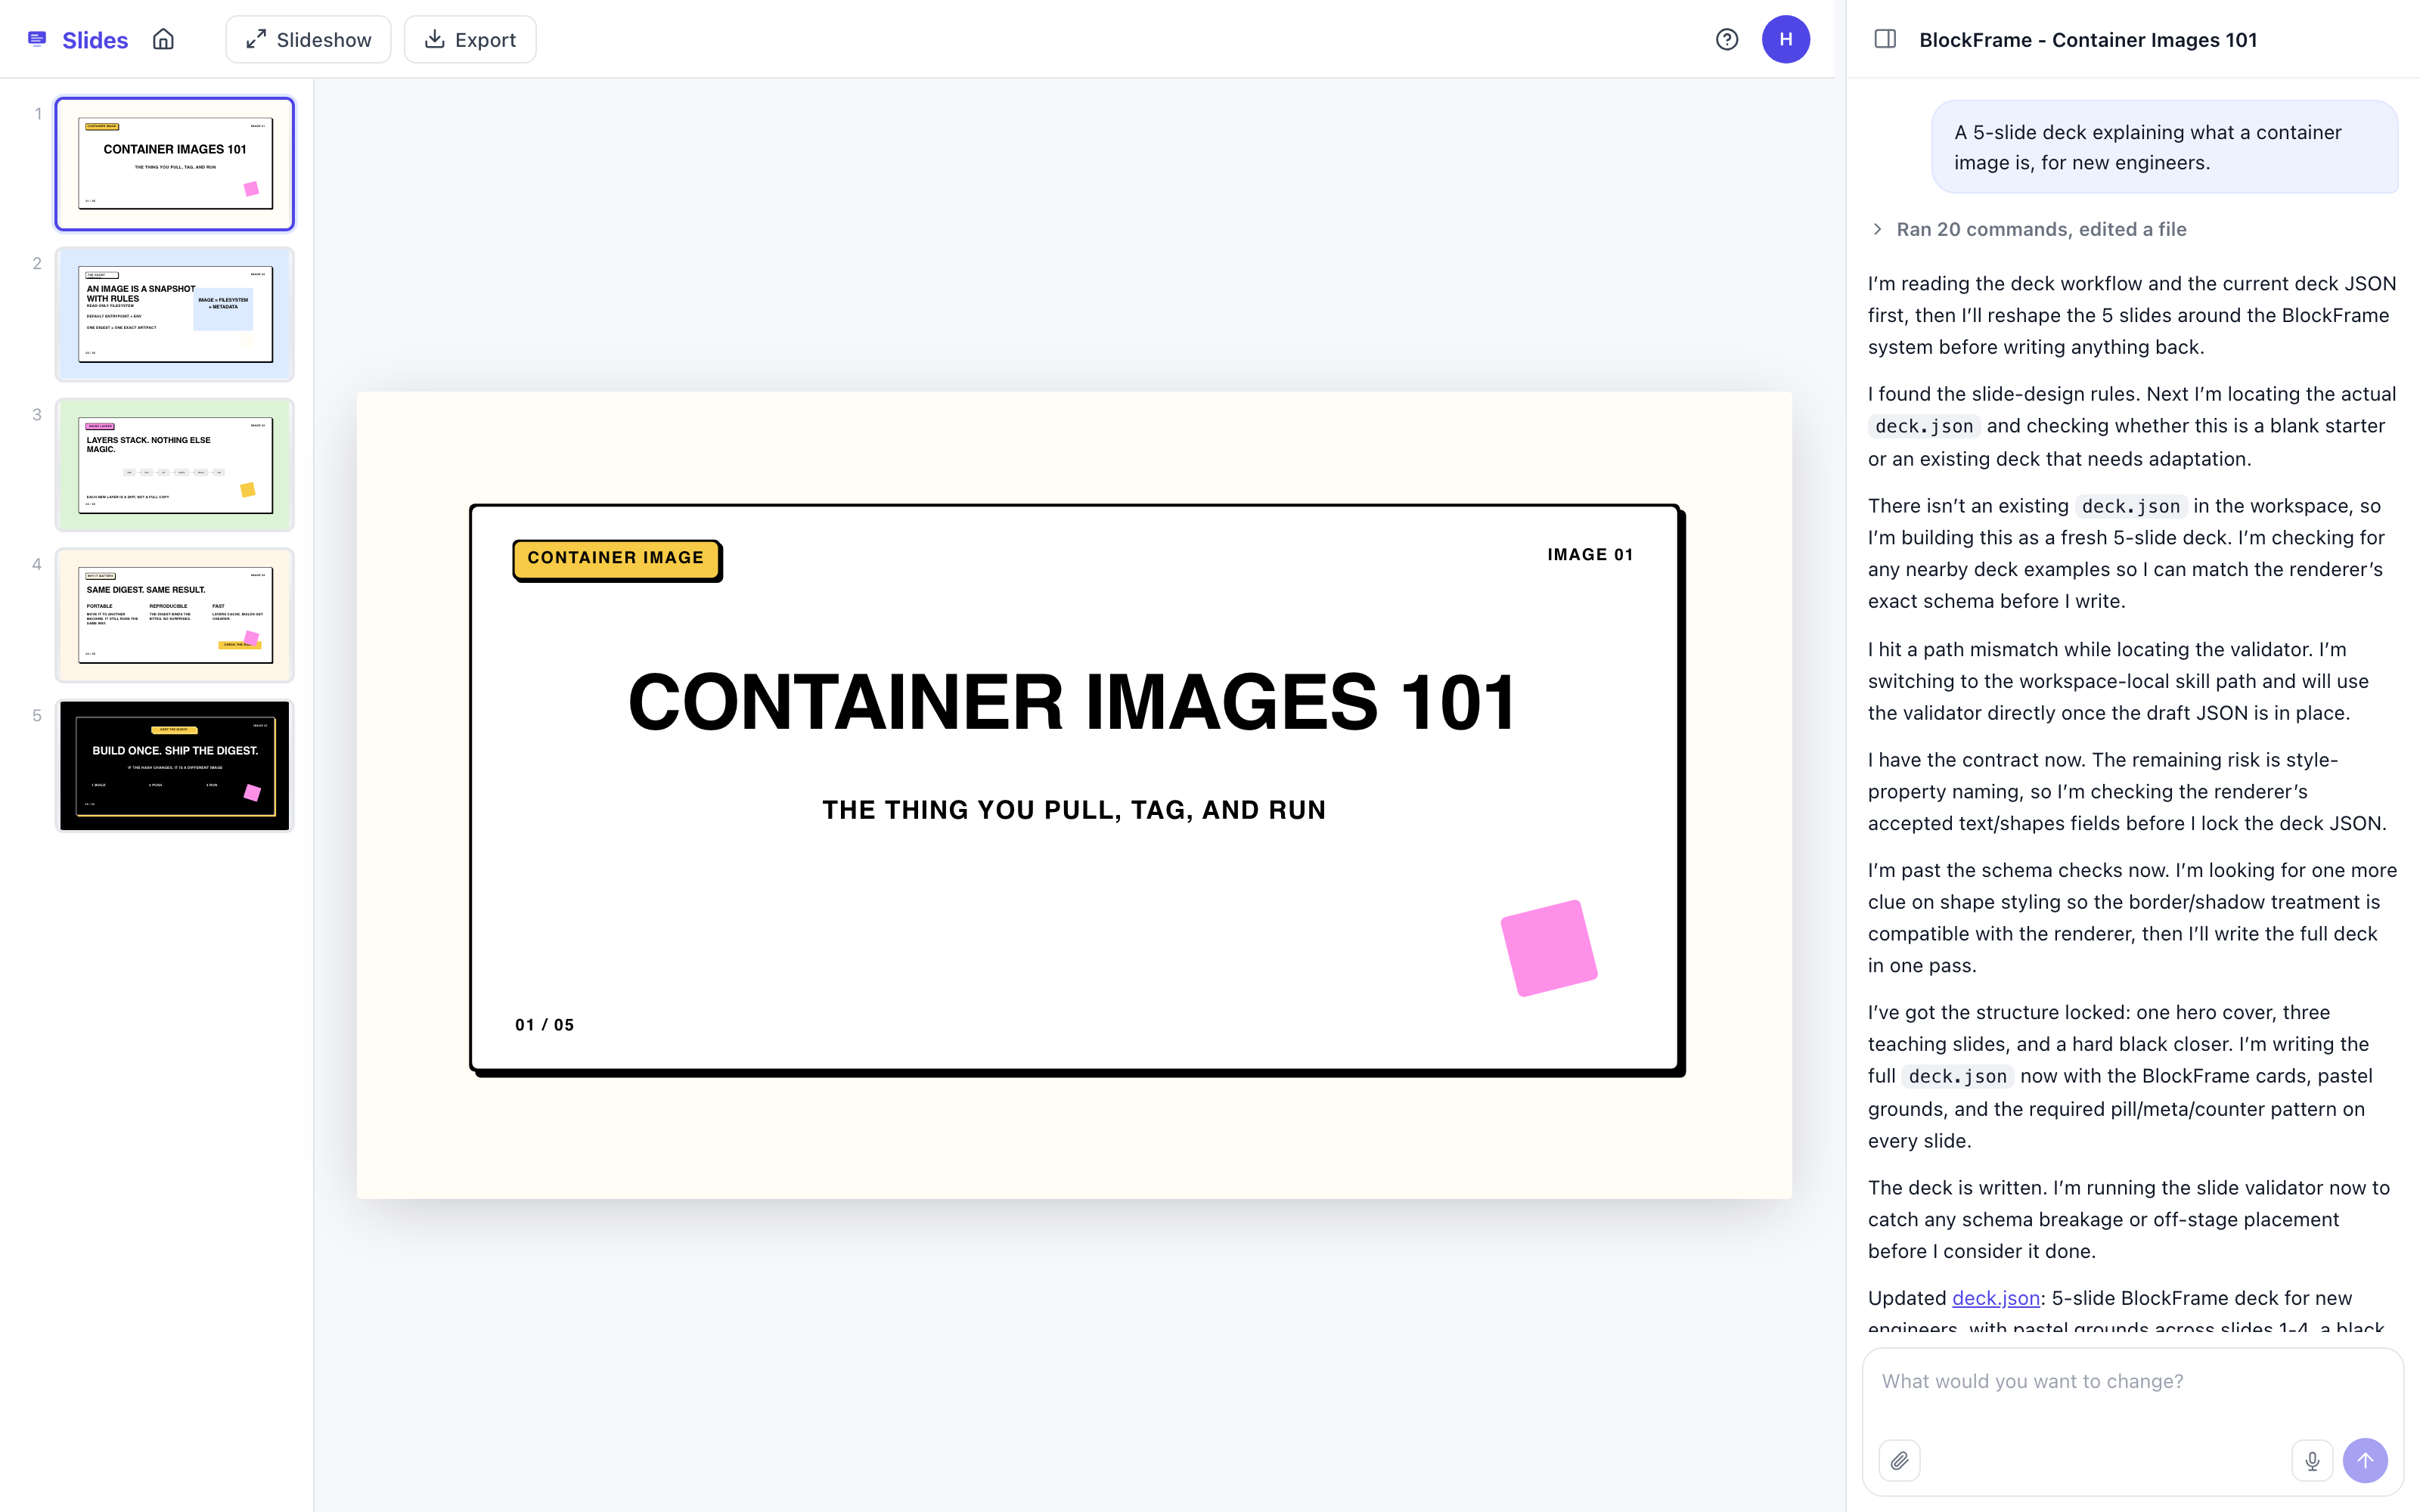
What you are looking at in the panel on the right
That is the run, not a progress bar. It settled the structure, built a style system, checked what
the canvas would accept, wrote the deck, then validated it, and it says so as it goes.
Nothing here is a picture of a slide: every element is a real object on the canvas, so you can drag
it, resize it, retype it, or ask for another pass in the same conversation.
### Sheets
Rows are your data. An agent column runs one of your harnesses on every row, with the columns to
its left as input, and the sheet fills itself cell by cell. Press Run and it fills in row order with
a live count and a Stop button, because a column of a thousand rows is a thing you should be able to
change your mind about.
This one opened with *"help me build a sheet, i wanna use this to map investors in silicon valley.
the goal is to provide this one to investors outside of SV the startups invested by investors based
SV."*
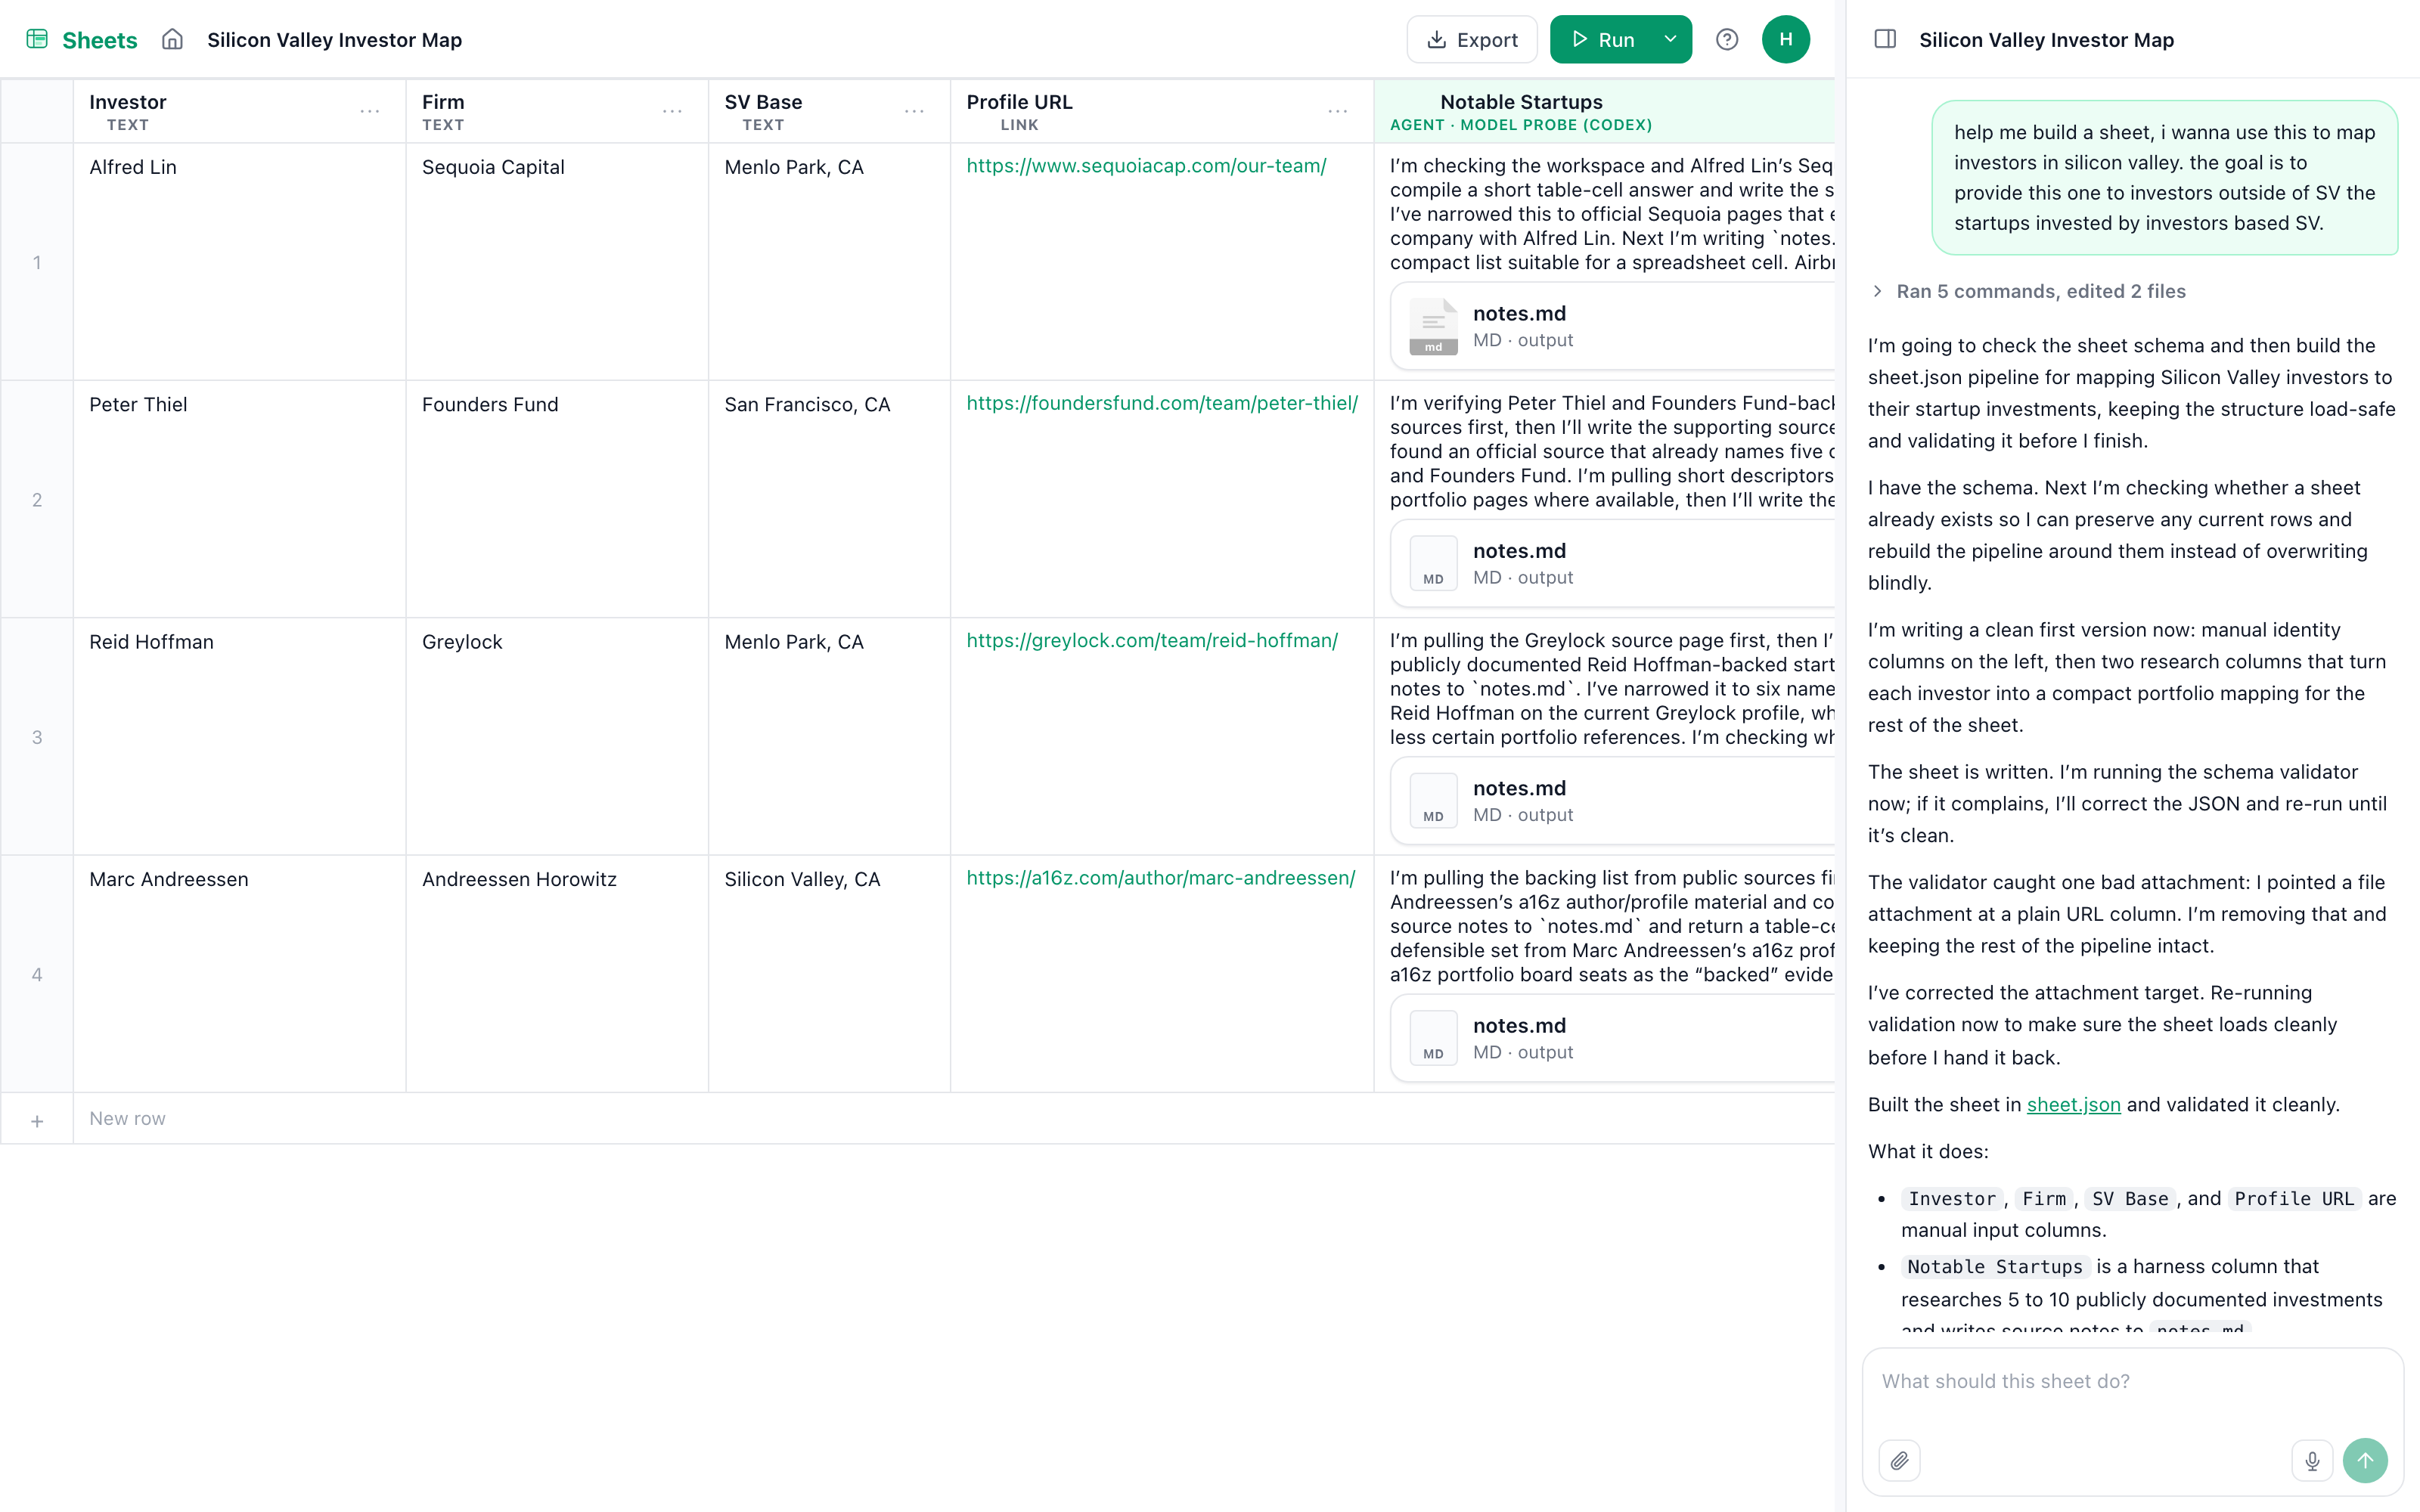
How that sheet got built
From that sentence, the agent decided the columns, worked out which of them a person fills in and
which one an agent should, and wrote the per-row prompt itself. The rows came from a follow-up,
*"search some real data and from internet"*, and it went and found four real investors with their
firm's own profile pages rather than inventing plausible ones.
If the agent-column menu says you have no other agents
An agent column runs one of your *other* agents, and a sheet will not run itself. So on an instance
where Sheets is the only thing you have launched, the column menu has nothing to offer and says so:
> Choose an agent… · You have no other agents yet. Create one, then choose it here.
**Harnesses → Add Harness** is the fix: a base, a model, a name, and it is ready in seconds. The
picker then lists it with the model it runs on. If you add one while a sheet is open, reload the
sheet first, because the list is read when the page loads.
### Dashboards
Say what you want to understand and point it at a database. The agent reads your schema, writes a
query per question, picks the chart that answers it, and lays the panels out. Opening the dashboard
re-runs every query, so what you see is the database now, not a snapshot from whenever it was
built.
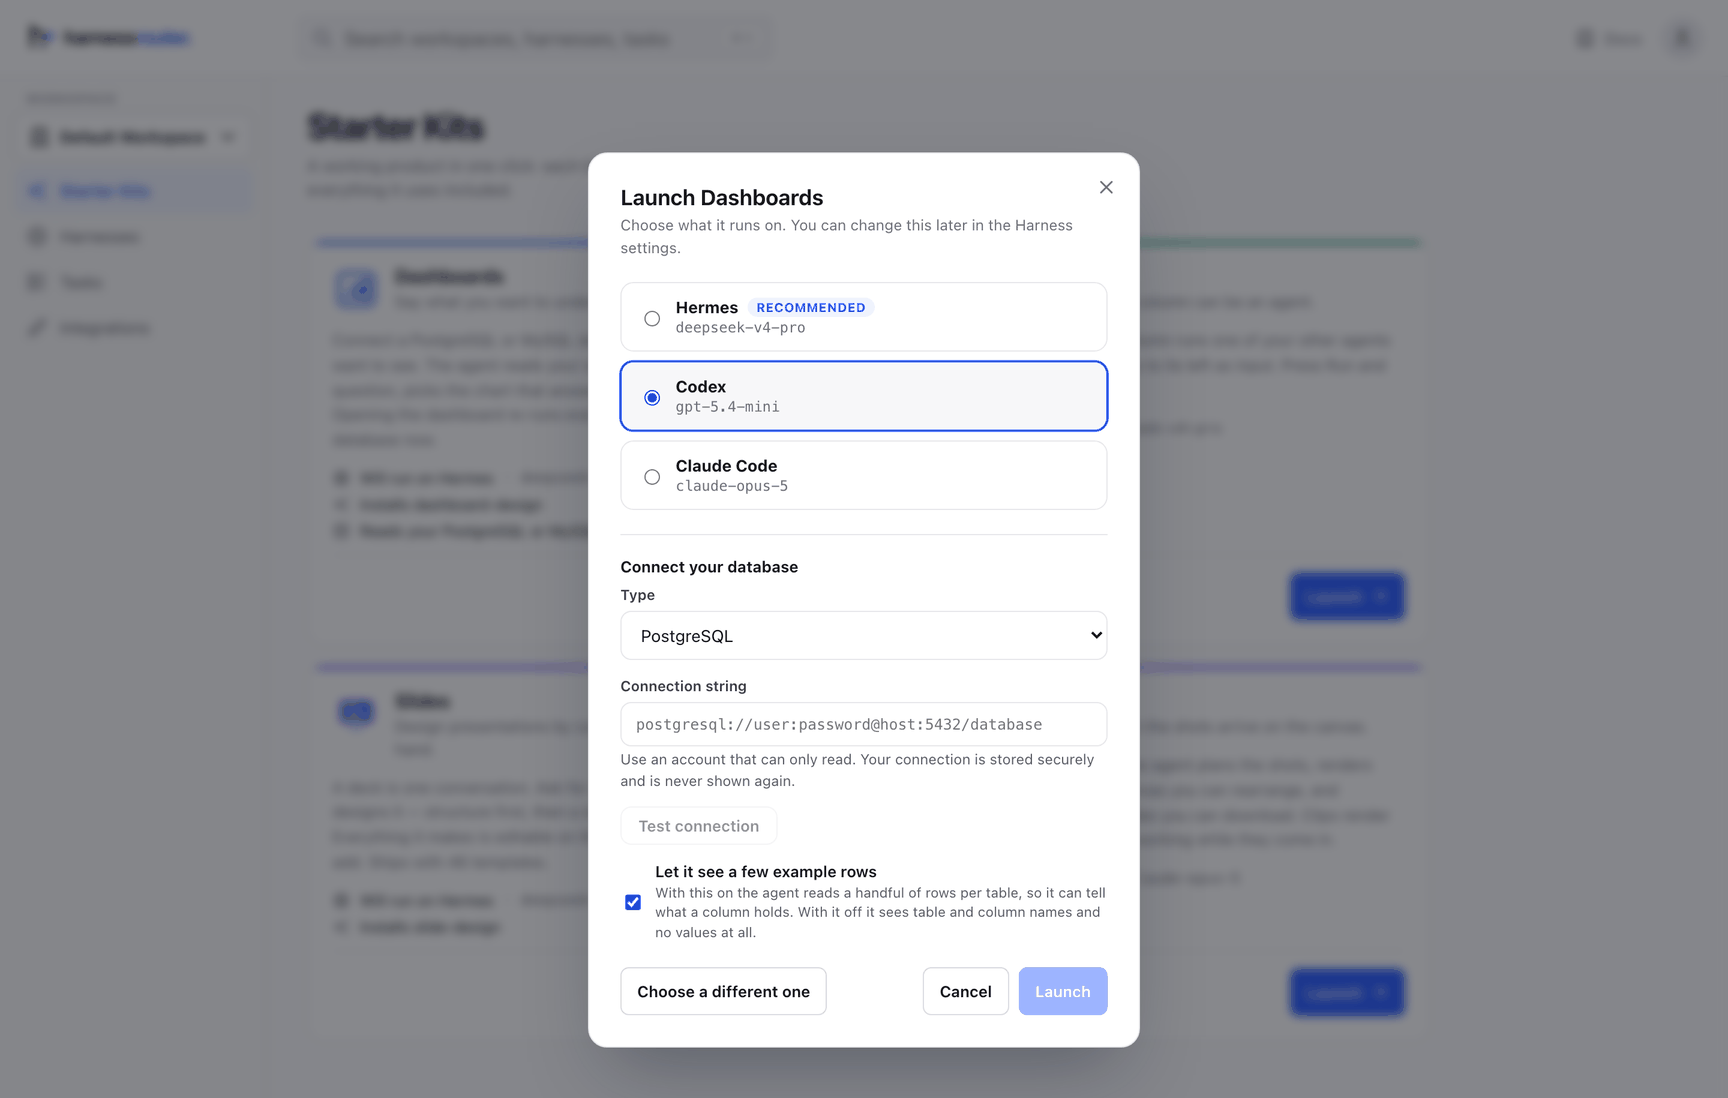
This is the one kit with setup, and it is two fields: the connection and the sample-rows switch.
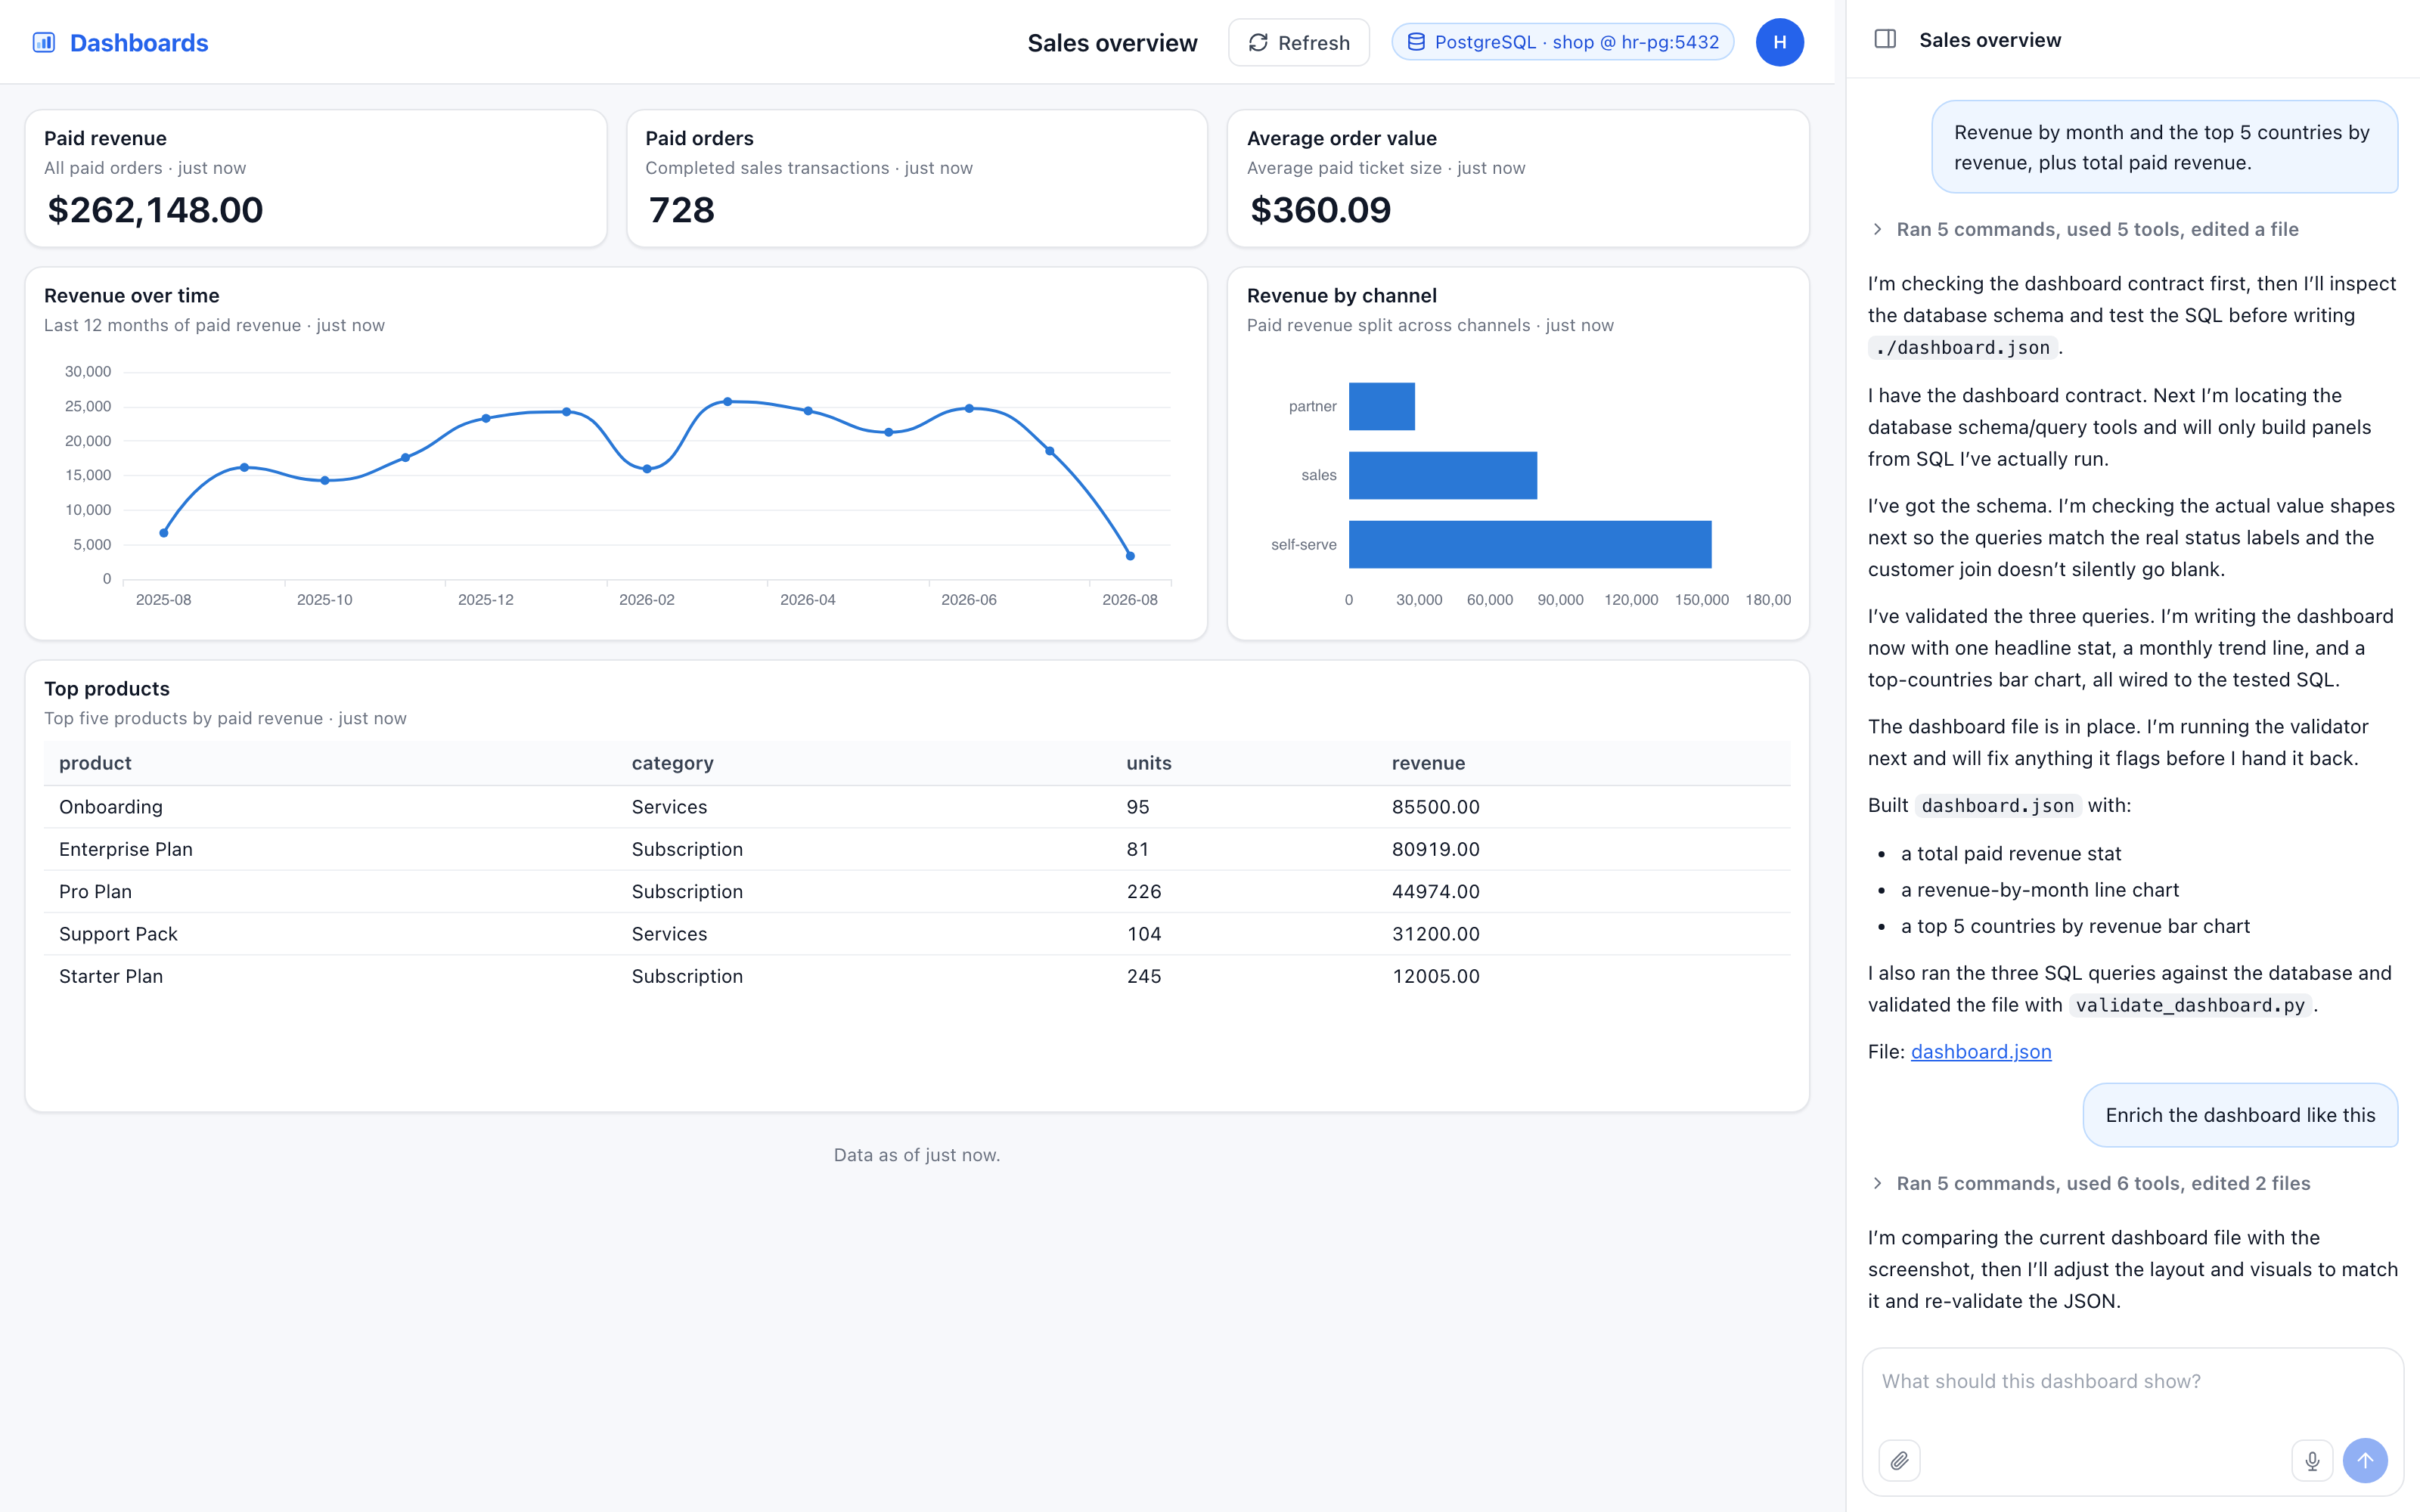
How that dashboard got built, and why its numbers are worth trusting
It opened with *"Revenue by month and the top 5 countries by revenue, plus total paid revenue."*
Both turns of that conversation are in the panel on the right: the first built it, and the second,
*"Enrich the dashboard like this"* with a picture of the layout attached, is where the panels you
see came from.
There is nowhere in a dashboard to type a number. Every figure on that page is the result of a
query that ran when the page opened, which is the property that makes it worth trusting. Ask for a
change and it runs each query before it wires it into a panel, so a panel that renders is a panel
whose query works.
Connecting a database
Three things to know before you connect one.
**The container has to be able to reach it.** If your database is another container, put both on
the same user-defined network so the database's *name* resolves. Docker's default bridge has no
DNS, so on it only the container's IP works, and that IP changes:
```bash
docker network create hr-net
docker network connect hr-net my-postgres
docker run -d --name harnessrouter --network hr-net \
-p 127.0.0.1:3000:3000 -v harnessrouter:/data … harnessrouter/harnessrouter
```
Then `my-postgres:5432` works as a host in the connection string. A database on the host machine
rather than in a container is reachable at `host.docker.internal` on Docker Desktop, or via
`--add-host=host.docker.internal:host-gateway` on Linux.
**Set `HR_SECRET_KEY`.** Connection strings are encrypted at rest under a key derived from it,
and without it the server refuses to store one rather than writing your production credential to
disk in plaintext:
```bash
-e HR_SECRET_KEY=a-long-random-passphrase
```
Keep it. Change it and the stored connections can no longer be decrypted, and you reconnect them.
**Use a read-only database account.** Every statement is checked and only `SELECT` is allowed,
non-`SELECT`, multiple statements and data-modifying CTEs are refused, and on PostgreSQL the
query additionally runs in a `READ ONLY` transaction. That check is a parser, and a parser is a
thing that can be wrong. An account that has been granted `SELECT` and nothing else is a second
defence that does not depend on ours being right:
```sql
CREATE USER dashboards WITH PASSWORD '…';
GRANT CONNECT ON DATABASE shop TO dashboards;
GRANT USAGE ON SCHEMA public TO dashboards;
GRANT SELECT ON ALL TABLES IN SCHEMA public TO dashboards;
```
The connection string is resolved at the moment a query runs. The agent's sandbox never receives
it. It gets a tool that runs `SELECT`s, and neither does the browser.
**Sample rows** are a per-connection switch, on by default: the agent sees a few real rows per
table so it can tell a status column from a category one. Turn it off and it sees table and
column names and types and no values at all.
### Videos
Describe a film and get one back: it plans the shots, renders each, lays them out on a canvas you
can rearrange, and assembles them into a single video you can download. Clips render in the
background, so you keep working while they arrive.
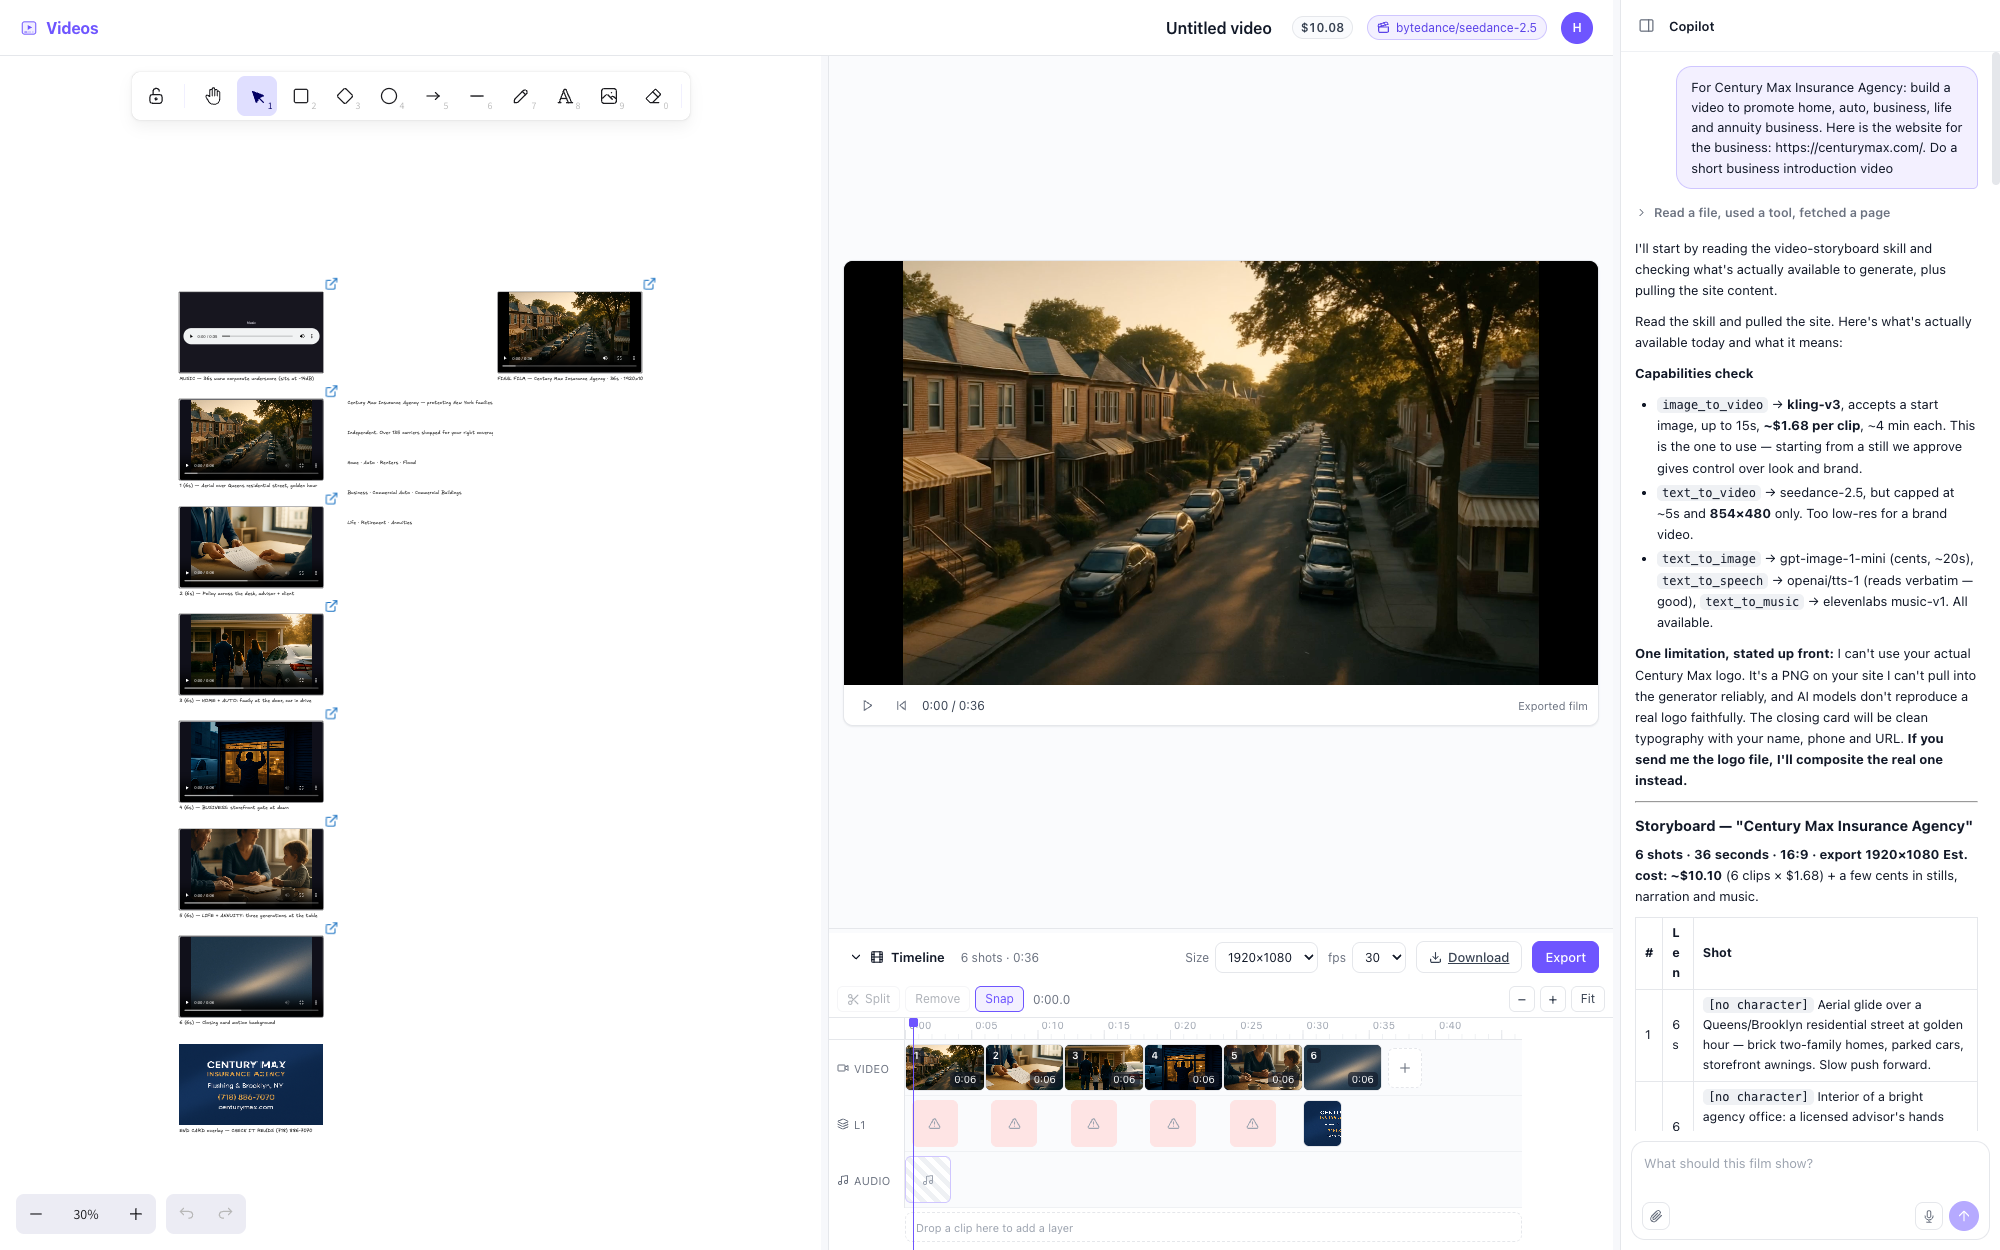
The conversation on the right is the whole job: what was asked for, what the agent found it could
actually generate and at what price, the storyboard it settled on, and what it wants you to check
before the film goes out. It costs what it says it costs, per clip, and it tells you before it
spends.
> [!WARNING]
> This is the one kit that spends real money per second of output rather than per turn, because
> every shot is a generation. Try it once you already know what the console is doing.
---
## What it is
An *agent harness* is the runtime layer around a model; Codex, Claude Code, and Hermes are harnesses. In this repo's API you also create *harness* objects: a saved configuration whose `base` is one of those runtimes, plus a model, instructions, and limits. A *task* is one run of that configuration, a real conversation against a real POSIX workspace with bash and git, streamed back as it happens.
HarnessRouter Community Edition implements UHP for both: an OpenAI **Responses-compatible** API for
running turns, harness CRUD, sessions, streaming, cancellation, and idempotency. The console is
a thin client over that API; anything the UI does, you can do from `curl`.
**The console is the hosted product's console.** Not a cut-down rebuild: the same pages, the
same components, the same API client. Surfaces that need a service a single box doesn't have,
such as accounts, billing, and marketplace, are simply not shown.
**Supported harnesses:** the running instance's catalog lists what is available, including Codex,
Claude Code, Hermes, DeepSeek Harness, and other enabled backends. They are installed on first
run rather than shipped in the image. Review each tool's upstream terms before use.
**Bring your own key.** Configure providers in Integrations or through environment-based connection
policies. Credentials are not baked into the image; model requests follow your chosen provider
and credentials.
## Why self-host
- **Your keys, your bills, your data.** You control the deployment and provider credentials.
Harnesses and tools may also make network requests needed for the tasks you run.
- **Real workspaces.** Agents get bash, git, and a filesystem, their native environment, not a
sandbox emulation.
- **No Console product telemetry.** Product analytics are disabled in the Community Edition Console.
- **The same UHP contract as the hosted product.** Your application can use the shared protocol
in either edition; deployment, authentication, and provider configuration differ.
- **Actually self-contained.** No control plane to phone home to, no managed database.
## The Unified Harness Protocol
This repository is both an implementation and a standard. The protocol the gateway speaks is
specified, versioned and testable in [`protocol/`](../protocol/), and documented at
[unifiedharnessprotocol.org](https://unifiedharnessprotocol.org):
| | |
|---|---|
| [Specification](../protocol/versions/2026-08-11/) | Ten normative chapters, version `2026-08-11` |
| [Machine-readable](../protocol/schema/) | OpenAPI 3.1 + JSON Schema 2020-12, generated from one source |
| [Conformance suite](../protocol/conformance/) | passing it is what "conformant" means, and what earns the right to the UHP name |
| [Governance](../protocol/GOVERNANCE.md) | How the standard changes, and the naming and conformance policy |
This edition is the reference implementation. The [recorded conformance run](../protocol/conformance/#reference-implementation-results)
on September 4, 2026 passed all 64 checks at class Full, with no failures, skips, or errors
(suite `2026.8.11.post1`, protocol `2026-08-11`). This is a dated measurement, not a test rerun
for every subsequent release.
**The standard can be implemented without HarnessRouter Cloud**: it is an HTTP contract, and
nothing in it requires a hosted service. Run the suite against your own server:
```bash
# From the repository root
pip install -e protocol/conformance
uhp-conformance --base-url https://your-server --api-key "$KEY" --class full
```
## Configuration
Choosing backends, and building with a browser
Backends are installed into your data volume rather than baked into the image, so which ones you
want is a run-time setting:
```bash
docker run -e HR_BACKENDS=claude,codex,hermes,pi,dsh,opencode,qwen,gemini,cline,omp,goose,kimi,aider,openhands,systemone ... # the default
docker run -e HR_BACKENDS=opencode ... # lean
```
Aider and OpenHands are the largest of the set: each environment is about 700 MB and takes a minute
or two to install on a fresh volume. Leave either out of `HR_BACKENDS` if you will not use it.
A backend that fails to install is not fatal: the others still work. The console offers every
base the gateway's catalogue lists, so a task on a backend that did not install fails on its
first turn; the container's log names the install that failed.
Chromium is genuinely an image layer, so it stays a build flag:
```bash
docker build -t harnessrouter --build-arg WITH_BROWSER=1 .
```
What the entrypoint sets for you
| Variable | Default | Why |
|---|---|---|
| `HR_BACKING` | `local` | SQLite + files on `/data`. No external storage. |
| `HR_IDENTITY_MODE` | `off` | One box, one owner; an accounts system would be ceremony with nothing behind it. |
| `HR_CREDIT_GATE` | `off` | Metering is a hosted concern. |
| `POOL_MGMT_ENDPOINT` | `http://127.0.0.1:8081` | The runner is in this container. |
| `HR_POOL_AUTH` | `none` | No cloud identity to present to a loopback runner. |
| `HR_SANDBOX_TRUST` | `owner` | You own the box, the agent and the key, so the key is handed over directly rather than brokered. |
| `HARNESS_WORKSPACE` | `/data/workspaces` | One directory per session, on the volume, so a restart doesn't discard work in flight. |
| `HR_WORKSPACE_TTL_HOURS` | `72` | Idle session workspaces are removed after this. They rehydrate from their checkpoint, so this costs time, not work. `0` keeps them forever. |
| `HARNESS_INTERNAL_KEY` | generated | Per-container; never leaves the process tree. |
## Using the API
A harness is a pluggable agent backend that runs agent tasks for your product. Integrate a built-in
or custom harness through your self-hosted HarnessRouter instance's OpenAI Responses-compatible
API. `metadata.harness_id` selects the harness that runs each task, so you can switch harnesses
without redesigning your product backend. No Cloud account or upload is required.
Three credentials have three separate jobs:
| Credential | Held by | Purpose |
|---|---|---|
| Console password | A person using the browser | Manage this CE instance and run tasks in its Console |
| Provider API key | HarnessRouter | Call the model provider configured under **Integrations** |
| HarnessRouter API key | Your product backend | Authenticate API calls to this CE instance and its workspace |
For the default local installation, the API base is `http://localhost:3000/api/harness`. Use the
host and port of the CE instance you actually started. If your backend runs on another machine
or in another container, `localhost` refers to that caller, not automatically to HarnessRouter.
The default Docker command publishes port 3000 only on the host's loopback interface. Keep that
default for same-machine development. For remote callers, deliberately make the instance reachable
through a trusted network or reverse proxy and use HTTPS; see [Putting it on a public URL](#putting-it-on-a-public-url).
Before wiring in a product, connect a provider and run one task in the Console with the harness and
model you intend to call. That verifies the execution path before adding network and backend-auth
variables. It is a setup check, not a technical prerequisite for the API.
### Create a key on this CE instance for your backend
1. Sign in to the Console of the CE instance your product will call, then open **API Keys** in the sidebar ([default local address](http://localhost:3000/keys)).
2. Confirm the workspace containing the harness, then select **Create API key**. Give it a name and select **Create key**.
3. Copy the secret shown once. Store it in your product backend's secret store or environment. The examples call this variable `HARNESSROUTER_API_KEY`.
The key is scoped to the selected workspace and can be rotated or revoked on the same page.
It is created in this self-hosted instance and authenticates requests to that CE deployment. It is
neither a Cloud key, your Console password, nor the model-provider key configured
in **Integrations**. Never put it in browser-side code or commit it to Git.
### Install a plugin on a harness
A plugin is a folder in the [Agent Plugins](https://agent-plugins.org) format: `plugin.json` at its
root, tools in `mcp.json`, Skills under `skills/`. Installing one gives a harness all of it at once,
and the harness records it as a named, versioned package it can export again. Starter kits built from
the kit release that carries plugin packages ship their Skills this way, so a kit launched from such
an image shows the kit as an installed plugin; a kit launched earlier keeps its Skills as its own.
In the Console, open the harness, find **Plugins**, and choose **Install from folder**. Over the API,
`plugins` is a field of the harness record. The simplest case is a new harness created with the
package in it:
```bash
curl -s -X POST "$HARNESSROUTER_BASE_URL/v1/harnesses" \
-H "Authorization: Bearer $HARNESSROUTER_API_KEY" -H "Content-Type: application/json" \
-d '{"name":"Contract Review Agent","base":"claude-code",
"plugins":[{"files":[
{"path":"plugin.json","content":"{\"$schema\":\"https://agent-plugins.org/schemas/1.0.0/plugin.schema.json\",\"name\":\"contract-review\"}"},
{"path":"skills/risk-checklist/SKILL.md","content":"---\nname: risk-checklist\ndescription: Turn an agreement into a risk checklist.\n---\n..."}
]}]}'
```
To add a plugin to a harness that already exists, remember that `PUT /v1/harnesses/{id}` replaces
the whole mutable configuration: any field you leave out is cleared, and an omitted `mcp_servers`
also removes the hosted tools behind it. Read the harness first, then send back its current
`system_prompt`, `default_model`, `mcp_servers`, `skills`, `disabled_tools`, `additional_headers`,
`max_step` and `timeout_seconds` (the write body uses these snake_case names; the record you read
uses camelCase) with the new package appended to `plugins`. Installed plugins round-trip as
`{name, enabled, blob}`, so send those back unchanged and add the new one beside them.
The record you read back carries what the server derived from the package (`manifest`,
`mcpServers`, `skills`, and `skipped` for anything it could not load) and a `blob` handle that
round-trips on the next PUT. The harness's own `mcpServers` and `skills` stay exactly what you wrote
there; a plugin's components are listed on the plugin. Names must not collide across the harness and
its enabled plugins. A package that declares a process (a `stdio` server) installs on every base: the
runner writes one launcher per server and each agent's own MCP client runs it (pi's adapter and dsh's
client included). A remote server reaches each client in its own spelling, and a client without an SSE
transport of its own (codex, dsh, goose) still takes an SSE server: the runner hands it a stdio bridge
that speaks SSE to the remote end, so every transport installs on every base. `GET /v1/harnesses/{id}/plugin` exports the harness's own tools and Skills as a
package, credentials omitted. The full contract is the
[Plugins chapter](https://unifiedharnessprotocol.org/spec/2026-09-12/plugins) of the protocol.
### Run a task
This example assumes `HARNESSROUTER_API_KEY` is already set. Choose an installed harness and a
model served by your connected provider. For a custom harness, use its **Harness ID** as
`metadata.harness_id`.
Set the base URL to the CE instance as seen by your backend. Creating a task requires **POST**. The
command below supplies a request body, so curl uses POST; opening the endpoint in a browser's
address bar sends GET and does not run a task.
```bash
export HARNESSROUTER_BASE_URL=http://localhost:3000/api/harness
curl --fail-with-body -sS "$HARNESSROUTER_BASE_URL/v1/responses" \
-H "Authorization: Bearer ${HARNESSROUTER_API_KEY:?}" \
-H 'content-type: application/json' \
-d '{"input":"Reply with exactly this and nothing else: it works.",
"metadata":{"harness_id":"codex"},
"model":"gpt-5.4-mini",
"stream":false}'
```
```json
{"id":"resp_284e450bc2be4de8bea94c4af6030292","object":"response","created_at":1786822334,
"status":"completed","error":null,"incomplete_details":null,"previous_response_id":null,
"model":"gpt-5.4-mini",
"output":[{"id":"msg_3d71e018c6584abbb063ee16d9a36e75","type":"message","status":"completed",
"role":"assistant",
"content":[{"type":"output_text","text":"it works.","annotations":[]}]}],
"store":true,
"usage":{"input_tokens":10878,"output_tokens":34,"total_tokens":10912},
"metadata":{"session_id":"hsessa79756fab07a4bf58fa072be24d5ce59"}}
```
The task and its transcript appear in the key's workspace in the same Console. API calls
authenticate with the key alone: your backend does not need to log in with a password or maintain
a Console session cookie. Your application's own user authentication and authorization remain
your responsibility.
The rest of the surface
All paths below are relative to the API base above and use the same Bearer key.
| Action | API operation |
|---|---|
| Discover harnesses and models | `GET /v1/harnesses`, `GET /v1/models` |
| Start a task or continue a session | `POST /v1/responses`; set `previous_response_id` to continue a previous turn |
| Check a response | `GET /v1/responses/{response_id}` |
| Stream progress | Set `"stream": true` on the response request for server-sent events |
| Read session history | `GET /v1/sessions/{session_id}/turns` |
| Upload inputs or retrieve outputs | `POST /v1/files`; `GET /v1/sessions/{session_id}/files` |
| Cancel work | `POST /v1/responses/{response_id}/cancel` |
| Inspect execution | `GET /v1/traces/{session_id}` and `/v1/traces/{session_id}/events` |
For file attachment and download formats, see the [UHP specification](https://unifiedharnessprotocol.org/spec).
Optional: use a Console session for local debugging
The Console uses a session cookie. You can also use that session from a local terminal when
debugging. This is also supported by self-hosted CE; it is not a Cloud-only flow. The cookie can
authenticate task requests to `POST /v1/responses` as well as the model-list request below.
It is not required for API-key authentication or recommended as your product's backend credential.
```bash
curl --fail-with-body -sS -c hr.cookies http://localhost:3000/api/selfhost/login \
-H 'content-type: application/json' \
-d '{"username":"harnessrouter","password":""}'
curl --fail-with-body -sS -b hr.cookies http://localhost:3000/api/harness/v1/models
```
Use your current Console credentials, not the initial defaults if you changed them. Treat
`hr.cookies` as a secret, do not commit it, and remove it when finished. Keep authentication enabled;
you do not need `HR_AUTH_DISABLED=1` to integrate your backend.
## Putting it on a public URL
The console can create harnesses, read every task transcript, and run an agent with your
provider key.
> [!WARNING]
> **Change the password before anyone else can reach the instance.** The defaults are printed
> right here, which makes them a placeholder, not a secret; the container warns on every start
> while the default is still in place. `HR_AUTH_DISABLED=1` removes the gate entirely, which is
> only reasonable on a machine nobody else can reach.
For TLS, keep the console on loopback and put a terminating proxy in front. With Caddy that is
one file and a real certificate, automatically:
```caddyfile
console.example.com {
encode zstd gzip
reverse_proxy 127.0.0.1:3000 {
flush_interval -1 # agent turns stream for minutes; never buffer them
}
}
```
The `flush_interval -1` matters: without it a proxy buffers the event stream and the console
looks frozen until the turn ends.
Pin the tag, and do not run `0.1.x` or `0.2.0`: they have no sign-in gate at all, so an instance
running them is open to anyone who can reach the port. `0.3.0` is the first release with one.
Why changing the password restarts the console
Changing it from **Profile** signs out every other browser and restarts the console. That restart
is what makes "signed out everywhere" true rather than merely displayed: the gate reads its
signing key once at start-up and cannot be told about a change in place. A task that is mid-turn
runs straight through it.
## Moving to the hosted service
Self-host for control, or use **HarnessRouter Cloud** for managed deployment, maintenance, and
scaling. Cloud runs tasks in serverless, isolated sandboxes through the same public API contract
as Community Edition.
When a custom harness is working the way you want, save any pending changes in its **Settings**
and select **Upload to Cloud**.
Connect a destination with an API key created inside the target Cloud workspace. Built-in harnesses
cannot be uploaded directly; create a custom harness first.
The upload copies the harness configuration, including its skills and MCP configuration. It does
not transfer provider keys, sessions, generated files, or the local workspace. Configure the
required model providers in the destination separately.
Update your application's base URL, authentication, and harness ID to use the destination.
The shared API contract does not mean that local credentials or endpoint URLs work unchanged in
Cloud. See the [Cloud authentication](https://harnessrouter.ai/docs/authentication) and
[base URL](https://harnessrouter.ai/docs/base-url) guides.
This is a manual, one-way upload. Later uploads replace the same hosted copy in that destination,
so they can overwrite changes made in Cloud. Cloud edits are not pulled back into the local copy.
Destination API keys are stored encrypted on your local instance for repeat uploads. Set
`HR_SECRET_KEY` before connecting a destination, and preserve the same key across restarts and
upgrades. You can remove a saved destination when it is no longer needed. See
[restarts, upgrades, and backups](#restarts-upgrades-and-backups) before changing container settings.
## Architecture
```
┌─ HarnessRouter container ─────────────────────────────────┐
│ Console :3000 ← only published port │
│ │ same-origin proxy │
│ ▼ │
│ Gateway :8080 Responses API + harness lifecycle │
│ │ loopback │
│ ▼ │
│ Runner :8081 runs harnesses in session workspaces │
│ │
│ /data volume database · files · secrets · workspaces │
└───────────────────────────────────────────────────────────┘
```
The gateway and the runner listen on loopback inside the container and are not publishable; the
console's port is the way in, which is why the login gate ships inside the image rather than in
whatever proxy happens to sit in front.
Sessions have separate workspace directories, conversation state, and checkpoints. Agent
processes run as per-session operating-system users inside the shared container; this is not
a separate sandbox or container per session. Turn concurrency defaults to the machine's core
count. This box cannot scale sandboxes on demand the way the hosted deployment does, so the
limit is what it can actually run.
Storage sits behind a small adapter interface for records, files, and secrets. This repo ships the
local implementations; the hosted deployment supplies its own against the same interface. That
seam is why this is genuinely the same codebase rather than a fork that drifts.
## Resources
- **[Documentation and Cloud](https://harnessrouter.ai)**: hosted service, guides, and pricing.
- **[Unified Harness Protocol](https://unifiedharnessprotocol.org)**: the open standard this repository implements.
- **[Starter Kit](https://github.com/HarnessRouter/starter-kit)**: runnable example applications built on Community Edition.
- **[Discord](https://discord.gg/nPcbwqVPb2)**: community for questions, integrations, and proposals.
- **[Contributing](../CONTRIBUTING.md)** and **[Security](../SECURITY.md)**: how to propose changes and report vulnerabilities.
## License
Apache-2.0, see [LICENSE](../LICENSE). Third-party notices are in [NOTICE](../NOTICE).
The agent CLIs are **not** redistributed here; they are installed on first run under their own
licenses. Review them before enabling a backend.