# Diffusers Model Optimizations
Model Optimizer supports techniques like Cache Diffusion and Quantization for Diffusion models.
Post-training quantization (PTQ) is an effective model optimization technique that compresses your models to lower precision like INT8, FP8, NVFP4, etc. Quantization with Model Optimizer can compress model size by 2x-4x, speeding up inference while preserving model quality. Quantization-Aware Training (QAT) is a powerful technique for optimizing your models, particularly when PTQ methods fail to meet the requirements for your tasks.
Cache Diffusion is a technique that reuses cached outputs from previous diffusion steps instead of recalculating them. This **training-free** caching approach is compatible with a variety of models, like **DiT** and **UNet**, enabling considerable acceleration without compromising quality.
| **Section** | **Description** | **Link** | **Docs** |
| :------------: | :------------: | :------------: | :------------: |
| Pre-Requisites | Required & optional packages to use this technique | \[[Link](#pre-requisites)\] | |
| Getting Started | Learn how to optimize your models using quantization/cache diffusion to reduce precision and improve inference efficiency | \[[Link](#getting-started)\] | \[[docs](https://nvidia.github.io/Model-Optimizer/guides/1_quantization.html)\] |
| Support Matrix | View the support matrix to see quantization/cahce diffusion compatibility and feature availability across different models | \[[Link](#support-matrix)\] | \[[docs](https://nvidia.github.io/Model-Optimizer/guides/1_quantization.html)\] |
| Sparse Attention (Skip-Softmax) | Skip-softmax sparse attention for diffusion models | \[[Link](#sparse-attention-skip-softmax)\] | |
| Cache Diffusion | Caching technique to accelerate inference without compromising quality | \[[Link](#cache-diffusion)\] | |
| Post Training Quantization (PTQ) | Example scripts on how to run PTQ on diffusion models | \[[Link](#post-training-quantization-ptq)\] | \[[docs](https://nvidia.github.io/Model-Optimizer/guides/1_quantization.html)\] |
| Quantization Aware Training (QAT) | Example scripts on how to run QAT on diffusion models | \[[Link](#quantization-aware-training-qat)\] | \[[docs](https://nvidia.github.io/Model-Optimizer/guides/1_quantization.html)\] |
| Quantization Aware Distillation (QAD) | Example scripts on how to run QAD on diffusion models | \[[Link](#quantization-aware-distillation-qad)\] | \[[docs](https://nvidia.github.io/Model-Optimizer/guides/1_quantization.html)\] |
| Build and Run with TensorRT | How to build and run your quantized model with TensorRT | \[[Link](#build-and-run-with-tensorrt-compiler-framework)\] | |
| LoRA | Fuse your LoRA weights prior to quantization | \[[Link](#lora)\] | |
| Pre-Quantized Checkpoints | Ready to deploy Hugging Face pre-quantized checkpoints | \[[Link](#pre-quantized-checkpoints)\] | |
| Resources | Extra links to relevant resources | \[[Link](#resources)\] | |
## Pre-Requisites
### Docker
Please use the TensorRT docker image (e.g., `nvcr.io/nvidia/tensorrt:26.02-py3`) or visit our [installation docs](https://nvidia.github.io/Model-Optimizer/getting_started/2_installation.html) for more information.
Also follow the installation steps below to upgrade to the latest version of Model Optimizer and install example-specific dependencies.
### Local Installation
Install Model Optimizer with `onnx` and `hf` dependencies using `pip` from [PyPI](https://pypi.org/project/nvidia-modelopt/):
```bash
pip install nvidia-modelopt[onnx,hf]
pip install -r requirements.txt
```
Each subsection (fastgen, distillation, etc.) may have their own `requirements.txt` file that needs to be installed separately.
You can find the latest TensorRT [here](https://developer.nvidia.com/tensorrt/download).
Visit our [installation docs](https://nvidia.github.io/Model-Optimizer/getting_started/2_installation.html) for more information.
## Getting Started
### Quantization
With the simple API below, you can very easily use Model Optimizer to quantize your model. Model Optimizer achieves this by converting the precision of your model to the desired precision, and then using a small dataset (typically 128-512 samples) to [calibrate](https://nvidia.github.io/Model-Optimizer/guides/_basic_quantization.html) the quantization scaling factors.
```python
import modelopt.torch.quantization as mtq
def forward_pass(model):
for prompt in prompts:
_ = model(prompt)
mtq.quantize(model=transformer, config=quant_config, forward_func=forward_pass)
```
## Support Matrix
### TensorRT Compiler Framework
| Model | fp8 | int8_sq | int4_awq | w4a8_awq1 | nvfp42 | nvfp4_svdquant3 | Cache Diffusion |
| :---: | :---: | :---: | :---: | :---: | :---: | :---: | :---: |
| [FLUX](https://huggingface.co/black-forest-labs/FLUX.1-dev) | ✅ | ✅ | ✅ | ✅ | ✅ | ✅ | - |
| [Stable Diffusion 3](https://huggingface.co/stabilityai/stable-diffusion-3-medium) | ✅ | ✅ | ✅ | ✅ | ✅ | ✅ | ✅ |
| [Stable Diffusion XL](https://huggingface.co/papers/2307.01952) | ✅ | ✅ | ✅ | ✅ | ✅ | ✅ | ✅ |
| [SDXL-Turbo](https://huggingface.co/stabilityai/sdxl-turbo) | ✅ | ✅ | ✅ | ✅ | ✅ | ✅ | - |
| [Stable Diffusion 2.1](https://huggingface.co/stabilityai/stable-diffusion-2-1) | ✅ | ✅ | ✅ | ✅ | ✅ | ✅ | - |
> *1.The w4a8_awq is an experimental quantization scheme that may result in a higher accuracy penalty.*
> *2.A selective set of the popular models are internally tested. The actual model support list may be longer. NVFP4 inference requires Blackwell GPUs and TensorRT-LLM v1.2 or later*
> *3.The SVDQuant Perf in TRT might not good as the [Nunchaku: MIT-Nvidia](https://github.com/nunchaku-tech/nunchaku) at this moment.*
## Post Training Quantization (PTQ)
We support calibration for INT8, FP8 and FP4 precision and for both weights and activations. The examples below shows how to use Model Optimizer to calibrate and quantize the backbone section of diffusion models. The backbone section typically consumes >95% of the E2E diffusion latency.
We also provide instructions on deploying and running E2E diffusion pipelines with Model Optimizer quantized INT8 and FP8 Backbone to generate images and measure latency on target GPUs. Note, Jetson devices are not supported at this time due to the incompatibility of the software.
> [!NOTE]
> Model calibration requires relatively more GPU computing power then deployment. It does not need to be on the same GPUs as the deployment target GPUs. ONNX export and TensorRT engine instructions live in [`quantization/ONNX-TRT-Deployment.md`](./quantization/ONNX-TRT-Deployment.md).
### Quantize scripts
#### FLUX|SD3|SDXL INT8 [Script](./quantization/quantize.py)
```sh
python quantize.py \
--model {flux-dev|flux-schnell|sdxl-1.0|sdxl-turbo|sd3-medium|sd3.5-medium} \
--format int8 --batch-size 2 \
--calib-size 32 --alpha 0.8 --n-steps 20 \
--model-dtype {Half/BFloat16} \
--quantized-torch-ckpt-save-path ./{MODEL_NAME}.pt \
--hf-ckpt-dir ./hf_ckpt
```
#### FLUX|SD3|SDXL|LTX|WAN2.2 FP8/FP4 [Script](./quantization/quantize.py)
```sh
python quantize.py \
--model {flux-dev|flux-schnell|sdxl-1.0|sdxl-turbo|sd3-medium|sd3.5-medium|ltx-video-dev|wan2.2-t2v-14b|wan2.2-t2v-5b} \
--model-dtype {Half|BFloat16} \
--format {fp8|fp4} --batch-size 2 --calib-size {128|256} --quantize-mha \
--n-steps 20 --quantized-torch-ckpt-save-path ./{MODEL_NAME}.pt --collect-method default \
--hf-ckpt-dir ./hf_ckpt
```
#### Wan 2.2 VAE NVFP4 (Conv3D Implicit GEMM)
The Wan 2.2 VAE (`AutoencoderKLWan`, shared between the 5B and 14B pipelines) is built from 3D convolutions. When quantizing the VAE with NVFP4, the `Conv3d` layers are automatically dispatched through a custom BF16 WMMA implicit-GEMM kernel with fused FP4 activation quantization. Requires SM80+ (Ampere or newer). See [`modelopt/torch/kernels/quantization/conv/README.md`](../../modelopt/torch/kernels/quantization/conv/README.md) for kernel details.
```sh
python quantize.py \
--model {wan2.2-t2v-14b|wan2.2-t2v-5b} \
--backbone vae \
--format fp4 --quant-algo max --collect-method default \
--model-dtype BFloat16 --trt-high-precision-dtype BFloat16 \
--batch-size 1 --calib-size 32 --n-steps 30 \
--quantized-torch-ckpt-save-path ./wan22_vae_fp4.pt
```
#### [LTX-2](https://github.com/Lightricks/LTX-2) FP4
> [!WARNING]
> **Third-Party License Notice — LTX-2**
>
> LTX-2 is a third-party model and set of packages developed and provided by Lightricks. LTX-2
> is **not** covered by the Apache 2.0 license that governs NVIDIA Model Optimizer.
>
> By installing and using LTX-2 packages (`ltx-core`, `ltx-pipelines`, `ltx-trainer`) with
> NVIDIA Model Optimizer, you **must** comply with the
> [LTX Community License Agreement](https://github.com/Lightricks/LTX-2/blob/main/LICENSE).
>
> Any derivative models or fine-tuned weights produced from LTX-2 using NVIDIA Model Optimizer
> (including quantized or distilled checkpoints) remain subject to the LTX Community License
> Agreement and are **not** covered by Apache 2.0.
This example produces three outputs: a PyTorch checkpoint (`--quantized-torch-ckpt-save-path`), a Hugging Face checkpoint (`--hf-ckpt-dir`), and a ComfyUI-compatible merged safetensor (`--extra-param merged_base_safetensor_path`).
```sh
python quantize.py \
--model ltx-2 --format fp4 --batch-size 1 --calib-size 32 --n-steps 40 \
--extra-param checkpoint_path=./ltx-2-19b-dev-fp8.safetensors \
--extra-param distilled_lora_path=./ltx-2-19b-distilled-lora-384.safetensors \
--extra-param spatial_upsampler_path=./ltx-2-spatial-upscaler-x2-1.0.safetensors \
--extra-param gemma_root=./gemma-3-12b-it-qat-q4_0-unquantized \
--extra-param fp8transformer=true \
--quantized-torch-ckpt-save-path ./ltx-2-transformer.pt \
--hf-ckpt-dir ./LTX2-NVFP4/ \
--extra-param merged_base_safetensor_path=./ltx-2-19b-dev-fp8.safetensors
```
To additionally apply NVFP4 scale swizzle and padding , add:
```sh
--extra-param enable_swizzle_layout=true \
--extra-param padding_strategy=row_col
```
#### Important Parameters
- `percentile`: Control quantization scaling factors (amax) collecting range, meaning that we will collect the chosen amax in the range of `(n_steps * percentile)` steps. Recommendation: 1.0
- `alpha`: A parameter in SmoothQuant, used for linear layers only. Recommendation: 0.8 for SDXL
- `calib-size`: For SDXL INT8, we recommend 32 or 64, for SDXL FP8, 128 is recommended.
- `n_steps`: Recommendation: SD/SDXL 20 or 30, SDXL-Turbo 4.
**You can use the generated checkpoint directly in PyTorch, export a Hugging Face checkpoint (`--hf-ckpt-dir`) to deploy the model on SGLang/vLLM/TRTLLM, or follow the ONNX/TensorRT workflow in [`quantization/ONNX-TRT-Deployment.md`](./quantization/ONNX-TRT-Deployment.md).**
## Quantization Aware Training (QAT)
Quantization-Aware Training (QAT) is a powerful technique for optimizing your models, particularly when post-training quantization (PTQ) methods fail to meet the requirements for your tasks. By simulating the effects of quantization during training, QAT allows the model to learn to minimize the quantization error, ultimately delivering better accuracy.
While the example below uses Hugging Face Accelerate for simplicity. You can integrate QAT into your workflow using your preferred training setup.
### How QAT Works in ModelOPT
With ModelOPT, the forward pass simulates quantization, allowing the model to adjust its weights to minimize training loss and reduce quantization errors. This enables the model to better handle the constraints of quantized hardware without significant loss of performance.
```python
import modelopt.torch.opt as mto
# Restore the model in its quantized state using ModelOPT's API
mto.restore(transformer_model, args.restore_quantized_ckpt)
# Move the model to the appropriate device and set the desired weight precision
transformer_model.to(accelerator.device, dtype=weight_dtype)
transformer_model.requires_grad_(True)
transformer_model, optimizer, train_dataloader, lr_scheduler = accelerator.prepare(
transformer_model, optimizer, train_dataloader, lr_scheduler
)
```
Once the model is loaded in its quantized state through ModelOPT, you can proceed with regular training. The QAT process will automatically take place during the forward passes.
## Quantization Aware Distillation (QAD)
Distillation is a powerful approach where a high-precision model (the teacher) guides the training of a quantized model (the student). ModelOPT simplifies the process of combining distillation with QAT by handling most of the complexity for you.
For more details about distillation, please refer to this [link](https://nvidia.github.io/Model-Optimizer/guides/4_distillation.html).
```diff
import modelopt.torch.opt as mto
import modelopt.torch.distill as mtd
# Restore the model in its quantized state using ModelOPT's API
mto.restore(transformer, args.restore_quantized_ckpt)
'''
After mtd.convert, the model structure becomes:
model:
transformer_0
transformer_1
teacher_model:
transformer_0
transformer_1
And the forward pass is automatically monkey-patched to:
def forward(input):
student_output = model(input)
_ = teacher_model(input)
return student_output
'''
+ # Configuration for knowledge distillation (KD)
+ kd_config = {
+ "teacher_model": teacher_model,
+ "criterion": distill_config["criterion"],
+ "loss_balancer": distill_config["loss_balancer"],
+ }
+ transformer = mtd.convert(transformer, mode=[("kd_loss", kd_config)])
# Move the model to the appropriate device and set the desired weight precision
transformer.to(accelerator.device, dtype=weight_dtype)
transformer.requires_grad_(True)
# Making sure to freeze the weights from model._teacher_model
transformer, optimizer, train_dataloader, lr_scheduler = accelerator.prepare(
transformer, optimizer, train_dataloader, lr_scheduler
)
# Compute the distillation loss using ModelOPT's compute_kd_loss
+ ...
+ loss = transformer.compute_kd_loss(...)
+ ...
```
## Build and Run with TensorRT Compiler Framework
ONNX export and TensorRT engine instructions are documented in [`quantization/ONNX-TRT-Deployment.md`](./quantization/ONNX-TRT-Deployment.md).
### LoRA
For optimal performance of INT8/FP8 quantized models, we highly recommend fusing the LoRA weights prior to quantization. Failing to do so can disrupt TensorRT kernel fusion when integrating the LoRA layer with INT8/FP8 Quantize-Dequantize (QDQ) nodes, potentially leading to performance losses.
Detailed guidance on how to fuse LoRA weights can be found in the Hugging Face [PEFT documentation](https://github.com/huggingface/peft):
After fusing the weights, proceed with the calibration and you can follow our code to do the quantization.
```python
pipe = DiffusionPipeline.from_pretrained(
"stabilityai/stable-diffusion-xl-base-1.0",
torch_dtype=torch.float16,
variant="fp16",
use_safetensors=True,
).to("cuda")
pipe.load_lora_weights(
"CiroN2022/toy-face", weight_name="toy_face_sdxl.safetensors", adapter_name="toy"
)
pipe.fuse_lora(lora_scale=0.9)
...
# All the LoRA layers should be fused
check_lora(pipe.unet)
mtq.quantize(pipe.unet, quant_config, forward_loop)
mto.save(pipe.unet, ...)
```
When it's time to export the model to ONNX format, ensure that you load the PEFT-modified LoRA model first.
```python
pipe = DiffusionPipeline.from_pretrained(
"stabilityai/stable-diffusion-xl-base-1.0",
torch_dtype=torch.float16,
variant="fp16",
use_safetensors=True,
)
pipe.load_lora_weights(
"CiroN2022/toy-face", weight_name="toy_face_sdxl.safetensors", adapter_name="toy"
)
pipe.fuse_lora(lora_scale=0.9)
mto.restore(pipe.unet, your_quantized_ckpt)
...
# Export the onnx model
```
By following these steps, your PEFT LoRA model should be efficiently quantized using ModelOpt, ready for deployment while maximizing performance.
## Sparse Attention (Skip-Softmax)
Skip-softmax sparse attention skips KV tiles whose attention scores are negligible during the softmax computation, reducing FLOPs without retraining. An exponential model (`scale_factor = a * exp(b * target_sparsity)`) is calibrated once, then the target sparsity can be adjusted at runtime without recalibration. Calibrated coefficients can be exported as a Hugging Face checkpoint (embedded in each component's `config.json` under `sparse_attention_config`) consumed directly by TRT-LLM's `SkipSoftmaxAttentionConfig.resolve_for_target_sparsity` — no extra conversion needed downstream.
### Getting Started
```python
import modelopt.torch.sparsity.attention_sparsity as mtsa
# 1. Define config with calibration
config = {
"sparse_cfg": {
"calibration": {
"target_sparse_ratio": {"prefill": 0.5},
},
"*.attn1": {
"method": "triton_skip_softmax",
"backend": "triton",
"is_causal": False,
"collect_stats": True,
"enable": True,
},
"*.attn2": {"enable": False},
"default": {"enable": False},
},
}
# 2. Provide a calibration forward loop
def forward_loop(model):
pipeline(prompt="a cat", num_frames=81, num_inference_steps=40, ...)
# 3. Sparsify + calibrate
mtsa.sparsify(transformer, config, forward_loop=forward_loop)
# 4. Generate as usual — sparsity is applied automatically
output = pipeline(prompt="a dog on the beach", ...)
```
### Example Scripts
#### Wan 2.2 [Script](./sparsity/wan22_skip_softmax.py)
The 14B model automatically sparsifies both `transformer` and `transformer_2`.
```bash
# 5B/14B model — calibrate and export a TRT-LLM-ready checkpoint
python sparsity/wan22_skip_softmax.py \
--model-path Wan-AI/Wan2.2-T2V-A14B-Diffusers|Wan-AI/Wan2.2-TI2V-5B-Diffusers \
--calibrate --target-sparsity 0.5 --calib-size 4 \
--export-dir /path/to/wan22-skip-softmax-ckpt \
--prompt "A sunset over mountains" --output out.mp4
```
## Cache Diffusion
Cache Diffusion methods, such as [DeepCache](https://arxiv.org/abs/2312.00858), [Block Caching](https://arxiv.org/abs/2312.03209) and [T-Gate](https://arxiv.org/abs/2404.02747), optimize performance by reusing cached outputs from previous steps instead of recalculating them. This **training-free** caching approach is compatible with a variety of models, like **DiT** and **UNet**, enabling considerable acceleration without compromising quality.
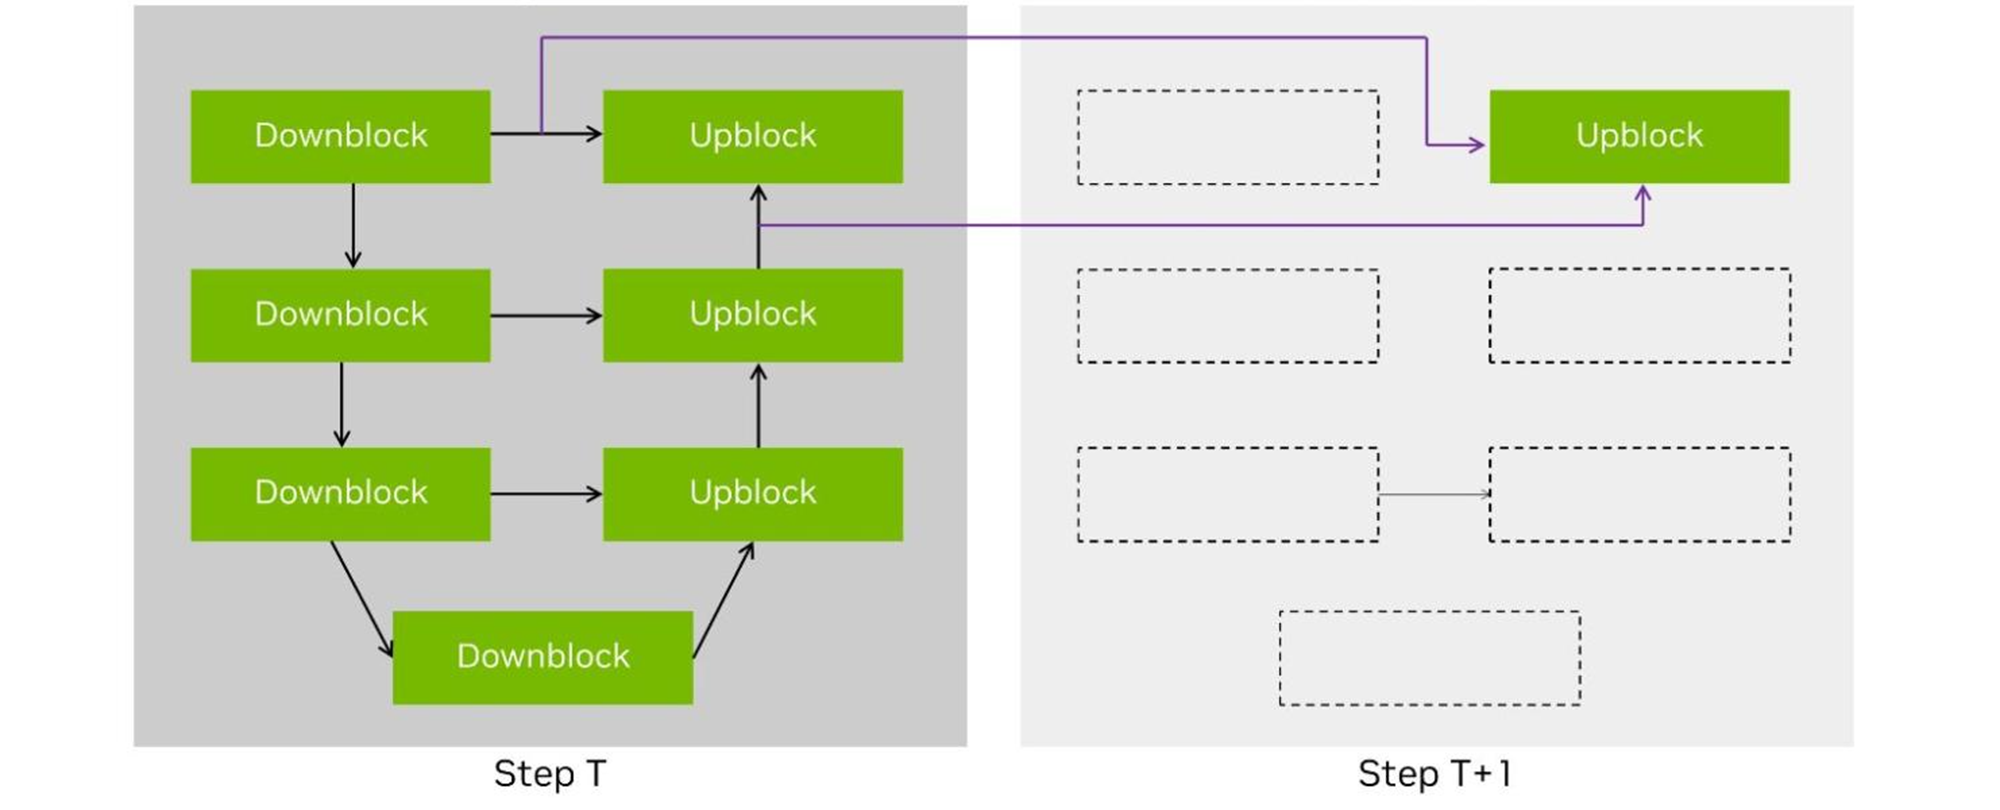
This diagram shows the default SDXL Cache compute graph in this example.
Significant speedup is achieve through skipping certain blocks at the specific steps.
### Getting Started
With the simple API below, you can very easily use Model Optimizer to apply cache diffusion to your model. Model Optimizer achieves this by breaking down different blocks into a single TensorRT engine, and at inference time, we combine multiple TensorRT engines in the same way a PyTorch module would..
```python
import torch
from cache_diffusion import cachify
from cache_diffusion.utils import SDXL_DEFAULT_CONFIG
from diffusers import DiffusionPipeline
pipe = DiffusionPipeline.from_pretrained(
"stabilityai/stable-diffusion-xl-base-1.0",
torch_dtype=torch.float16,
variant="fp16",
use_safetensors=True,
)
pipe = pipe.to("cuda")
num_inference_steps = 20
prompt = "beautiful lady, (freckles), big smile, blue eyes, short hair, dark makeup, hyperdetailed photography, soft light, head and shoulders portrait, cover"
cachify.prepare(pipe, SDXL_DEFAULT_CONFIG)
cachify.enable(pipe)
generator = torch.Generator(device="cuda").manual_seed(2946901)
with cachify.infer(pipe) as cached_pipe:
img = cached_pipe(
prompt=prompt, num_inference_steps=num_inference_steps, generator=generator
).images[0]
img
```
### PyTorch Framework
Please refer to [example.ipynb](./cache_diffusion/example.ipynb) for more details on how to apply cache diffusion.
### TensorRT Compiler Framework
To execute cache diffusion in TensorRT, follow these steps:
```python
# Load the model
compile(
pipe.unet,
model_id="sdxl",
onnx_path=Path("./onnx"),
engine_path=Path("./engine"),
)
cachify.prepare(pipe, num_inference_steps, SDXL_DEFAULT_CONFIG)
```
Afterward, use it as a standard cache diffusion pipeline to generate the image.
Please note that only the UNET component is running in TensorRT, while the other parts remain in PyTorch.
### Customize
Model Optimizer also provides an API to create various compute graphs by simply adjusting the parameters. For instance, the default parameter for SDXL is:
```python
SDXL_DEFAULT_CONFIG = [
{
"wildcard_or_filter_func": lambda name: "up_blocks.2" not in name,
"select_cache_step_func": lambda step: (step % 2) != 0,
}
]
cachify.prepare(pipe, num_inference_steps, SDXL_DEFAULT_CONFIG)
```
Two parameters are essential: `wildcard_or_filter_func` and `select_cache_step_func`.
`wildcard_or_filter_func`: This can be a **str** or a **function**. If the module matches the given str or filter_func, then it will perform the cache operation. For example, if your input is a string `*up_blocks*`, it will match all names containing `up_blocks` and will perform the cache operation in the future, as you use `fnmatch` to match the string. If you use a function instead, the module name will be passed into the function you provided, and if the function returns True, then it will perform the cache operation.
`select_cache_step_func`: During inference, code will check at each step to see if you want to perform the cache operation based on the `select_cache_step_func` you provided. If `select_cache_step_func(current_step)` returns True, the module will cached; otherwise, it won't.
Multiple configurations can be set up, but ensure that the `wildcard_or_filter_func` works correctly. If you input more than one pair of parameters with the same `wildcard_or_filter_func`, the later one in the list will overwrite the previous ones.
### Demo
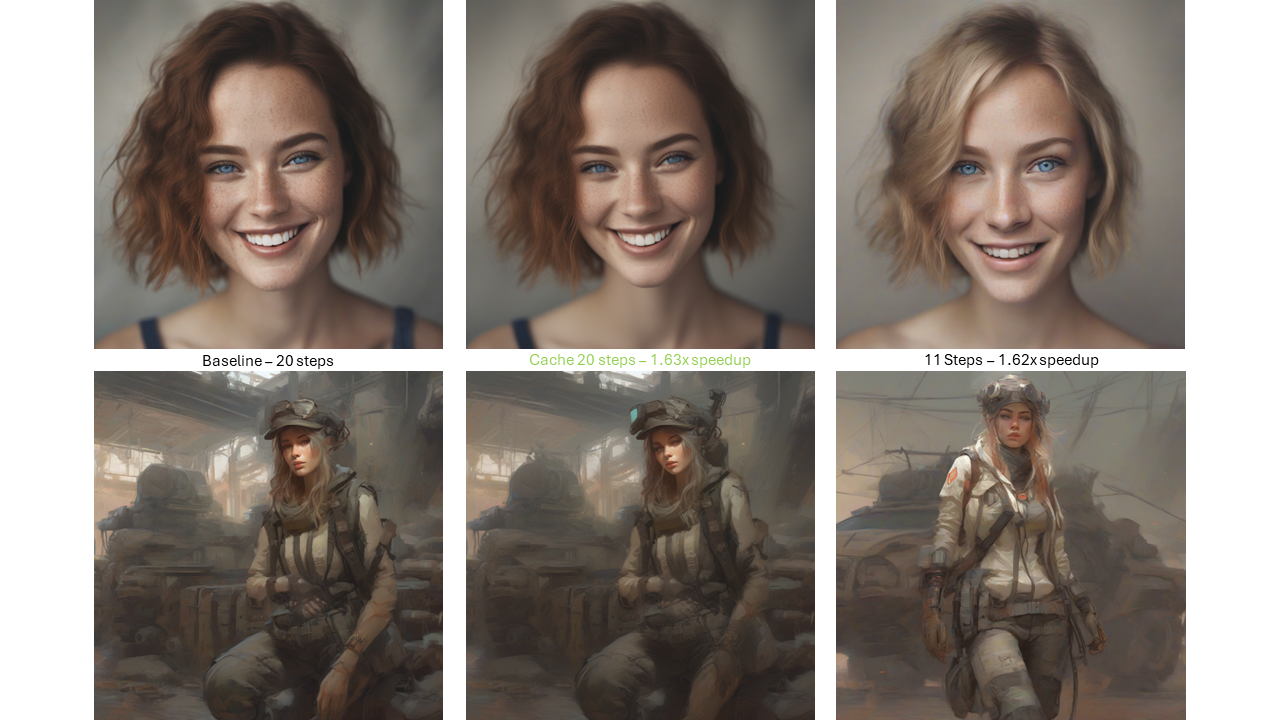
The following demo images are generated using `torch==2.3.0` with a single RTX 6000 Ada GPU.
Comparing with naively reducing the generation steps, cache diffusion can achieve the same speedup and also much better image quality, even close to the reference image. If the image quality does not meet your needs or product requirements, you can replace our default configuration with your customized settings.
#### Stable Diffusion - XL
### Notes About Randomness
Stable Diffusion pipelines rely heavily on random sampling operations, which include creating Gaussian noise tensors to denoise and adding noise in the scheduling step. In the quantization recipe, we don't fix the random seed. As a result, every time you run the calibration pipeline, you could get different quantizer amax values. This may lead to the generated images being different from the ones generated with the original model. We suggest to run a few more times and choose the best one.
## Pre-Quantized Checkpoints
- Ready-to-deploy checkpoints \[[🤗 Hugging Face - Black Forest Labs](https://huggingface.co/black-forest-labs)\]
- Deployable on [TensorRT](https://developer.nvidia.com/tensorrt) and [PyTorch](https://github.com/pytorch/pytorch)
- More models coming soon!
## Resources
- 📅 [Roadmap](https://github.com/NVIDIA/Model-Optimizer/issues/1699)
- 📖 [Documentation](https://nvidia.github.io/Model-Optimizer)
- 🎯 [Benchmarks](../benchmark.md)
- 💡 [Release Notes](https://nvidia.github.io/Model-Optimizer/reference/0_changelog.html)
- 🐛 [File a bug](https://github.com/NVIDIA/Model-Optimizer/issues/new?template=1_bug_report.md)
- ✨ [File a Feature Request](https://github.com/NVIDIA/Model-Optimizer/issues/new?template=2_feature_request.md)