# Setup Guide
Complete guide to install and configure ESPectre with ESPHome.
Choose one of the two installation methods below:
| Method | Best for | Tools |
|--------|----------|-------|
| **Option A** | End users, quick setup | Chrome + ESPConnect |
| **Option B** | Developers, customization | Python + ESPHome CLI |
---
## Option A: Web Flash (no coding required)
### What You Need
**Hardware:**
- **ESP32 board** with CSI support:
- ✅ Tested: ESP32-S3, ESP32-C6, ESP32-C5, ESP32-C3, ESP32 (original)
- ⚠️ Experimental: ESP32-S2
- **USB cable** (USB-C or Micro-USB, depending on your board)
- **Wi-Fi router** (2.4 GHz, 802.11b/g/n/ax)
**Software:**
- Google Chrome browser (required for Web Serial API)
### 1. Download Firmware
Go to [Releases](https://github.com/francescopace/espectre/releases/latest) and download the `.bin` file for your chip (e.g., `espectre-2.5.0-esp32c6.bin`).
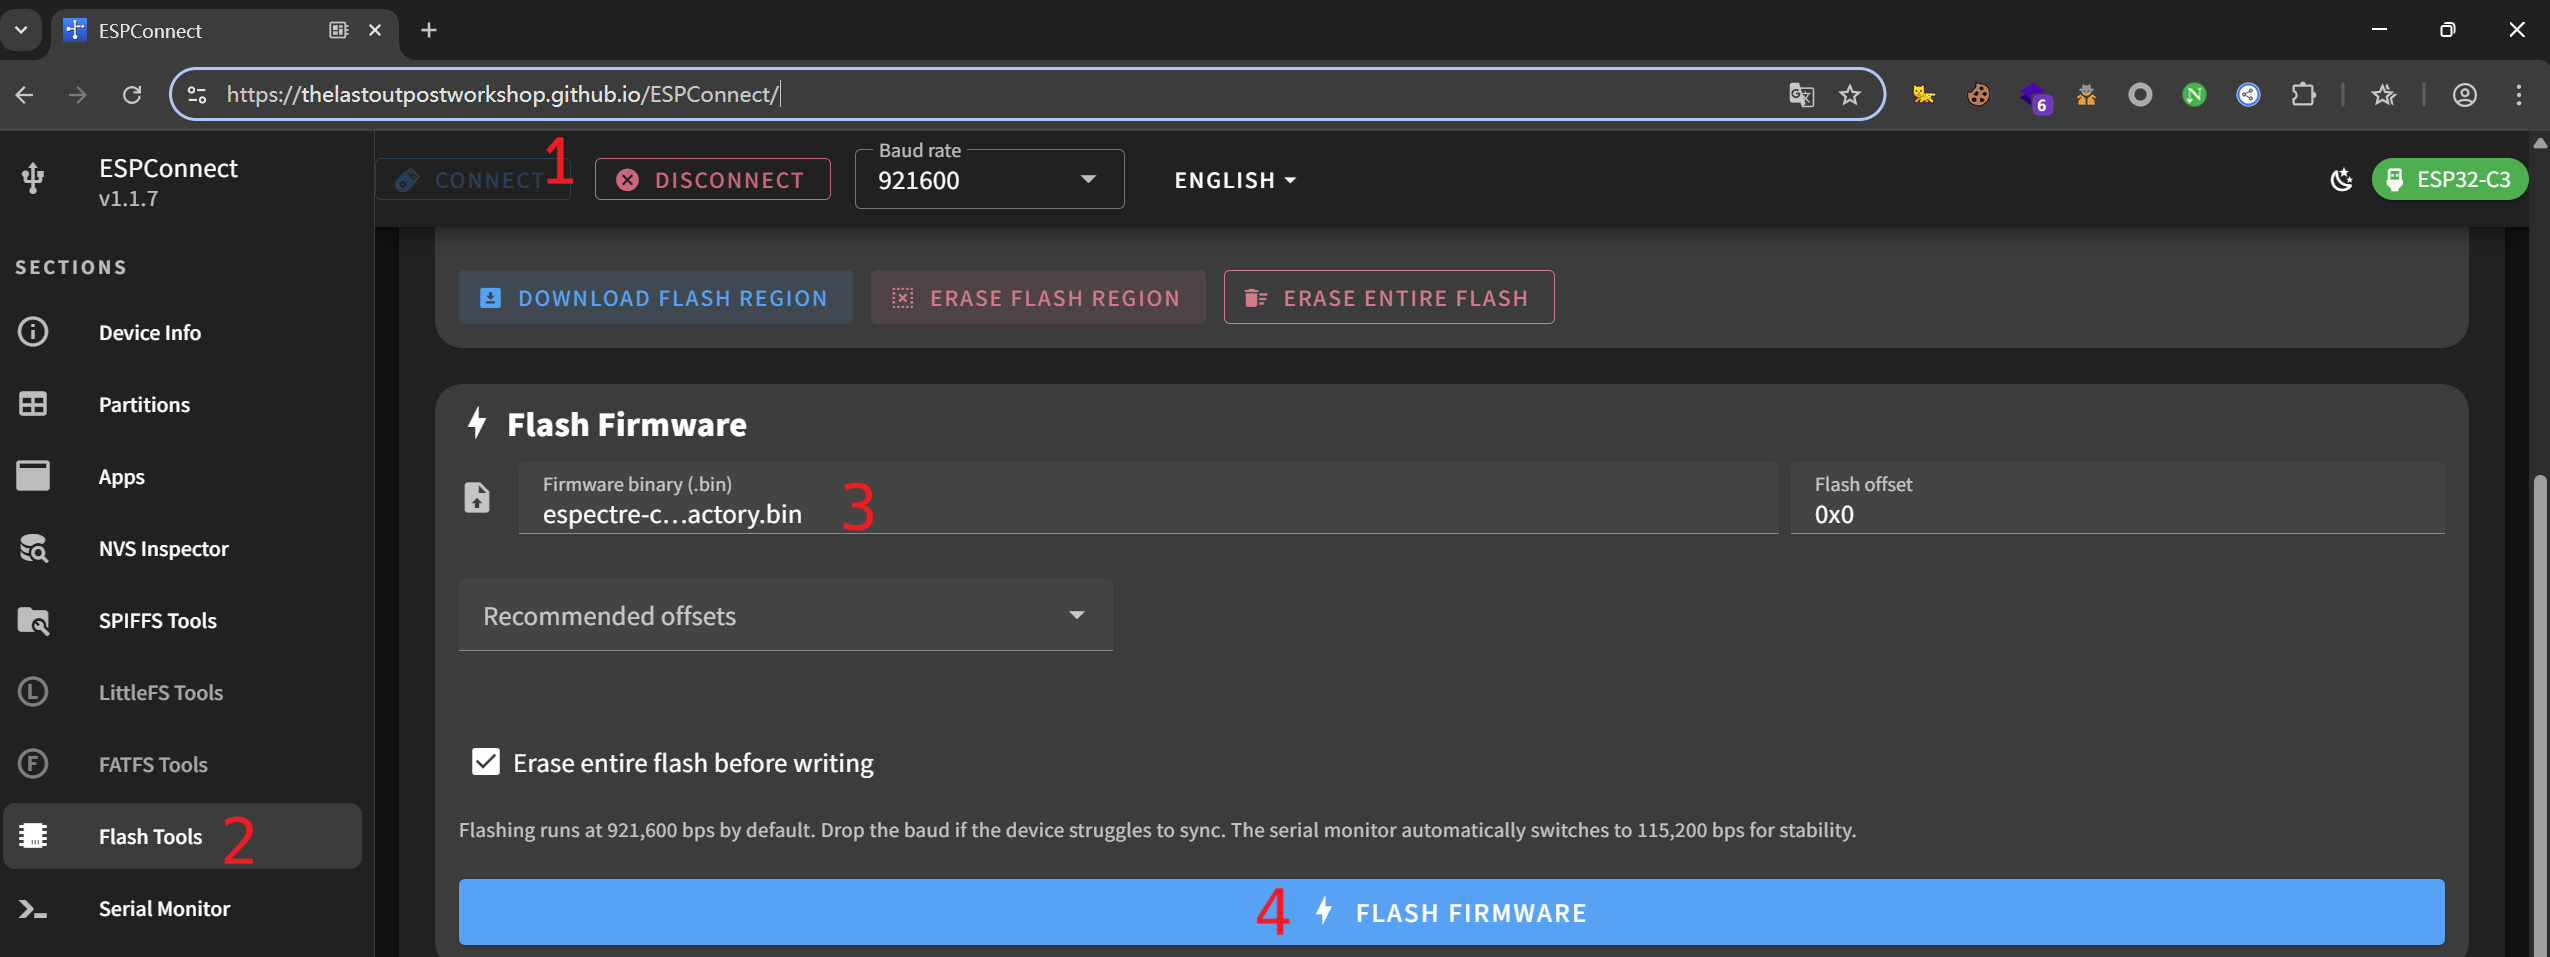
### 2. Flash Firmware
1. Open [ESPConnect](https://thelastoutpostworkshop.github.io/ESPConnect/) in Chrome
2. Connect your ESP32 via USB
3. Click **Connect** and select the serial port
4. Select the `.bin` file you downloaded
5. Click **Flash**
### 3. Configure WiFi
After flashing, configure WiFi using one of these methods:
| Method | How |
|--------|-----|
| **BLE** (easiest) | Use ESPHome or Home Assistant Companion app |
| **USB** | Go to [web.esphome.io](https://web.esphome.io) → Connect → Configure WiFi |
| **Captive Portal** | Connect to "ESPectre Fallback" WiFi → Configure in browser |
That's it! The device will be automatically discovered by Home Assistant.
---
## Option B: ESPHome CLI (for developers)
### What You Need
**Hardware:** Same as Easy Install above.
**Software:**
- Python 3.12 (⚠️ Python 3.14 has known issues with ESPHome)
- ESPHome 2026.5.0 or newer
- Home Assistant (recommended, but optional)
### 1. Install ESPHome
```bash
# Create virtual environment (recommended)
python3 -m venv venv
source venv/bin/activate # On macOS/Linux
# venv\Scripts\activate # On Windows
# Install ESPHome
pip install esphome
```
### 2. Download a configuration file
Download the example configuration for your hardware:
| Platform | Configuration File | CPU | WiFi Chip | PSRAM | Status |
|----------|-------------------|-----|-----------|-------|--------|
| **ESP32-C6** | [espectre-c6.yaml](https://raw.githubusercontent.com/francescopace/espectre/main/examples/espectre-c6.yaml) | RISC-V @ 160MHz | WiFi 6 capable | ❌ | ✅ Tested |
| **ESP32-S3** | [espectre-s3.yaml](https://raw.githubusercontent.com/francescopace/espectre/main/examples/espectre-s3.yaml) | Xtensa @ 240MHz | WiFi 4 | ✅ 8MB | ✅ Tested |
| **ESP32-C3** | [espectre-c3.yaml](https://raw.githubusercontent.com/francescopace/espectre/main/examples/espectre-c3.yaml) | RISC-V @ 160MHz | WiFi 4 | ❌ | ✅ Tested ² |
| **ESP32** | [espectre-esp32.yaml](https://raw.githubusercontent.com/francescopace/espectre/main/examples/espectre-esp32.yaml) | Xtensa @ 240MHz | WiFi 4 | Optional | ✅ Tested ³ |
| **ESP32-C5** | [espectre-c5.yaml](https://raw.githubusercontent.com/francescopace/espectre/main/examples/espectre-c5.yaml) | RISC-V @ 240MHz | WiFi 6 capable | ❌ | ✅ Tested ¹ |
| **ESP32-S2** | [espectre-s2.yaml](https://raw.githubusercontent.com/francescopace/espectre/main/examples/espectre-s2.yaml) | Xtensa @ 240MHz | WiFi 4 | Optional | ⚠️ Experimental |
> **Note**: ESPectre uses WiFi 4 (802.11b/g/n) mode for stable 64 subcarriers and faster calibration, even on WiFi 6 capable chips (C5, C6). This ensures consistent performance across all platforms.
>
> On ESP32-C5, ESPectre also forces `2.4 GHz only` band mode at runtime to avoid unintended 5 GHz association and keep CSI behavior stable.
**Recommendations**:
- **ESP32-C6**: Modern RISC-V platform, good performance, compact form factor
- **ESP32-S3**: Best for advanced applications, future ML features (more memory)
- **ESP32-C3**: Budget-friendly option, compact form factor
These files are pre-configured to download the component automatically from GitHub.
> ⚠️ **Experimental platform**: ESP32-S2 has CSI support but has not been extensively tested. Please report your results on [GitHub Discussions](https://github.com/francescopace/espectre/discussions)!
>
> ¹ ESP32-C5: `improv_serial` (USB provisioning) not yet supported by ESPHome. Use BLE or WiFi AP provisioning instead.
>
>
> ³ ESP32 (original/WROOM-32): AGC/FFT gain lock is not available on this platform. Band calibration works but CSI amplitudes may have more variance than newer chips.
>
> ⁴ **Boards with USB-UART bridges** (CH340, CP2102, CH343): If you don't see logs after flashing, uncomment the `hardware_uart: UART0` line in the `logger:` section of your configuration file to enable logging on UART0.
### 3. Build and flash
```bash
esphome run espectre-c6.yaml # replace with your platform's file
```
### 4. Configure WiFi
After flashing, configure WiFi using one of these methods:
| Method | How |
|--------|-----|
| **BLE** (easiest) | Use ESPHome app or Home Assistant Companion app |
| **USB** | Go to [web.esphome.io](https://web.esphome.io) → Connect → Configure WiFi |
| **Captive Portal** | Connect to "ESPectre Fallback" WiFi → Configure in browser |
That's it! The device will be automatically discovered by Home Assistant.
---
## Development Setup
For development, contributions, or offline use, use the pre-configured development files.
### 1. Clone the repository
```bash
git clone https://github.com/francescopace/espectre.git
cd espectre
```
### 2. Install ESPHome
```bash
python3 -m venv venv
source venv/bin/activate # On macOS/Linux
pip install esphome
```
### 3. Create secrets file
```bash
cat > examples/secrets.yaml << EOF
wifi_ssid: "YourWiFiName"
wifi_password: "YourWiFiPassword"
# Optional: lock to specific AP (useful for mesh networks)
# wifi_bssid: "AA:BB:CC:DD:EE:FF"
EOF
```
### 4. Build and flash
Use the development configuration files (with debug sensors and local component path):
| Platform | Development File |
|----------|-----------------|
| **ESP32-C6** | `examples/espectre-c6-dev.yaml` |
| **ESP32-C5** | `examples/espectre-c5-dev.yaml` |
| **ESP32-S3** | `examples/espectre-s3-dev.yaml` |
| **ESP32-C3** | `examples/espectre-c3-dev.yaml` |
| **ESP32** | `examples/espectre-esp32-dev.yaml` |
```bash
# For ESP32-C6
esphome run examples/espectre-c6-dev.yaml
# For ESP32-S3
esphome run examples/espectre-s3-dev.yaml
# For ESP32 (original)
esphome run examples/espectre-esp32-dev.yaml
```
### Development vs Production Files
| File | Component Source | WiFi | Logger | Debug Sensors |
|------|-----------------|------|--------|---------------|
| `espectre-c6.yaml` | GitHub | Provisioning (BLE/USB/AP) | INFO | ❌ |
| `espectre-c6-dev.yaml` | Local | secrets.yaml | DEBUG | ✅ |
| `espectre-s3.yaml` | GitHub | Provisioning (BLE/USB/AP) | INFO | ❌ |
| `espectre-s3-dev.yaml` | Local | secrets.yaml | DEBUG | ✅ |
| `espectre-esp32.yaml` | GitHub | Provisioning (BLE/USB/AP) | INFO | ❌ |
| `espectre-esp32-dev.yaml` | Local | secrets.yaml | DEBUG | ✅ |
---
## Docker / Home Assistant Add-on
If you run ESPHome in Docker or as a Home Assistant add-on, just download an example file to your config directory.
**Example for Docker with bind mount:**
```bash
# Your docker-compose.yml mounts /home/user/esphome/config:/config
cd /home/user/esphome/config
# Download the configuration file
curl -O https://raw.githubusercontent.com/francescopace/espectre/main/examples/espectre-c6.yaml
# Run ESPHome
docker compose exec esphome esphome run espectre-c6.yaml
# After flashing, configure WiFi via BLE, USB, or Captive Portal
```
No need to copy any files manually - the component is downloaded automatically from GitHub!
---
## Configuration Parameters
### ESPectre Component
All parameters can be adjusted in the YAML file under the `espectre:` section:
| Parameter | Type | Default | Description |
|-----------|------|---------|-------------|
| `detection_algorithm` | string | mvs | Detection algorithm: `mvs` (variance) or `ml` (neural network) |
| `traffic_generator_rate` | int | 100 | Packets/sec for CSI generation (0-1000, 0=disabled) |
| `traffic_generator_mode` | string | ping | Traffic generator mode: `ping` (ICMP) or `dns` (UDP queries) |
| `publish_interval` | int | auto | Packets between periodic sensor/log updates (default: same as traffic_generator_rate, or 100 if traffic is 0) |
| `evaluation_interval` | int | 25 | Packets between internal detector state evaluations |
| `motion_on_hits` | int | 3 | Consecutive evaluated hits required before switching the binary sensor to `MOTION` |
| `motion_off_hits` | int | 3 | Consecutive evaluated hits required before switching the binary sensor back to `IDLE` |
| `segmentation_threshold` | string/float | auto | Threshold: `auto`, `min`, or number (0.0-10.0 for both MVS and ML) |
| `segmentation_window_size` | int | 100 | Moving variance window in packets (10-200) |
| `selected_subcarriers` | list | auto | Fixed subcarriers (omit for auto-calibration) |
| `lowpass_enabled` | bool | false | Enable low-pass filter for noise reduction (MVS and ML) |
| `lowpass_cutoff` | float | 11.0 | Low-pass filter cutoff frequency in Hz (5-20) |
| `hampel_enabled` | bool | true | Enable Hampel outlier filter (MVS and ML) |
| `hampel_window` | int | 7 | Hampel filter window size (3-11) |
| `hampel_threshold` | float | 5.0 | Hampel filter sensitivity (MAD multiplier) (1.0-10.0) |
| `gain_lock` | string | auto | AGC/FFT gain lock: `auto`, `enabled`, `disabled` |
| `ble_channel_enabled` | bool/string | auto | Enable BLE telemetry/control channel: `auto`, `true`, `false` |
| `ble_telemetry_interval_ms` | int | 40 | BLE telemetry notify interval in ms (20-500) |
For detailed parameter tuning (ranges, recommended values, troubleshooting), see [TUNING.md](TUNING.md).
### Choosing Detection Algorithm
| Algorithm | How It Works | Pros | Cons | Best For |
|-----------|--------------|------|------|----------|
| **MVS** (default) | Variance of spatial turbulence | Low CPU, adaptive threshold | Requires 10s NBVI calibration | General use |
| **ML** | Neural network (MLP 9→32→16→1) | Fast boot (~3s), no calibration | Pre-trained weights, fixed subcarriers | Experimental |
Both algorithms support optional low-pass and Hampel filters on the turbulence stream.
```yaml
espectre:
detection_algorithm: mvs # or ml
```
**Threshold ranges (unified for both algorithms):**
- Range: 0.0 - 10.0
- MVS default: `auto` (adaptive based on baseline noise)
- ML default: 5.0 (equivalent to 0.5 probability)
### Integrated Sensors (Created Automatically)
All sensors are created automatically when the `espectre` component is configured. You can optionally customize their names.
| Sensor Config | Type | Default Name | Description |
|---------------|------|--------------|-------------|
| `movement_sensor` | sensor | "Movement Score" | Current motion score on a 0-10 scale (more gradual in ML mode) |
| `motion_sensor` | binary_sensor | "Motion Detected" | Edge-driven motion state (on/off), filtered by `evaluation_interval` and hit counters |
| `threshold_number` | number | "Threshold" | Detection threshold (adjustable from HA) |
| `calibrate_switch` | switch | "Calibrate" | Trigger band recalibration (ON during calibration) |
### Customizing Sensors
All sensor entities support standard ESPHome options:
| Option | Type | Description |
|--------|------|-------------|
| `name` | string | Custom entity name |
| `internal` | bool | If `true`, hide from Home Assistant (still processes data) |
| `icon` | string | Custom MDI icon (e.g., `mdi:motion-sensor`) |
| `disabled_by_default` | bool | Entity disabled until manually enabled in HA |
The `movement_sensor` also supports ESPHome [sensor filters](https://esphome.io/components/sensor/#sensor-filters) for data transformation.
- **MVS mode**: publishes the current moving-variance based metric
- **ML mode**: publishes a 0-10 confidence-like score derived from the neural network output
- **ML temperature scaling**: the ML score is intentionally softened before the sigmoid so Home Assistant can show intermediate values instead of a nearly binary 0/10 output
Common filters:
| Filter | Example | Description |
|--------|---------|-------------|
| `multiply` | `multiply: 10` | Scale values (e.g., 0-10 → 0-100) |
| `round` | `round: 1` | Round to N decimal places |
| `clamp` | `min_value: 0, max_value: 100` | Limit value range |
| `offset` | `offset: -0.5` | Add/subtract constant |
| `sliding_window_moving_average` | `window_size: 5` | Smooth noisy readings |
See the [ESPHome sensor filters documentation](https://esphome.io/components/sensor/#sensor-filters) for the complete list.
**Example:**
```yaml
espectre:
movement_sensor:
name: "Living Room Movement"
internal: true # Hide from Home Assistant
icon: "mdi:sine-wave"
filters:
- multiply: 100 # Scale 0-1 to 0-100
- clamp:
min_value: 0
max_value: 100 # Cap at 100%
- round: 1 # Round to 1 decimal
motion_sensor:
name: "Living Room Motion"
icon: "mdi:motion-sensor"
threshold_number:
name: "Living Room Threshold"
```
> **Tip:** Use `internal: true` on `movement_sensor` to reduce data sent to Home Assistant while keeping `motion_sensor` for automations.
---
## Home Assistant Integration
ESPHome provides **automatic Home Assistant integration**. Once the device is flashed and connected to WiFi:
1. Home Assistant will automatically discover the device
2. Go to **Settings** → **Devices & Services** → **ESPHome**
3. Click **Configure** on the discovered device
4. All sensors will be automatically added
### Entities Created
Entity names are based on the device name in your YAML (default: `espectre`):
- **binary_sensor.espectre_motion_detected** - Motion state (on/off)
- **sensor.espectre_movement_score** - Movement intensity value
- **number.espectre_threshold** - Detection threshold (adjustable from Home Assistant)
- **switch.espectre_calibrate** - Trigger recalibration (ON during calibration)
> **Note:** If you change the device name, replace `espectre` with your device name in automations and dashboards.
### Automation Example
```yaml
automation:
- alias: "Turn on light on motion"
trigger:
- platform: state
entity_id: binary_sensor.espectre_motion_detected
to: "on"
action:
- service: light.turn_on
target:
entity_id: light.living_room
- alias: "Turn off light after no motion"
trigger:
- platform: state
entity_id: binary_sensor.espectre_motion_detected
to: "off"
for:
minutes: 5
action:
- service: light.turn_off
target:
entity_id: light.living_room
```
**Inactivity alert:**
```yaml
automation:
- alias: "Inactivity Alert"
trigger:
- platform: state
entity_id: binary_sensor.espectre_motion_detected
to: "off"
for:
hours: 4
condition:
- condition: time
after: "08:00:00"
before: "22:00:00"
action:
- service: notify.mobile_app
data:
message: "No movement detected for 4 hours"
```
### Dashboard Examples
Two dashboard examples are available:
| Dashboard | Description |
|-----------|-------------|
| [home-assistant-dashboard.yaml](examples/home-assistant-dashboard.yaml) | Production dashboard with motion sensors |
| [home-assistant-dashboard-dev.yaml](examples/home-assistant-dashboard-dev.yaml) | Development dashboard with debug sensors (Free Heap, Loop Time, etc.) |
**How to use:**
1. Go to **Settings** → **Dashboards** → **Add Dashboard**
2. Open the new dashboard and click **Edit** (pencil icon)
3. Click the three dots menu → **Raw configuration editor**
4. Replace ALL content with the YAML from the file (delete the default content first)
5. Click **Save**
> **Note:** If you changed the device name from `espectre`, replace all occurrences of `espectre_` with your device name (e.g., `espectre_living_room_`).
> ⚠️ **Multiple devices?** If you uncommented `name_add_mac_suffix: true` in your YAML, entity names will include the MAC suffix (e.g., `sensor.espectre_a1b2c3_movement_score`). Update the dashboard entities accordingly.
**Production dashboard includes:**
- **Gauge**: Visual representation of movement score with color-coded severity
- **Motion tile**: Current motion state with last changed time
- **Threshold control**: Adjustable detection threshold
- **History graph**: 24-hour view of movement and threshold
**Development dashboard adds:**
- **Free Heap**: Available memory (monitor for leaks)
- **Max Free Block**: Largest contiguous memory block
- **Loop Time**: Main loop execution time
---
## Traffic Generator
The traffic generator creates network packets that trigger CSI callbacks from the WiFi driver. Default rate is **100 pps** (packets per second).
> ⚠️ **Important**: The traffic generator runs **continuously** while the device is powered on, not just during calibration. Each ESPectre device constantly sends packets to generate CSI data for motion detection. See [Network Impact](#network-impact) below to understand the bandwidth and airtime implications for your WiFi network.
```yaml
espectre:
traffic_generator_rate: 100 # packets per second (0-1000)
traffic_generator_mode: ping # ping (default) or dns
```
### Traffic Generator Mode
Two modes are available:
| Mode | Protocol | Description |
|------|----------|-------------|
| `ping` | ICMP | Sends ICMP echo requests to gateway. Default mode, more reliable on routers that ignore root-domain DNS queries. |
| `dns` | UDP | Sends DNS queries to gateway:53. Lower-overhead alternative when DNS works well in your environment. |
Both modes generate minimal network traffic (<20 bytes per packet).
**Choosing a mode:**
- Start with `ping` (default) - more reliable when routers ignore root-domain DNS queries
- Try `dns` if you prefer lower-overhead UDP traffic and your router responds consistently
- Note: some routers/firewalls may rate-limit or block ICMP ping responses
```yaml
espectre:
traffic_generator_rate: 100
traffic_generator_mode: dns # Use DNS queries instead of the default ping mode
```
**Community test results** (thanks to [@gasment](https://github.com/francescopace/espectre/issues/48)):
| Board | Antenna | Mode | Rate | RSSI | AGC | Result |
|-------|---------|------|------|------|-----|--------|
| ESP32-S3-N16R8 | built-in | DNS | 100 | -15±5 | 15±5 | ✅ |
| ESP32-S3-N16R8 | built-in | PING | 100 | -15±5 | 10±5 | ✅ |
| ESP32-S3-N16R8 | external | DNS | 100 | -10±5 | 5±5 | ✅ |
| ESP32-S3-N16R8 | external | PING | 100 | -5±5 | 5±5 | ✅ |
| ESP32-C6 Super Mini | built-in | DNS | 100 | -20±5 | 15±5 | ✅ |
| ESP32-C6 Super Mini | built-in | PING | 100 | -20±5 | 15±5 | ✅ |
| ESP32-C3 Core | built-in | DNS | 94 | -20±5 | 15±5 | ✅ |
| ESP32-C3 Core | built-in | PING | 94 | -20±5 | 15±5 | ✅ |
Both modes work reliably across different boards and antenna configurations.
For detailed rate recommendations and Nyquist-Shannon sampling theory, see [TUNING.md](TUNING.md#traffic-generator-rate-0-1000-pps).
### Network Impact
Each ESPectre device generates **continuous** WiFi traffic as long as it's powered on. This is required for motion detection to work. Here's the approximate impact per device:
| Rate | Packets/sec | Approximate Bandwidth |
|------|-------------|----------------------|
| 50 pps | 50 | ~4.5 KB/s |
| 100 pps (default) | 100 | ~9 KB/s |
| 200 pps | 200 | ~18 KB/s |
For single devices or small deployments (< 5 devices), the default 100 pps has negligible impact on most home networks (typically <1% of available bandwidth).
> ⚠️ **Planning a large deployment?** With many ESPectre devices, the cumulative traffic can consume noticeable WiFi airtime. For example, 10 devices at 100 pps each = 2000 packets/sec (1000 requests + 1000 responses), using approximately 10-15% of airtime. Consider using [External Traffic Mode](#external-traffic-mode) with UDP broadcast to reduce this to ~0.5% airtime.
### External Traffic Mode
You can disable the internal traffic generator and rely on external WiFi traffic:
```yaml
espectre:
traffic_generator_rate: 0 # Disable internal generator
publish_interval: 100 # Publish movement score/logs every 100 packets
evaluation_interval: 25 # Re-evaluate motion state every 25 packets
```
This is useful when:
- You have multiple ESPectre devices and want to reduce total network traffic
- You already have continuous WiFi traffic on your network
- You want centralized control over traffic generation
**Generating external traffic:**
When `traffic_generator_rate: 0`, ESPectre opens a UDP listener on **port 5555**. Send UDP packets to this port to generate CSI data.
Use the standalone Python script: [`espectre_traffic_generator.py`](examples/espectre_traffic_generator.py)
**Configuration:** Edit the script and set your device IP(s):
```python
TARGETS = ['192.168.1.255'] # Broadcast address (recommended for multiple devices)
# TARGETS = ['192.168.1.100', '192.168.1.101'] # Or list specific device IPs
PORT = 5555
RATE = 100 # packets per second (recommended: 100)
```
> ⚠️ **ESP32 (original) limitation:** The CSI driver on ESP32 has a known issue where it doesn't detect traffic that was already flowing when CSI was enabled. You must start the external traffic generator **after** the ESP32 connects to WiFi. Additionally, broadcast mode is not supported - use unicast (specific device IP) instead. ESP32-C3, ESP32-C5, ESP32-C6, and ESP32-S3 don't have these limitations. See [espressif/esp-csi#247](https://github.com/espressif/esp-csi/issues/247) for details.
**Usage:**
```bash
python3 espectre_traffic_generator.py run # Foreground (Ctrl+C to stop)
python3 espectre_traffic_generator.py start # Background daemon
python3 espectre_traffic_generator.py stop # Stop daemon
python3 espectre_traffic_generator.py status # Check if running
```
**Home Assistant (Docker) note:**
The script starts the background process using `subprocess.Popen` (no `fork()`), which avoids the deprecation warning emitted by Python in multi-threaded Home Assistant environments.
Run on any device on the network: Raspberry Pi, NAS, Home Assistant server, etc.
**Home Assistant integration:**
Copy the script to `/config/python_scripts/espectre_traffic_generator.py` and add to `configuration.yaml` (see [command_line integration docs](https://www.home-assistant.io/integrations/command_line/)):
```yaml
command_line:
- switch:
name: "ESPectre Traffic Generator"
command_on: "python3 /config/python_scripts/espectre_traffic_generator.py start"
command_off: "python3 /config/python_scripts/espectre_traffic_generator.py stop"
command_state: "python3 /config/python_scripts/espectre_traffic_generator.py status"
value_template: '{{ "Running" in value }}'
unique_id: espectre_traffic_generator
```
This creates a `switch.espectre_traffic_generator` entity you can toggle from dashboards or use in automations.
Why UDP instead of ping?
You might wonder why we don't just use `ping -b` (broadcast ping) for external traffic. While ping works for CSI generation, UDP has significant advantages:
| Aspect | Ping broadcast | UDP broadcast |
|--------|----------------|---------------|
| Response traffic | Yes (ICMP Echo Reply from each device) | None |
| Network overhead | N+1 packets (1 request + N replies) | 1 packet |
| Root required | Yes (for broadcast and high-rate) | No |
For 10 devices at 100 pps, ping broadcast generates 1100 packets/sec (100 requests + 1000 replies), while UDP broadcast generates only 100 packets/sec total.
### Network Impact: Internal vs External Traffic
**Packet sizes by mode:**
| Mode | Payload | IP packet | On-wire (with MAC) |
|------|---------|-----------|-------------------|
| DNS (default) | 17 bytes | 45 bytes | ~75 bytes |
| Ping | 8 bytes | 28 bytes | ~58 bytes |
| External UDP | 3 bytes | 31 bytes | ~61 bytes |
*On-wire size includes WiFi MAC header (~30 bytes). Actual size varies with encryption and PHY rate.*
**Comparison for 10 devices at 100 pps:**
| Approach | Total packets/sec | Total airtime |
|----------|-------------------|---------------|
| Internal traffic generator (DNS) | 1000 + 1000 replies | ~14% |
| Internal traffic generator (Ping) | 1000 + 1000 replies | ~11% |
| **UDP broadcast (recommended)** | **100** | **~0.5%** |
UDP broadcast is the most efficient option for multi-device deployments: one packet reaches all devices, with no response traffic.
What is airtime?
Airtime is the percentage of time the WiFi channel is occupied by transmissions. Since WiFi is a shared medium, only one device can transmit at a time.
Each packet occupies the channel for:
- **Transmission time**: packet size / PHY rate (e.g., 60 bytes at 54 Mbps ≈ 9 µs)
- **Protocol overhead**: preamble, inter-frame spacing, ACK (~40 µs)
At 100 pps with ~50 µs per packet: **airtime = 0.5%**
High airtime (>30-50%) causes network congestion, increased latency, and packet loss. The UDP broadcast approach keeps airtime minimal even with many ESPectre devices.
---
## Auto-Calibration (MVS only)
> ⚠️ **CRITICAL**: The room must be **still** during the first ~13 seconds after boot. Movement during calibration will result in poor detection accuracy!
Auto-calibration applies only to MVS mode. ML mode uses fixed subcarriers from pre-trained weights and skips this phase.
ESPectre automatically calibrates in two phases:
1. **Gain Lock** (~3 seconds, 300 packets): Stabilizes AGC/FFT for consistent amplitudes
2. **NBVI Band Calibration** (~10 seconds, 10 × `window_size` packets): Selects optimal 12-subcarrier band and calculates adaptive threshold
With default `segmentation_window_size: 100`, the calibration collects 1000 packets. If you change the window size, the calibration buffer adjusts automatically.
Room must be quiet during the entire ~10 second calibration.
**Sensor placement:** Position the sensor 3-8 meters from your access point for optimal performance. See [Sensor Placement](TUNING.md#sensor-placement) in the Tuning Guide for details.
**Gain lock modes:** The `gain_lock` parameter (`auto`/`enabled`/`disabled`) controls AGC stabilization. See [Gain Lock](TUNING.md#gain-lock) in the Tuning Guide.
**Runtime recalibration:** You can trigger recalibration from Home Assistant using the Calibrate switch (`switch.espectre_calibrate`). The switch is automatically disabled during calibration to prevent accidental interruption. For a complete reset, erase flash and re-flash.
---
## Custom Hardware Configuration
ESPectre now provides example configurations for all ESP32 variants with CSI support. If you need to customize further, use these guidelines:
### Automatic sdkconfig options
ESPectre automatically sets all required and recommended sdkconfig options. You don't need to manually configure anything in most cases.
The component automatically configures:
| Option | Value | Purpose |
|--------|-------|---------|
| `CONFIG_ESP_WIFI_CSI_ENABLED` | `y` | Enable CSI (mandatory) |
| `CONFIG_PM_ENABLE` | `n` | Disable power management |
| `CONFIG_ESP_WIFI_STA_DISCONNECTED_PM_ENABLE` | `n` | Disable disconnected PM |
| `CONFIG_ESP_WIFI_AMPDU_TX_ENABLED` | `n` | More CSI callbacks |
| `CONFIG_ESP_WIFI_AMPDU_RX_ENABLED` | `n` | More CSI callbacks |
| `CONFIG_ESP_WIFI_DYNAMIC_RX_BUFFER_NUM` | `128` | Larger RX buffer |
| `CONFIG_FREERTOS_HZ` | `1000` | 1ms tick for precise timing |
### Platform-specific options (optional)
You only need to add sdkconfig options for platform-specific features:
```yaml
esp32:
variant: ESP32C6 # or ESP32S3, etc.
framework:
type: esp-idf
version: 5.5.1
sdkconfig_options:
# CPU frequency (platform-dependent)
CONFIG_ESP_DEFAULT_CPU_FREQ_MHZ: "160" # 160 for C6, 240 for S3
# PSRAM (if available on your board)
# CONFIG_ESP32S3_SPIRAM_SUPPORT: y
```
**Reference:** For advanced sdkconfig tuning see official Espressif documentation: [ESP32 WiFi](https://docs.espressif.com/projects/esp-idf/en/stable/esp32/api-guides/wifi.html#how-to-configure-parameters).
---
## Flash Size and Partitions
> **Minimum requirement: 4MB flash.** ESPectre fits comfortably in 4MB with full OTA support. Larger flash (8MB/16MB) is only useful for additional components (like `bluetooth_proxy`) or future ML features planned for v3.x.
### ESPectre Flash Footprint
ESPectre itself is very lightweight. The actual code overhead is minimal:
| Configuration | Flash | RAM | Notes |
|---------------|-------|-----|-------|
| ESPHome base + provisioning | 1,464 KB | 49.9 KB | BLE, captive portal, improv |
| ESPectre production | 1,535 KB | 50.0 KB | Full featured |
| **ESPectre overhead** | **~70 KB** | **88 bytes** | Just the CSI code |
The ESPectre component adds only **~70KB of Flash** and less than **100 bytes of RAM**. The majority of flash usage comes from standard ESPHome components (WiFi, API, OTA, provisioning).
### Custom Partition Table
ESPectre includes a custom partition table (`partitions.csv`) that is automatically applied during compilation. This partition table:
- Supports **OTA updates** (dual app partitions)
- Includes **SPIFFS** for calibration buffer (320KB, used during boot only)
- App partition size: **~1.8MB** per slot
```
# ESPectre Partition Table (4MB flash)
# Name, Type, SubType, Offset, Size
nvs, data, nvs, 0x9000, 0x5000
otadata, data, ota, 0xe000, 0x2000
app0, app, ota_0, 0x10000, 0x1D0000 # ~1.8MB
app1, app, ota_1, 0x1E0000, 0x1D0000 # ~1.8MB
spiffs, data, spiffs, 0x3B0000, 0x50000 # 320KB
```
### Combining with Other Components
If you want to add ESPectre to an existing ESPHome configuration with other heavy components, be aware that ESPectre's partition table may override your existing partitions.
**To use your own partition table**, you can override it in your YAML using an **absolute path**:
```yaml
esphome:
name: my-device
platformio_options:
board_build.partitions: /path/to/partitions_custom.csv
```
Then create the `partitions_custom.csv` file at that location.
**Example for 4MB flash** (no OTA, ~3.7MB for app):
```
# Name, Type, SubType, Offset, Size
nvs, data, nvs, 0x9000, 0x5000,
phy_init, data, phy, 0xe000, 0x1000,
app0, app, factory, 0x10000, 0x3C0000,
spiffs, data, spiffs, 0x3D0000,0x30000,
```
**Example for 8MB flash** (no OTA, ~7.7MB for app):
```
# Name, Type, SubType, Offset, Size
nvs, data, nvs, 0x9000, 0x5000,
phy_init, data, phy, 0xe000, 0x1000,
app0, app, factory, 0x10000, 0x7C0000,
spiffs, data, spiffs, 0x7D0000, 0x30000,
```
**Notes**:
- SPIFFS is required. ESPectre uses it as a temporary buffer during calibration. Removing SPIFFS will cause the component to fail during initialization.
- If you remove OTA partitions, you must also remove the `ota:` section from your YAML (OTA updates won't work without the partitions).
---
## BLE Control API (Optional)
ESPectre can expose a BLE telemetry/control channel for custom integrations, even without Home Assistant.
For the complete protocol reference (UUIDs, commands, limits, and frame examples), see [docs/game/README.md#communication-protocol](docs/game/README.md#communication-protocol).
Minimal setup:
```yaml
espectre:
ble_channel_enabled: auto
ble_telemetry_interval_ms: 40
esp32_ble_server:
id: espectre_ble_server
services:
- uuid: "d33ff46b-2203-4775-bc6f-b3a2c36af8f0"
advertise: true
characteristics:
- id: espectre_ble_telemetry
uuid: "119d5cac-48da-4bd9-bfc3-169805868258"
notify: true
- id: espectre_ble_sysinfo
uuid: "c8c89ffa-c401-461f-9ffc-942fa04adfe3"
read: true
notify: true
value: ""
- id: espectre_ble_control
uuid: "33ed9214-a8d7-40e8-82d1-c82747dcdc71"
write: true
write_no_response: true
```
Use this channel with any standard BLE client by implementing the same UUID/profile contract.
If you do not use BLE integrations, you can remove the `esp32_ble_server:` section entirely. With `ble_channel_enabled: auto` (default), ESPectre will keep the BLE channel disabled when no BLE server is configured.
This can slightly reduce runtime overhead (RAM/CPU usage and BLE radio activity), which may be useful on constrained boards or when you only use Home Assistant entities.
---
## Troubleshooting
### WiFi protocol/bandwidth shows "unavailable"
On some targets or band modes, the WiFi driver may not expose protocol/bandwidth values through all read APIs. In this case, ESPectre logs:
```
WiFi Protocol: unavailable (...)
WiFi Bandwidth: unavailable (...)
```
This is expected for unsupported read paths and does not necessarily indicate a WiFi connection failure.
### CSI packet length warnings (`wrong SC count`)
ESPectre expects HT20 CSI payloads mapped to `128 bytes` (64 subcarriers). Runtime normalization already handles common alternate lengths:
- `256 -> 128` (double HT-LTF / STBC-like packet)
- `228 -> 114 -> 128` (double short HT estimate, then remap)
- `114 -> 128` (57-subcarrier short HT estimate remapped to 64)
If you still see repeated `Filtered ... wrong SC count` warnings, packets are likely arriving in another unsupported format. In that case, keep an eye on the logged metadata (`ch`, `bb`/`sig_mode`, `est_len`) and open an issue with logs and target chip/AP details.
### No motion detection
1. **Verify traffic generator is enabled** (`traffic_generator_rate > 0`)
2. Check WiFi is connected (look for IP address in logs)
3. Wait for band calibration to complete (~13 seconds after boot)
4. Adjust `segmentation_threshold` (try 0.5-2.0 for more sensitivity)
### False positives
1. Increase `segmentation_threshold` (try 2.0-5.0)
2. Check for interference sources (fans, AC, moving curtains)
3. Increase `segmentation_window_size` for more stable detection
### Calibration fails (MVS only)
Applies only when `detector_algorithm: mvs` (default). The `ml` detector does not use NBVI calibration.
1. Ensure room is quiet during calibration (first ~13 seconds after boot)
2. Check traffic generator is running
3. Verify WiFi connection is stable
**Note:** If band selection fails, the system automatically falls back to the shared default subcarriers `[12, 14, 16, 18, 20, 24, 28, 36, 40, 44, 48, 52]` with a default threshold of `1.0`. Motion detection still works but may be less optimal. Look for the log message `⚠ Fallback calibration: using default subcarriers`.
### SPIFFS partition not found
If you see `SPIFFS partition could not be found` in logs, ESPectre's partition table was not applied correctly. This commonly happens when:
- Combining ESPectre with other components like `bluetooth_proxy` or `esp32_ble_tracker`
- Using a custom YAML instead of the provided examples
- Another component is overriding the partition table
**Solution:**
1. First, try a full flash erase and reflash:
```bash
# Erase flash completely (replace /dev/ttyUSB0 with your port)
esptool.py --port /dev/ttyUSB0 erase_flash
# Then reflash
esphome run your-config.yaml
```
Or use the ESPHome dashboard: click the three dots menu → "Install" → "Erase device before installing".
2. If the problem persists, create a custom partition table that includes SPIFFS. See the "Combining with Other Components" section above for examples.
### Unstable detection with mesh networks
If you have a mesh WiFi network, the sensor may roam between access points causing CSI inconsistencies. Lock it to a specific AP using the BSSID.
**For development files** (`espectre-*-dev.yaml`):
1. Add `wifi_bssid` to your `secrets.yaml`:
```yaml
wifi_bssid: "AA:BB:CC:DD:EE:FF"
```
2. Uncomment the `bssid` line in your config file:
```yaml
wifi:
networks:
- ssid: !secret wifi_ssid
password: !secret wifi_password
bssid: !secret wifi_bssid
```
**For production files** (`espectre-*.yaml` with provisioning):
Add the BSSID directly after configuring WiFi, or use the ESPHome dashboard to edit the configuration.
To find your AP's BSSID:
- Check your router's admin page
- Use a WiFi analyzer app on your phone
- Look in ESPectre logs after connection (shows connected BSSID)
### ESP32-C3 Super Mini issues
If you're using an ESP32-C3 Super Mini (popular budget boards from AliExpress/Temu):
1. **No logs visible via USB**: ESPHome defaults to native USB Serial/JTAG on C3, but boards with external USB-UART bridges (like CH343, CP2102) need explicit UART0 configuration. Add this to your YAML:
```yaml
logger:
hardware_uart: UART0
```
2. **Calibration takes very long or fails**: Set `traffic_generator_rate: 94` or lower. Values of 95+ cause calibration to hang for 90+ minutes.
3. **Flash fails or board doesn't respond**: Some cheap clones don't support QIO flash mode. Add this to your YAML:
```yaml
esphome:
platformio_options:
board_build.flash_mode: dio
```
### Flash failed
1. Hold BOOT button on ESP32
2. Press RESET button
3. Release BOOT button
4. Run flash command again
### View logs
```bash
# Via USB
esphome logs .yaml
# Via network (after first flash)
esphome logs .yaml --device espectre.local
```
---
## Next Steps
- **Tuning Guide**: [TUNING.md](TUNING.md) - Optimize for your environment
- **Main Documentation**: [README.md](README.md) - Full project overview
---
## License
GPLv3 - See [LICENSE](LICENSE) for details.