{
"cells": [
{
"cell_type": "markdown",
"metadata": {
"toc-hr-collapsed": false
},
"source": [
"# Jupyterlab 的安装与配置"
]
},
{
"cell_type": "markdown",
"metadata": {},
"source": [
"## 下载并安装 Anaconda"
]
},
{
"cell_type": "markdown",
"metadata": {},
"source": [
"[Anaconda](https://www.anaconda.com) 是目前最方便的 Python 发行版,搭载了很多我们终将必用的软件包,除了 Python 之外,还有 [R 语言](https://www.r-project.org/),还包括 [Pandoc](https://pandoc.org/),[NumPy](http://www.numpy.org/),[SciPy](https://www.scipy.org/),[Matplotlib](https://matplotlib.org/)…… 等等。\n",
"\n",
"无论是图形化界面安装,还是命令行界面安装,建议都把 Anaconda 安装在本地用户目录内,`~/`。请下载并安装 Python 3.x 的版本。\n",
"\n",
"图形化界面安装的教程,官方的很详细,各个操作平台的说明都有:\n",
"\n",
"> https://docs.anaconda.com/anaconda/install/\n",
"\n",
"在 MacOS 的 Terminal 命令行下,可以直接下载并安装:\n",
"\n",
"```bash\n",
"cd ~/Downloads/\n",
"wget https://repo.anaconda.com/archive/Anaconda3-2018.12-MacOSX-x86_64.sh\n",
"chmod +x Anaconda3-2018.12-MacOSX-x86_64.sh\n",
"./Anaconda3-2018.12-MacOSX-x86_64.sh\n",
"```\n",
"\n",
"安装到最后一步,会问你是否要安装微软出品的 [Visual Studio Code](https://code.visualstudio.com),选择 `yes` —— 反正以后你的电脑上会不止一个文本编辑器…… 以后你可能还会安装的文本编辑器包括 [SublimeText](https://www.sublimetext.com), [Atom](https://atom.io) 等等。\n",
"\n",
"安装完毕之后,打开 Terminal(Windows 系统需要打开之前安装的 Anaconda Prompt 输入),继续安装几个组件:\n",
"\n",
"```bash\n",
"conda update conda\n",
"conda update anaconda\n",
"conda install -c conda-forge nodejs\n",
"conda install -c conda-forge jupyterlab # 这是用来升级 jupyter lab 到最新版的方法\n",
"\n",
"```\n",
"\n",
"安装完毕之后,可以看看各个你将要用到的可执行命令都在什么地方,用 `which` 命令(windows下用 `where` 命令):\n",
"\n",
"```bash\n",
"which python\n",
"python --version\n",
"which node\n",
"node -v\n",
"which jupyter\n",
"jupyter lab --version\n",
"jupyter notebook --version\n",
"which pip\n",
"pip --version\n",
"```\n"
]
},
{
"cell_type": "markdown",
"metadata": {},
"source": [
"## 第一次启动 Jupyter lab"
]
},
{
"cell_type": "markdown",
"metadata": {},
"source": [
"打开 Terminal,`cd` 到你想打开 Jupyter lab 的目录(就是你保存 `ipynb` 文件的地方,以便在 Jupyter lab 中打开、浏览、编辑 `ipynb` 文件),在这里以用户根目录为例 `~/`:\n",
"\n",
"```bash\n",
"cd ~\n",
"jupyter lab\n",
"```\n",
"此时的 Terminal 窗口不能关闭,否则 Jupyter lab 就停止运行了 —— 就将它放在那里。\n",
"\n",
"随后会有个浏览器打开,指向 [http://localhost:8888/lab?](http://localhost:8888/lab?) —— 你就看到 Jupyter lab 的操作界面了。\n",
"\n",
"目前,Jupyter lab 和 Jupyter notebook 是并存的,虽然前者是后者的下一步替代者。如果你依然习惯于使用 Jupyter notebook,那么,在浏览器中指向 [http://localhost:8888/tree?](http://localhost:8888/tree?) 看到的就是 Jupyter notebook."
]
},
{
"cell_type": "markdown",
"metadata": {},
"source": [
"## 配置 Jupyter lab"
]
},
{
"cell_type": "markdown",
"metadata": {},
"source": [
"打开 Terminal,输入以下命令:\n",
"\n",
"```bash\n",
"jupyter lab --generate-config\n",
"```\n",
"\n",
"这会在 `~/.jupyter/` 目录下生成一个 `jupyter_notebook_config.py` 文件。\n",
"\n",
"```bash\n",
"cd ~/.jupyter\n",
"code jupyter_notebook_config.py\n",
"```\n",
"上面的 code 命令,需要你已经安装 Visual Studio Code,并且在已经在其中设置了 `Install 'code' command in PATH`。参见附录 [Visual Studio Code 的安装与配置](T-appendix.editor.vscode.ipynb)\n",
"\n",
"事实上,你可以用你喜欢的任何编辑器打开 `~/.jupyter/jupyter_notebook_config.py` 文件。\n",
"\n",
"文件内容很长,有空可以仔细看。可以直接将以下内容拷贝粘贴到文件底部,根据需求修改:\n",
"\n",
"```json\n",
"#c.NotebookApp.token = ''\n",
"#c.NotebookApp.open_browser = False\n",
"#c.NotebookApp.notebook_dir = '~/'\n",
"#c.NotebookApp.default_url = '/tree'\n",
"```\n",
"\n",
"逐条解释一下:\n",
"\n",
"> `c.NotebookApp.token = ''`\n",
"\n",
"每次打开 jupyter,它都会给你生成一个新的 Token —— 这是安全策略。但是,如果你只是在自己的电脑上使用,那么,这就给你制造了麻烦,因为若是你想同时用另外一个浏览器打开它,那你就需要从 Terminal 里拷贝那个 Token 出来。所以,你可以在配置文件里直接把它设置为空。\n",
"\n",
"> `c.NotebookApp.open_browser = False`\n",
"\n",
"每次你执行 `jupyter lab` 或者 `jupyter notebook` 命令的时候,它都会使用系统默认浏览器。\n",
"\n",
"每个人的习惯不一样。比如我,会想到用一个平时不怎么用的浏览器专门用在 Jupyter 上,这样会防止自己在关闭其它网页的时候不小心把 Jupyter 关掉…… 那我就会把这项设定为 `False`。\n",
"\n",
"> `c.NotebookApp.notebook_dir = '~/'`\n",
"\n",
"在 Terminal 中执行 `jupyter` 命令的时候,它默认是在你当前所在的工作目录打开 `jupyter`,这同样是出于安全考虑。但是,如果你只是在自己的电脑上使用,且只有自己在使用,那么莫不如直接把它设置成 `~/`,即,你的用户根目录,这样会很方便地访问各种地方的文件……\n",
"\n",
"> `c.NotebookApp.default_url = '/tree'`\n",
"\n",
"这一项留给那些依然习惯于使用 jupyter notebook 的人,这样设置之后,即便是输入 `jupyter lab` 命令,打开的还是 jupyter notebook。\n",
"\n",
"在 Terminal 里常用的与 Jupyter 有关的命令有:\n",
"\n",
"```bash\n",
"jupyter lab\n",
"jupyter lab --version\n",
"conda install -c conda-forge jupyterlab # 这是用来升级 jupyter lab 到最新版的方法\n",
"jupyter notebook list # 查看正在运行的 jupyter lab/notebook\n",
"jupyter notebook stop # 停止 jupyter lab/notebook 服务\n",
"```"
]
},
{
"cell_type": "markdown",
"metadata": {},
"source": [
"## 将 Jupyter lab 配置成系统服务"
]
},
{
"cell_type": "markdown",
"metadata": {},
"source": [
"如果,你厌烦每次都要跑到 Terminal 里启动 Jupyter lab,可以把它配置成系统服务,每次开机启动它就自动运行。而你需要做的只不过是直接从浏览器中访问 [http://localhost:8888/](http://localhost:8888/)。\n",
"\n",
"```bash\n",
"code ~/Library/LaunchAgents/com.jupyter.lab.plist\n",
"```\n",
"\n",
"这条命令会让 Visual Studio Code 创建 `~/Library/LaunchAgents/com.jupyter.lab.plist` 文件并打开。\n",
"\n",
"在其中拷贝粘贴以下内容,注意,要把其中的 `your_username` 修改为你的用户名:\n",
"\n",
"``` xml\n",
"\n",
"\n",
"\n",
"\n",
"\tLabel\n",
"\tlocal.job\n",
"\tProgramArguments\n",
"\t\n",
"\t\t/Users/your_username/anaconda3/bin/jupyter\n",
"\t\tlab\n",
"\t\t--no-browser\n",
"\t\t--notebook-dir=/Users/your_username/\n",
"\t\n",
"\tRunAtLoad\n",
"\t\n",
"\tStandardErrorPath\n",
"\t/tmp/local.job.err\n",
"\tStandardOutPath\n",
"\t/tmp/local.job.out\n",
"\n",
"\n",
"```\n",
"如果之前在 `jupyter_notebook_config.py` 文件里已经设置过\n",
"\n",
"```json\n",
"c.NotebookApp.open_browser = False\n",
"c.NotebookApp.notebook_dir = '~/'\n",
"```\n",
"那么这两行就可以不要了:\n",
"\n",
"```xml\n",
"\t\t--no-browser\n",
"\t\t--notebook-dir=/Users/your_username/\n",
"```\n",
"\n",
"\n",
"而后在 Terminal 里执行:\n",
"\n",
"```bash\n",
"launchctl load ~/Library/LaunchAgents/com.jupyter.lab.plist\n",
"```\n",
"\n",
"如果你想重新启动这个服务,那么执行:\n",
"\n",
"```bash\n",
"launchctl unload ~/Library/LaunchAgents/com.jupyter.lab.plist\n",
"launchctl load ~/Library/LaunchAgents/com.jupyter.lab.plist\n",
"```"
]
},
{
"cell_type": "markdown",
"metadata": {},
"source": [
"## 关于 Jupyter lab themes"
]
},
{
"cell_type": "markdown",
"metadata": {},
"source": [
"对中文用户来说,Jupyter 的默认字号有点过小,阅读起来不是很舒适。但最佳的方案不是去寻找合适的 themes,而是直接使用支持 [Stylus](https://github.com/openstyles/stylus) 这类终端 CSS 定制插件的浏览器,Chrome/Firefox/Opera 都支持 Stylus 插件。\n",
"\n",
"我用的 Stylus 定制 CSS 是这样的:\n",
"\n",
"```css\n",
"a {color: #2456A4 !important;}\n",
"strong {color:#6392BF;}\n",
"em {color: #A9312A; font-style: normal !important;}\n",
"table {font-size: 90% !important;}\n",
"\n",
"#jp-main-dock-panel {background-color: #f9f9f9;}\n",
".jp-RenderedHTMLCommon {font-family: \"Yuanti SC\"; font-size: 100%;}\n",
".jp-Notebook {background-color: #fbfafa;}\n",
".CodeMirror, .jp-RenderedHTMLCommon pre {font-size: 90%;}\n",
".jp-RenderedHTMLCommon pre {\n",
" padding: 10px 25px;\n",
" background-color: #fafafa;\n",
" border-left: 4px solid #dadada;\n",
" border-radius: 10px;\n",
"}\n",
"\n",
".jp-RenderedHTMLCommon pre code {\n",
" background-color: #fafafa;\n",
"}\n",
"\n",
".jp-RenderedHTMLCommon h1 code,\n",
".jp-RenderedHTMLCommon h2 code,\n",
".jp-RenderedHTMLCommon h3 code,\n",
".jp-RenderedHTMLCommon h4 code,\n",
".jp-RenderedHTMLCommon p code, \n",
".jp-RenderedHTMLCommon li code,\n",
".jp-RenderedHTMLCommon blockquote p code, \n",
".jp-RenderedHTMLCommon blockquote li code,\n",
".jp-RenderedHTMLCommon td code {\n",
" background-color: #f6f6f6;\n",
" font-size: 90%;\n",
" color:#2e2e2e;\n",
" padding: 4px 4px;\n",
" margin: 0 8px;\n",
" box-shadow: 0px 1px 2px 0px rgba(0,0,0,0.2);\n",
" border-radius: 4px;\n",
"}\n",
"```\n",
"\n",
"这样就相当于我把 JupyterLab Light 这个 Theme 稍微 Tweak 了一下。\n",
"\n",
"另,我写的内容里,为了重点突出,特别定制了 `strong` 和 `em` 两个元素的显示,让它们以不同的颜色展示;又因为中文并不适合斜体展示,所以,把 `em` 的 `font-style` 设定为 `normal`……"
]
},
{
"cell_type": "markdown",
"metadata": {},
"source": [
"## 安装插件"
]
},
{
"cell_type": "markdown",
"metadata": {},
"source": [
"Jupyter notebook 经过很多年的发展,现在有很多扩展插件,但也有其中一些并不兼容最新的 Jupyter lab。不过,刚开始的时候用不着那么多插件,你只用其中的两个就足够开始了:\n",
"\n",
"> * [@jupyterlab/toc](https://github.com/jupyterlab/jupyterlab-toc)\n",
"> * [ryantam626/jupyterlab_sublime](https://github.com/ryantam626/jupyterlab_sublime)\n",
"\n",
"首先在用快捷键 `⌘ ,` 打开 jupyter lab 的 Advanced Settings,在 Extension Manager 中,添加 User Overrides:\n",
"\n",
"```json\n",
"{\n",
" \"enabled\": true\n",
"}\n",
"```\n",
"\n",
"> **注**:JupyterLab 3.x / 4.x 的 Extension Manager 已支持在 Settings 界面中直接勾选启用,不再需要手动添加上面这段 JSON 配置。\n",
"\n",
"而后在 Terminal 执行以下命令安装插件:\n",
"\n",
"```bash \n",
"jupyter labextension install @jupyterlab/toc\n",
"jupyter labextension install @ryantam626/jupyterlab_sublime\n",
"jupyter lab build\n",
"```\n",
"\n",
"toc 插件,自动将 ipynb 文件中的标题转换成目录。\n",
"\n",
"\n",
"\n",
"当在 Mac OS环境下使用`jupyter labextension install @jupyterlab/toc`命令安装 toc 插件时,可能会出现下面的错误:\n",
"```bash\n",
"jupyter labextension install @jupyterlab/toc\n",
"An error occured.\n",
"ValueError: Please install nodejs >=12.0.0 before continuing. nodejs may be installed using conda or directly from the nodejs website.\n",
"See the log file for details: /var/folders/sp/06qflh5d5vlc95zgww49ntpc0000gn/T/jupyterlab-debug-dpz_hyyz.log\n",
"```\n",
"出现错误提示时,需要使用下面的命令,来安装相对高版本的 nodejs :\n",
"```bash\n",
"conda install nodejs -c conda-forge --repodata-fn=repodata.json\n",
"```\n",
"在成功安装高版本的 nodejs 之后 ,需要重新安装 toc 插件:\n",
"```bash\n",
"jupyter labextension install @jupyterlab/toc\n",
"```\n",
"\n",
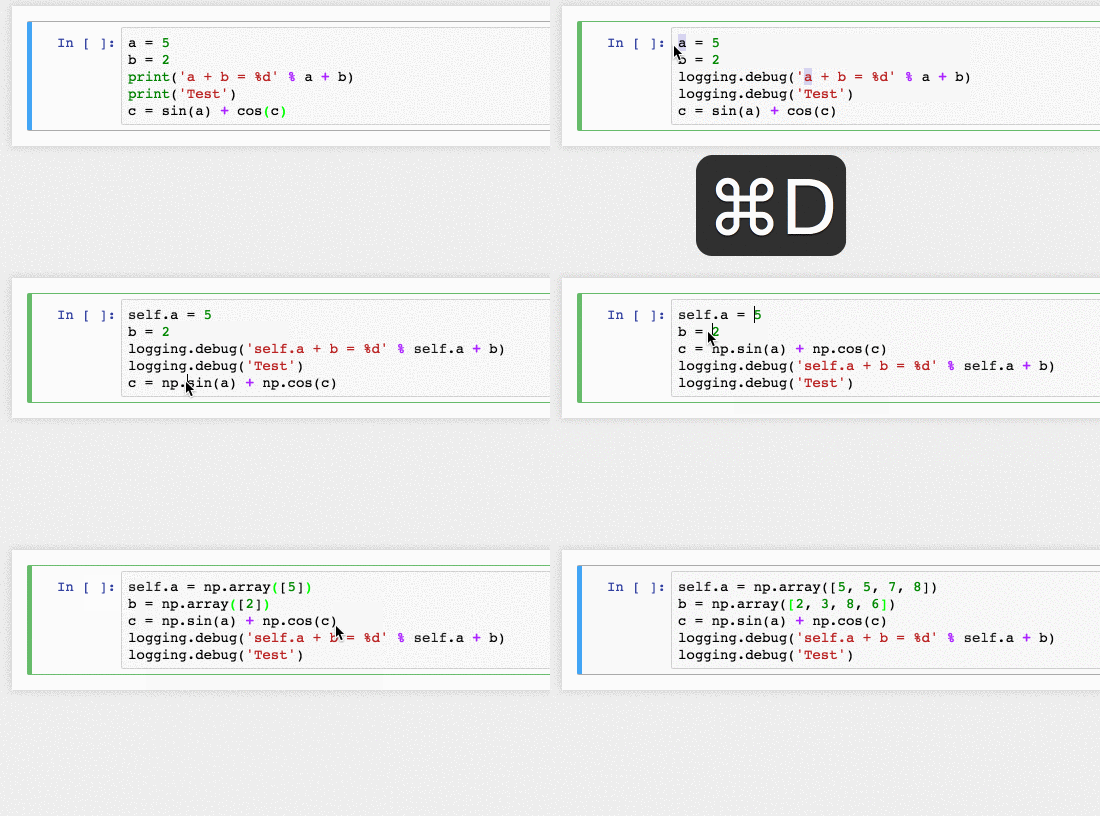
"jupyterlab_sublime 则可以让你在 Jupyter lab 的 cell 中,使用跟 SublimeText 一样的快捷键,比如 `⌘ D` 能够多选其它与当前选中内容一样的内容;比如 `⌘` 加鼠标点击,可以生成多个可编辑点……\n",
"\n",
""
]
},
{
"cell_type": "markdown",
"metadata": {},
"source": [
"## 常用快捷键"
]
},
{
"cell_type": "markdown",
"metadata": {},
"source": [
"以下是 MacOS 下 Jupyter lab 最常用的快捷键。快捷键在两种模式下执行,进入编辑模式用 `⏎`,回到命令模式用 `⎋`(ESC)。\n",
"\n",
"另外,代码编辑过程中需要安装 Jupyterlab 插件 [@ryantam626/jupyterlab_sublime](https://github.com/ryantam626/jupyterlab_sublime) 之后才能使用 “多行同时编辑功能”。\n",
"\n",
"\n",
"| 快捷键 | 说明 | 模式 |\n",
"| --------------------------------------- | ------------------------------------------------------------ | ------ |\n",
"| `ESC` | 从编辑模式回到命令模式 | 命令 |\n",
"| `A` | 在当前 Cell 之前插入一个 Cell | |\n",
"| `B` | 在当前 Cell 之后插入一个 Cell | |\n",
"| `D`, `D` | 连续按两次 `d` 键,删除当前 Cell | |\n",
"| `Y` | 将当前 Cell 设置为 Code Cell | |\n",
"| `M` | 将当前 Cell 设置为 Markdown Cell | |\n",
"| `^ ⇧ - ` | 将当前 Cell 拆分为两个 | 编辑 |\n",
"| `⇧ M` | 合并选中的 Cells | |\n",
"| `⇧ J` or `⇧ ↓` | 连续向下选中 Cells | |\n",
"| `⇧ K` or `⇧ ↑` | 连续向上选中 Cells | |\n",
"| `⇧ ⏎` or `^ ⏎` | 运行当前 Cell 中的代码 | |\n",
"| `⇧ L` | 显示/隐藏代码行号 | |\n",
"| `⏎` | 当前 Cell 进入编辑模式 | 编辑 |\n",
"| `⇥` | 自动补全代码 | |\n",
"| `⇧ ⇥` | 呼出当前光标下词汇的 Docstring | |\n",
"| `⌘ D` | Sublime Keymap: 选中下一个相同字符串 | |\n",
"| `⇧ ⌘ L` | Sublime Keymap: 在选中的行内启动多行同时编辑 | |\n",
"| `⌘ + Mouse Click` | 生成下一个可同时编辑的光标点 | |"
]
},
{
"cell_type": "markdown",
"metadata": {},
"source": [
"## 增加一些必要的快捷键"
]
},
{
"cell_type": "markdown",
"metadata": {},
"source": [
"在 Settings > Keyboard Shortcuts 中,可以设定一些常用但系统并未给出的快捷键:\n",
"\n",
"```json\n",
"{\n",
"\t\"notebook:move-cells-down-down\": {\n",
"\t\t\"command\": \"notebook:move-cell-down\",\n",
"\t\t\"keys\": [\n",
"\t\t\"Alt J\"\n",
"\t\t],\n",
"\t\t\"selector\": \".jp-Notebook:focus\",\n",
"\t\t\"title\": \"Move Cells Down\",\n",
"\t\t\"category\": \"Notebook Cell Operations\"\n",
"\t},\n",
"\t\"notebook:move-cells-down-up\": {\n",
"\t\t\"command\": \"notebook:move-cell-up\",\n",
"\t\t\"keys\": [\n",
"\t\t\"Alt K\"\n",
"\t\t],\n",
"\t\t\"selector\": \".jp-Notebook:focus\",\n",
"\t\t\"title\": \"Move Cells Down\",\n",
"\t\t\"category\": \"Notebook Cell Operations\"\n",
"\t},\n",
"\t\"notebook:enable-output-scrolling\": {\n",
"\t\t\"command\": \"notebook:enable-output-scrolling\",\n",
"\t\t\"keys\": [\n",
"\t\t\"S\"\n",
"\t\t],\n",
"\t\t\"selector\": \".jp-Notebook:focus\",\n",
"\t\t\"title\": \"Enable output scrolling\",\n",
"\t\t\"category\": \"Notebook Cell Operations\"\n",
"\t},\n",
"\t\"notebook:disable-output-scrolling\": {\n",
"\t\t\"command\": \"notebook:disable-output-scrolling\",\n",
"\t\t\"keys\": [\n",
"\t\t\"Alt S\"\n",
"\t\t],\n",
"\t\t\"selector\": \".jp-Notebook:focus\",\n",
"\t\t\"title\": \"Enable output scrolling\",\n",
"\t\t\"category\": \"Notebook Cell Operations\"\n",
"\t}\n",
"}\n",
"```\n",
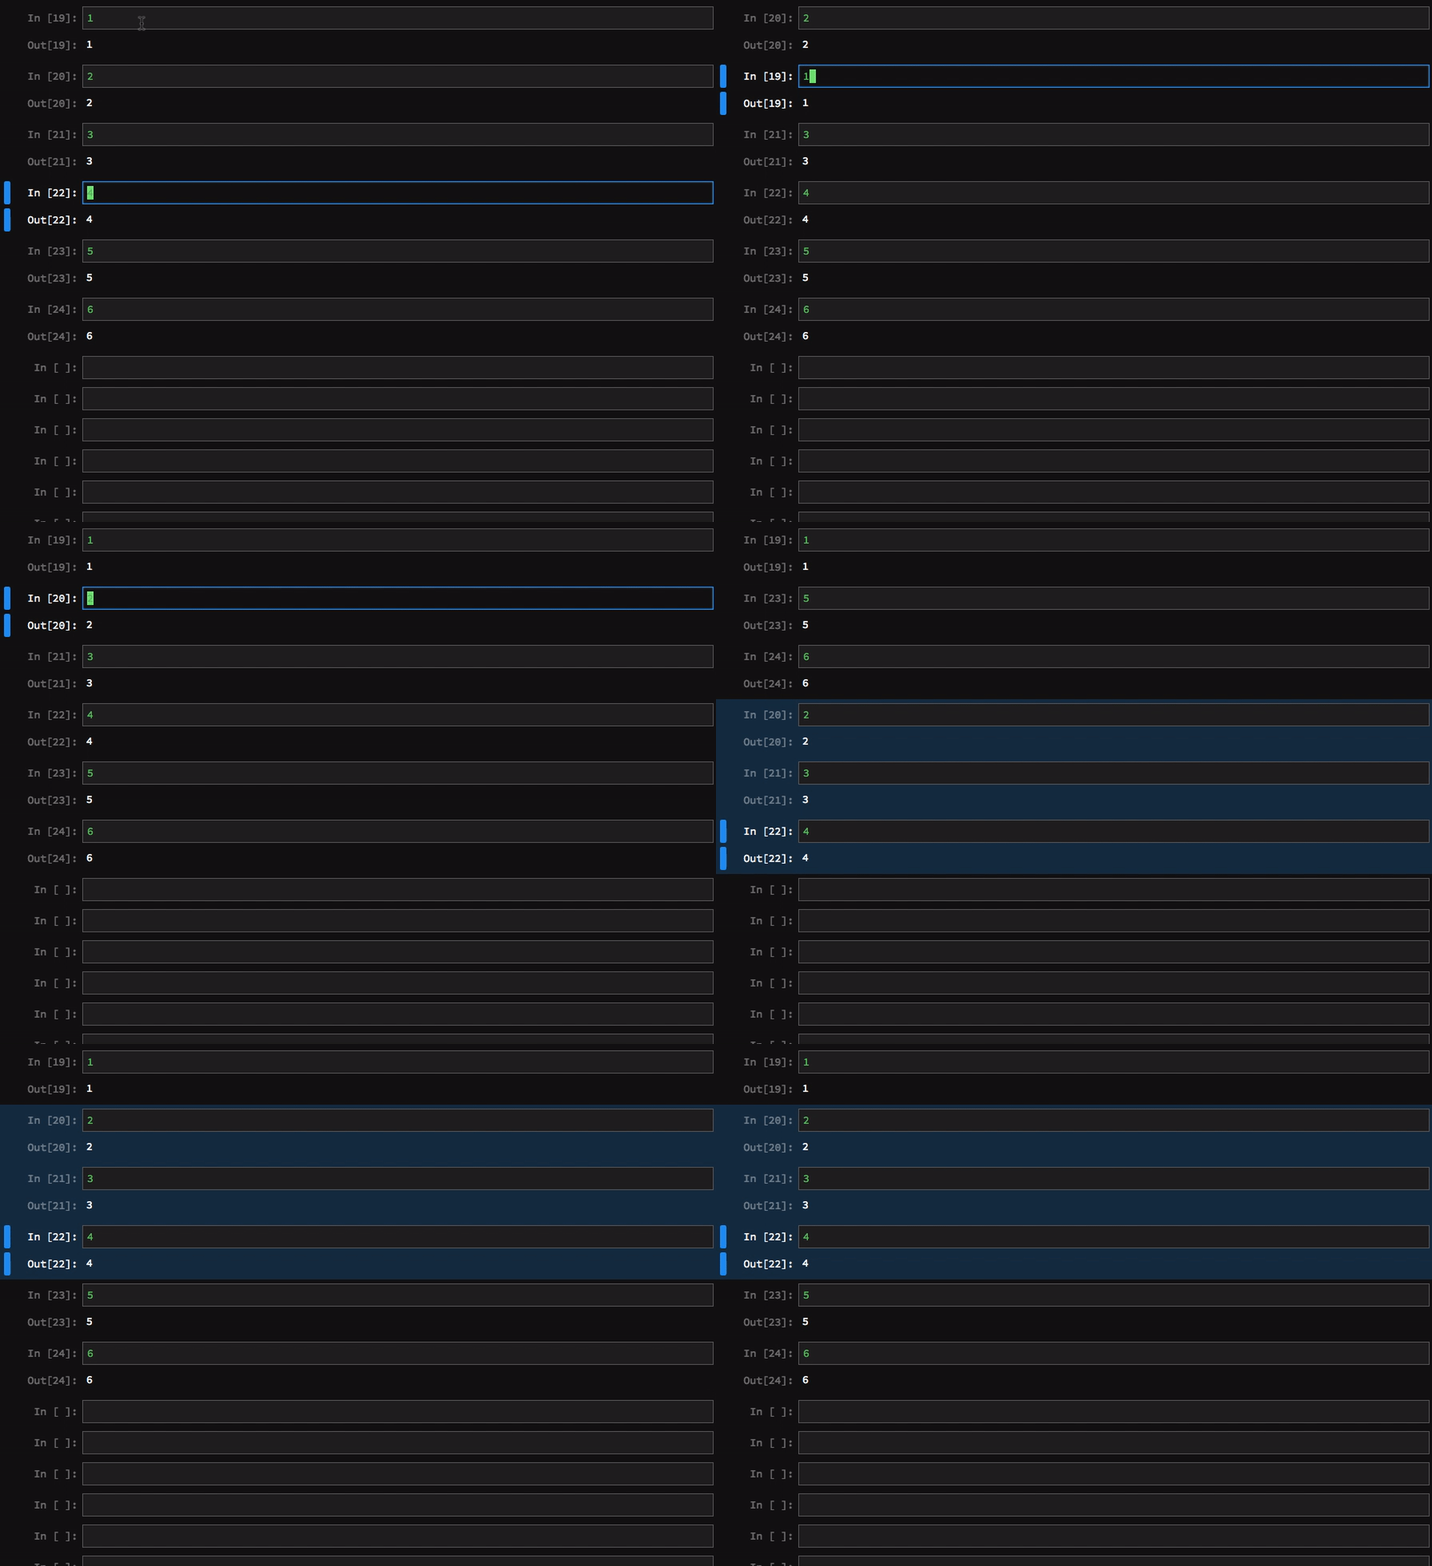
"这样就添加了 4 个快捷键:\n",
"> * `⌥ J`: Move selected cells down\n",
"> * `⌥ K`: Move selected cells up\n",
"> * `S`: Enable output scrolling\n",
"> * `⌥ S`: Disable output scrolling\n",
"\n",
"比如 Move Selected cells up:\n",
"\n",
""
]
},
{
"cell_type": "markdown",
"metadata": {},
"source": [
"## 输出所有变量内容"
]
},
{
"cell_type": "markdown",
"metadata": {},
"source": [
"默认情况下,Code Cell 只输出最后一个可以被 evaluate 的值,用 `_` 代表之前刚刚被 evaluate 的值。"
]
},
{
"cell_type": "code",
"execution_count": 16,
"metadata": {},
"outputs": [
{
"data": {
"text/plain": [
"[1, 2, 3]"
]
},
"execution_count": 16,
"metadata": {},
"output_type": "execute_result"
}
],
"source": [
"[1, 2, 3]"
]
},
{
"cell_type": "code",
"execution_count": 17,
"metadata": {},
"outputs": [
{
"data": {
"text/plain": [
"[1, 2, 3]"
]
},
"execution_count": 17,
"metadata": {},
"output_type": "execute_result"
}
],
"source": [
"_ # 执行完上面的 Cell,试试这个 Cell; 而后执行完下面的 Cell 之后再重新执行一次当前这个 Cell"
]
},
{
"cell_type": "code",
"execution_count": 13,
"metadata": {},
"outputs": [
{
"data": {
"text/plain": [
"{1, 2, 3}"
]
},
"execution_count": 13,
"metadata": {},
"output_type": "execute_result"
}
],
"source": [
"(1, 2, 3)\n",
"{1, 2, 3}"
]
},
{
"cell_type": "markdown",
"metadata": {},
"source": [
"于是,为了显示最近 evaluate 的多个值,我们总是不得不使用很多的 `print()`……\n",
"\n",
"如果觉得这事比较烦的话,可以在 Cell 最上面写上:\n",
"\n",
"```python\n",
"from IPython.core.interactiveshell import InteractiveShell\n",
"InteractiveShell.ast_node_interactivity = \"all\"\n",
"```\n",
"\n",
"如果还想更省事一点,就把这个设置写入配置文件:\n",
"\n",
"```python\n",
"c.InteractiveShell.ast_node_interactivity = \"all\"\n",
"```"
]
},
{
"cell_type": "code",
"execution_count": 21,
"metadata": {},
"outputs": [
{
"data": {
"text/plain": [
"(1, 2, 3)"
]
},
"execution_count": 21,
"metadata": {},
"output_type": "execute_result"
},
{
"data": {
"text/plain": [
"{1, 2, 3}"
]
},
"execution_count": 21,
"metadata": {},
"output_type": "execute_result"
}
],
"source": [
"from IPython.core.interactiveshell import InteractiveShell\n",
"InteractiveShell.ast_node_interactivity = \"all\"\n",
"\n",
"(1, 2, 3)\n",
"{1, 2, 3}"
]
},
{
"cell_type": "markdown",
"metadata": {},
"source": [
"## 魔法函数"
]
},
{
"cell_type": "markdown",
"metadata": {},
"source": [
"在 Code Cell 里,可以运行一些 “魔法函数”(Magic Functions),这是秉承了 IPython 的特性。绝大多数在 IPython 里能够使用的魔法函数在 Jupyterlab 里都可以直接使用。完整的 IPython 魔法函数请参照:\n",
"\n",
"> https://ipython.readthedocs.io/en/stable/interactive/magics.html\n",
"\n",
"Jupyterlab 里较为常用的魔法函数整理如下:\n",
"\n",
"| 魔法函数 | 说明 |\n",
"| -------------------- | ------------------------------------------------------------ |\n",
"| `%lsmagic` | 列出所有可被使用的 Jupyter lab 魔法函数 |\n",
"| `%run` | 在 Cell 中运行 `.py` 文件:`%run file_name` |\n",
"| `%who` | 列出所有当前 Global Scope 中的变量;类似的还有:`%who df`,`%whos` |\n",
"| `%env` | 列出当前的环境变量 |\n",
"| `%load` | 将其他文件内容导入 Cell,`%load source`,`source` 可以是文件名,也可以是 URL。|\n",
"| `%time` | 返回 Cell 内代码执行的时间,相关的还有 `%timeit` |\n",
"| `%writefile` | 把 Cell 的内容写入文件,`%write file_name`;%write -a file_name,`-a` 是追加 |\n",
"| `%matplotlib inline` | 行内展示 matplotlib 的结果 |\n",
"| `%%bash` | 运行随后的 shell 命令,比如 %%bash ls;与之类似的还有 `%%HTML`,`%%python2`,`%%python3`,`%%ruby`,`%%perl`…… |"
]
},
{
"cell_type": "markdown",
"metadata": {
"toc-hr-collapsed": true
},
"source": [
"## 桌面版 Jupyter App"
]
},
{
"cell_type": "markdown",
"metadata": {},
"source": [
"### Nteract"
]
},
{
"cell_type": "markdown",
"metadata": {},
"source": [
"支持各个操作系统,很好看、很好用。有一个小缺点是,不支持 `input()` 函数的调用。\n",
"\n",
"> https://nteract.io/desktop\n",
"\n",
""
]
},
{
"cell_type": "markdown",
"metadata": {
"toc-hr-collapsed": true
},
"source": [
"### Pineapple"
]
},
{
"cell_type": "markdown",
"metadata": {},
"source": [
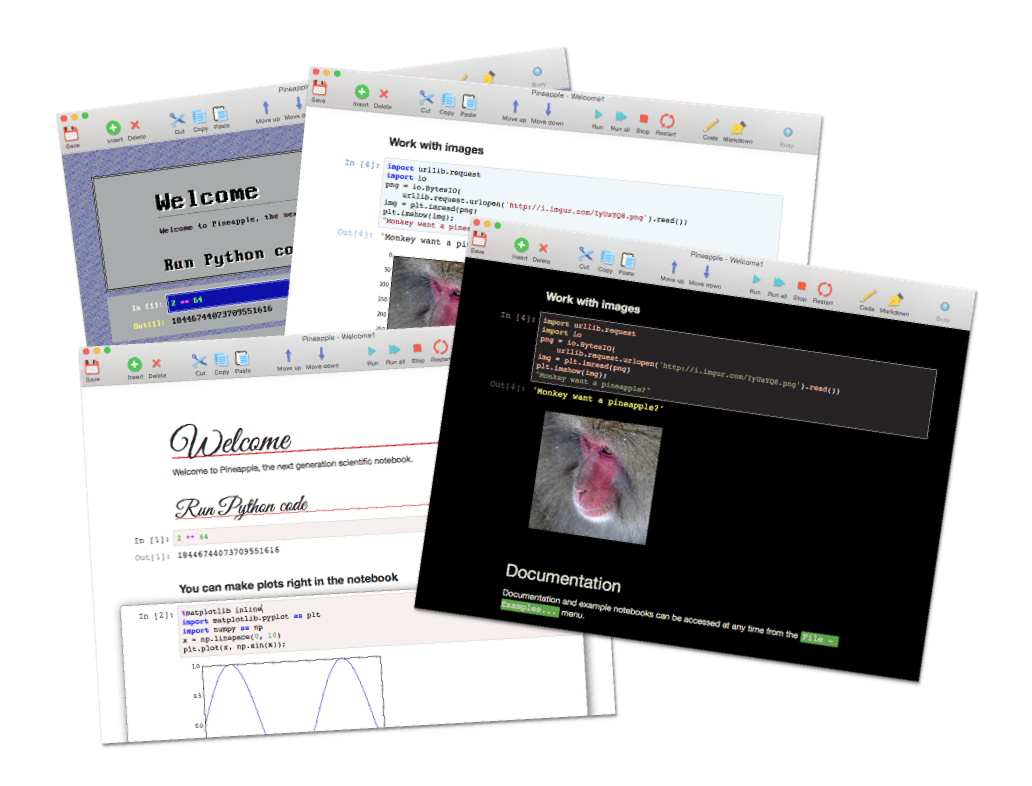
"只支持 MacOS,也很好用 —— 缺点就是很难看……\n",
"\n",
"> https://nwhitehead.github.io/pineapple/\n",
"\n",
""
]
}
],
"metadata": {
"kernelspec": {
"display_name": "Python 3",
"language": "python",
"name": "python3"
},
"language_info": {
"codemirror_mode": {
"name": "ipython",
"version": 3
},
"file_extension": ".py",
"mimetype": "text/x-python",
"name": "python",
"nbconvert_exporter": "python",
"pygments_lexer": "ipython3",
"version": "3.7.1"
},
"toc-autonumbering": true
},
"nbformat": 4,
"nbformat_minor": 2
}