# Setup Guide
**English** | [中文](SETUP.zh-CN.md)
---
## Prerequisites
| Tool | Version | Install |
|------|---------|---------|
| **Node.js** | >= 20.0.0 | [nodejs.org](https://nodejs.org/) |
| **pnpm** | >= 9.0.0 | `npm install -g pnpm` |
| **Redis** | >= 7.0 | `brew install redis` (macOS) or [redis.io](https://redis.io/download/) — *optional: use `--memory` flag to skip* |
| **Git** | any recent | Comes with most systems |
## Quick Start
### Choose an Installation Path
For most non-developer users, start with the desktop installer when a release asset is available:
| Platform | Recommended path | Notes |
|----------|------------------|-------|
| Windows | Download the `.exe` installer from [Releases](https://github.com/zts212653/clowder-ai/releases) | Bundles the runtime, portable Node.js, Redis, desktop shortcut, and first-run config generation |
| macOS | Download the `.dmg` from [Releases](https://github.com/zts212653/clowder-ai/releases) | Drag to Applications; if the unsigned app is blocked, right-click → **Open** |
| Linux | Source setup or `bash scripts/install.sh` | Desktop AppImage is not available yet |
After launching the desktop app, go to **Hub → System Settings → Account Configuration** to connect provider API keys and CLI accounts. The installer prepares the local runtime; it does not complete your third-party provider login for you.
Use the source setup below if you want to develop Clowder, run from a specific branch, or no desktop installer is available for your platform.
### Source Setup
```bash
# 1. Clone
git clone https://github.com/zts212653/clowder-ai.git
cd clowder-ai
# 2. Install
pnpm install
# 3. Build (required — creates dist/ for workspace packages)
pnpm build
# 4. Configure infrastructure (API keys are added via UI after launch)
cp .env.example .env
# 5. Run
pnpm start
# If this fails with "target path exists", use:
# pnpm start:direct
```
To enable local semantic rerank for the memory system, install the **Embedding** service from Console settings — the installer creates `~/.cat-cafe/embed-venv` with the right backend for your platform (MLX on Apple Silicon, fastembed/ONNX or sentence-transformers elsewhere). On Windows, `pnpm start` / `pnpm start:direct` then auto-launches `scripts/services/embed-server.ps1` when Console reports the service as installed + enabled. Uninstalling or disabling via Console will skip the autostart.
`pnpm start` uses the **runtime worktree** architecture: it creates an isolated `../cat-cafe-runtime` worktree (on first run), syncs it to `origin/main`, builds, starts Redis, and launches Frontend (port 3003) + API (port 3004). This keeps your development checkout clean.
> **Tip:** If `pnpm start` fails because `../cat-cafe-runtime` already exists, use `pnpm start:direct` instead — it runs directly in your current checkout without creating a worktree. You can also set a custom path: `CAT_CAFE_RUNTIME_DIR=../my-runtime pnpm start`.
Open `http://localhost:3003` and start talking to your team.
> **Alternative — One-line installer (Linux):** `bash scripts/install.sh` handles Node, pnpm, Redis, dependencies, `.env`, and first launch in one step. On **Windows**, use `scripts/install.ps1` then `scripts/start-windows.ps1`.
## How `pnpm start` Works (Runtime Worktree)
Clowder uses a **runtime worktree** to keep your dev checkout clean:
```
your-projects/
├── clowder-ai/ # Your development checkout (feature branches, edits)
└── cat-cafe-runtime/ # Auto-created runtime worktree (tracks origin/main)
```
| Command | What it does |
|---------|-------------|
| `pnpm start` | Init (first time) → sync to origin/main → build → start Redis + API + Frontend |
| `pnpm start --memory` | Same, but skip Redis (in-memory store, data lost on restart) |
| `pnpm start --quick` | Same, but skip rebuild (use existing `dist/`) |
| `pnpm start --daemon` | Same, but run in background (logs to `cat-cafe-daemon.log`) |
| `pnpm start:direct` | Bypass worktree — start from current checkout without auto-update ([details](#running-a-specific-version-without-auto-update)) |
| `pnpm stop` | Stop background daemon |
| `pnpm start:status` | Check if daemon is running |
| `pnpm runtime:init` | Only create the runtime worktree (no start) |
| `pnpm runtime:status` | Show worktree path, branch, HEAD, ahead/behind |
> Runtime contract (ADR-039 passive frozen): `pnpm start` is the single entry; sync+build+restart are folded into one command. There is no standalone sync — that was removed to prevent stale-dist crashes (see ADR-039).
First run creates `../cat-cafe-runtime` automatically. Subsequent runs do a fast-forward sync then start.
> **Custom runtime path:** Set `CAT_CAFE_RUNTIME_DIR` to use a different location: `CAT_CAFE_RUNTIME_DIR=../my-clowder-runtime pnpm start`
## Running a Specific Version (Without Auto-Update)
By default, `pnpm start` auto-syncs to the latest `origin/main`. If you want to **stay on a specific release** — for stability, reproducibility, or because you're not ready to update — use `pnpm start:direct` instead.
### Option 1: Checkout a Release Tag
Clowder publishes [tagged releases](https://github.com/zts212653/clowder-ai/releases) (`v0.1.0`, `v0.2.0`, `v0.3.0`, `v0.4.0`, etc.). To run a specific version:
```bash
# 1. Clone (or use your existing clone)
git clone https://github.com/zts212653/clowder-ai.git
cd clowder-ai
# 2. Checkout the version you want
git checkout v0.4.0 # or any tag from the Releases page
# 3. Install + build
pnpm install
pnpm build
# 4. Configure infrastructure (API keys are added via UI after launch)
cp .env.example .env
# 5. Start directly (bypasses worktree, won't auto-update)
pnpm start:direct
# No Redis? Use in-memory mode
pnpm start:direct -- --memory
```
### Option 2: Stay on Your Current Commit
If you've already cloned and are happy with the current version, just use `pnpm start:direct` instead of `pnpm start`:
```bash
pnpm start:direct # Runs from current checkout, no sync
pnpm start:direct -- --quick # Skip rebuild too
```
### Why `pnpm start:direct`?
| Command | Auto-syncs to latest? | Creates worktree? | Use case |
|---------|----------------------|-------------------|----------|
| `pnpm start` | **Yes** — syncs to `origin/main` | Yes | Always run the latest version |
| `pnpm start:direct` | **No** — runs from current checkout | No | Pin to a specific version or branch |
> **Updating later:** When you're ready to update, simply `git fetch && git checkout v0.5.0` (or whichever new tag), then `pnpm install && pnpm build && pnpm start:direct`.
## Background / Daemon Mode
By default `pnpm start` runs in the foreground — if you close the terminal or SSH disconnects, the services stop. Use `--daemon` to run in the background:
```bash
# Start in background
pnpm start --daemon
# Combine with other flags
pnpm start --daemon --memory
pnpm start --daemon --quick
# Check status
pnpm start:status
# View logs
tail -f cat-cafe-daemon.log
# Stop
pnpm stop
```
The daemon writes logs to `cat-cafe-daemon.log` in the project root (or runtime worktree root). A PID file (`~/.cat-cafe/daemon.pid`) tracks the running process.
> **Alternative approaches** (if you prefer not to use `--daemon`):
> - **tmux / screen**: `tmux new -s cat-cafe` → `pnpm start` → detach with `Ctrl+B D`
> - **nohup**: `nohup pnpm start > cat-cafe.log 2>&1 &`
> - **systemd** (Linux production): create a service file — see below
systemd service file example
```ini
# /etc/systemd/system/clowder-ai.service
[Unit]
Description=Clowder AI (Cat Café)
After=network.target
[Service]
Type=simple
User=your-user
WorkingDirectory=/path/to/clowder-ai
ExecStart=/usr/bin/pnpm start:direct
Restart=on-failure
RestartSec=5
Environment=NODE_ENV=production
[Install]
WantedBy=multi-user.target
```
```bash
sudo systemctl enable --now clowder-ai
sudo journalctl -u clowder-ai -f
```
## Configuration
### Infrastructure (`.env`)
The `.env` file configures **infrastructure only** — ports, Redis, and optional service URLs. Model API keys are managed through the web UI (see below).
**Redis** — persistent store for threads, messages, tasks, and memory:
```bash
REDIS_URL=redis://localhost:6399
```
The `pnpm start` command auto-starts Redis on port 6399. Data persists in `~/.cat-cafe/redis-dev/`.
**No Redis?** Use `pnpm start --memory` for in-memory mode (data lost on restart — fine for trying things out).
**Frontend:**
```bash
NEXT_PUBLIC_API_URL=http://localhost:3004
```
### Model Access (UI)
After launching, open `http://localhost:3003` and navigate to **Hub → System Settings → Account Configuration** to set up your model providers.
There are two types of accounts:
| Type | How It Works | Providers |
|------|-------------|-----------|
| **Built-in (OAuth / CLI subscription)** | Authenticate via the provider's CLI tool (`claude`, `codex`, `gemini`). No API key needed — the CLI subscription handles auth. | Claude, GPT/Codex, Gemini |
| **API Key** | Enter your API key + base URL for direct API access. Works with any OpenAI-compatible or Anthropic-compatible endpoint. | Claude, GPT, Gemini, **Kimi, GLM, MiniMax, Qwen, OpenRouter**, and more |
**Steps:**
1. Click **"Add Account"** in the Account Configuration tab
2. Choose a provider or add a custom one
3. For built-in providers: select OAuth/subscription mode (no key needed if CLI is authenticated)
4. For API key providers: enter your API key and (optionally) a custom base URL
5. Click **Save**
**Adding Chinese / third-party providers (Kimi, GLM, MiniMax, Qwen, OpenRouter):**
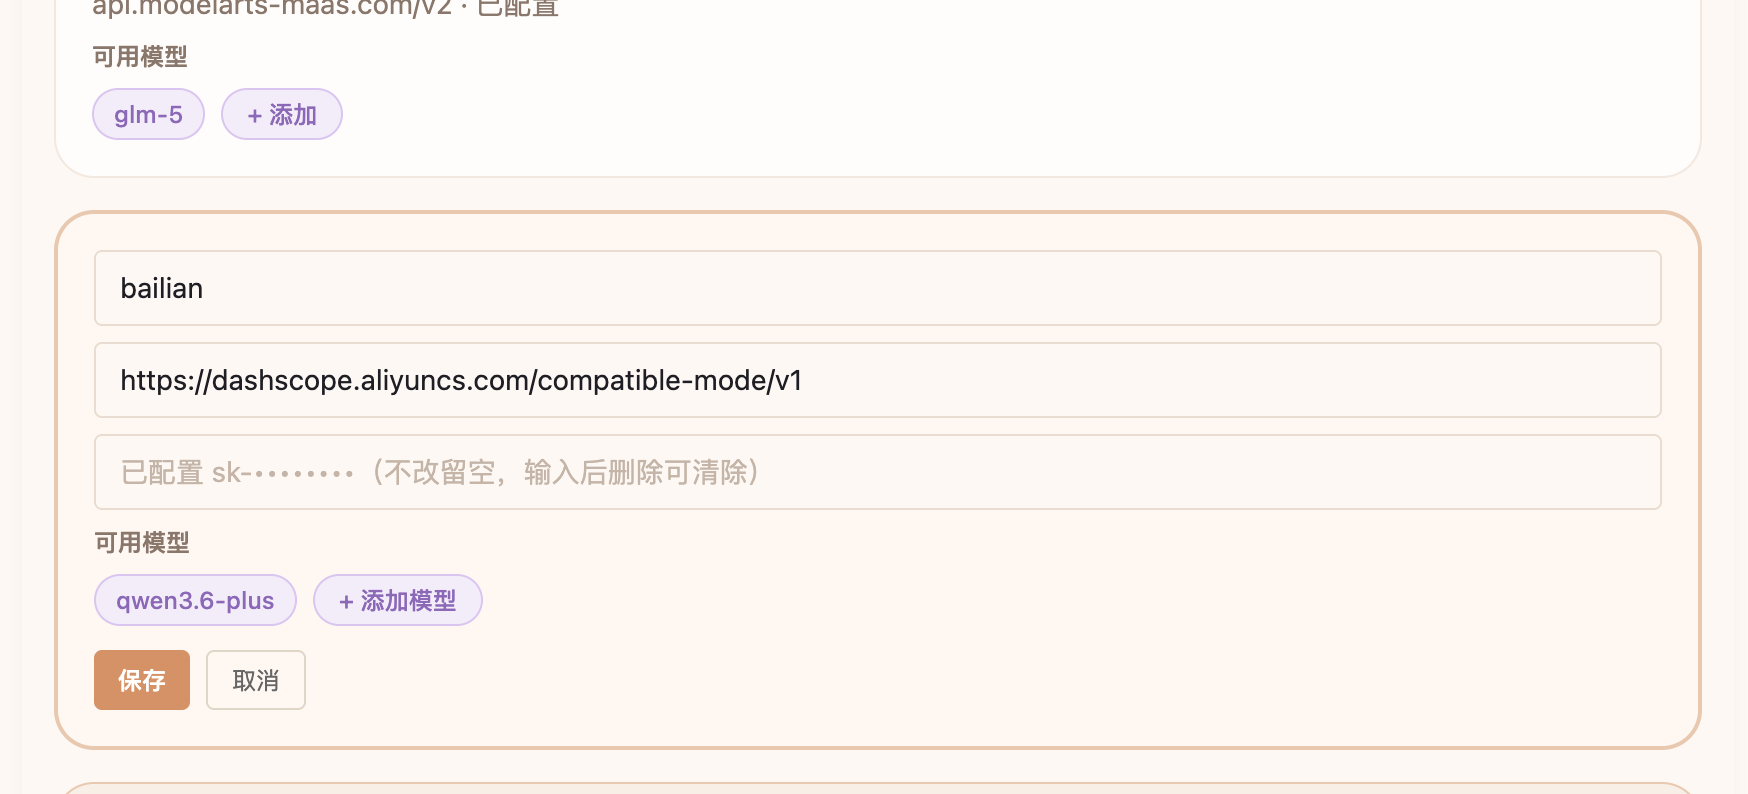
These providers are configured as API key accounts with a custom base URL. In the **Account Configuration** UI, add a new account, choose the provider, enter your API key, and set the base URL to the provider's OpenAI-compatible endpoint. Select the appropriate protocol and click **Save**.
**Example — Alibaba Bailian (Qwen):**
> **Legacy `.env` fallback:** The system still reads `ANTHROPIC_API_KEY`, `OPENAI_API_KEY`, and `GOOGLE_API_KEY` from `.env` as a fallback, but this path is deprecated. Use the UI for all new setups.
### Member Configuration
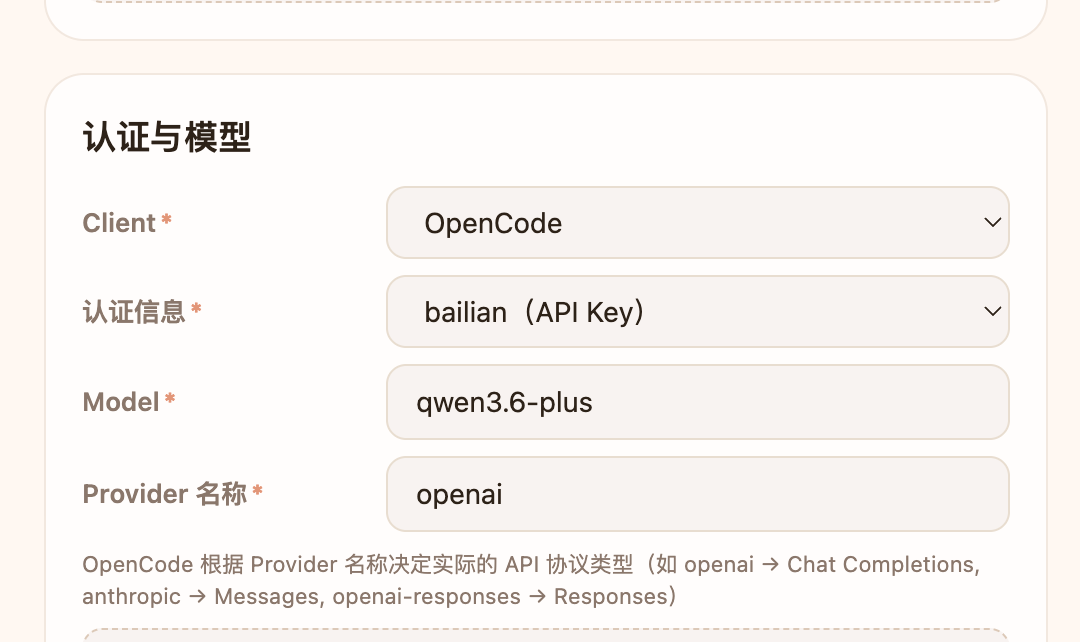
To add team members (cats) that use specific providers:
1. Go to **Hub → Member Collaboration → Overview**
2. Each member can be bound to a provider account from your Account Configuration
3. Built-in providers support OAuth; third-party providers use API key accounts
## Optional Features
Clowder works out of the box with model access and Redis (or `--memory` mode). Everything below is opt-in.
### Design Tooling (Pencil MCP)
For design tasks, UI iteration, screenshots, and design-to-code workflows, install [Pencil](https://marketplace.visualstudio.com/items?itemName=highagency.pencildev) in your editor (VS Code, Cursor, or Antigravity).
Without Pencil: Clowder still runs, coding tasks still work, design tasks degrade to plain text guidance.
**Auto-configuration:** The capability orchestrator automatically detects your Pencil installation by scanning (in order):
1. `PENCIL_MCP_BIN` environment variable (explicit path — highest priority)
2. `~/.antigravity/extensions/highagency.pencildev-*/`
3. `~/.vscode/extensions/highagency.pencildev-*/`
4. `~/.cursor/extensions/highagency.pencildev-*/`
5. `~/.vscode-insiders/extensions/highagency.pencildev-*/`
The newest version across all editors is selected. When two editors have the same version, Antigravity is preferred.
**Environment variable overrides:**
| Variable | Purpose | Example |
|----------|---------|---------|
| `PENCIL_MCP_BIN` | Force a specific Pencil binary path | `/path/to/mcp-server-darwin-arm64` |
| `PENCIL_MCP_APP` | Force which editor to connect to | `vscode`, `antigravity`, `cursor`, `vscode-insiders` |
**Diagnostics:** `pnpm mcp:doctor` shows MCP readiness (ready / missing / unresolved).
### Voice Input / Output
Talk to your cats hands-free. Requires local ASR/TTS services.
```bash
ASR_ENABLED=1
TTS_ENABLED=1
LLM_POSTPROCESS_ENABLED=1
# Speech-to-Text (ASR)
WHISPER_URL=http://localhost:9876
NEXT_PUBLIC_WHISPER_URL=http://localhost:9876
# Text-to-Speech (TTS)
TTS_URL=http://localhost:9879
TTS_CACHE_DIR=./data/tts-cache
# Speech correction (LLM post-processing)
NEXT_PUBLIC_LLM_POSTPROCESS_URL=http://localhost:9878
```
Supported engines: Qwen3-ASR (primary), Whisper (fallback) for input; Kokoro, edge-tts, Qwen3-TTS for output.
These services are disabled by default. Set the corresponding `*_ENABLED=1` flags only after you have installed the local dependencies.
**Starting voice services:**
```bash
# TTS (Text-to-Speech) — requires Python 3, creates venv at ~/.cat-cafe/tts-venv
./scripts/tts-server.sh # default: Qwen3-TTS (三猫声线)
TTS_PROVIDER=edge-tts ./scripts/tts-server.sh # edge-tts fallback (no GPU needed)
# ASR (Speech-to-Text) — requires Python 3 + ffmpeg, unified whisper-stt service
WHISPER_MODEL=mlx-community/Qwen3-ASR-1.7B-8bit ./scripts/services/whisper-server.sh # Qwen3-ASR
WHISPER_MODEL=mlx-community/whisper-large-v3-turbo ./scripts/services/whisper-server.sh # Whisper
```
> **System dependency**: `ffmpeg` is required for audio processing. Install with `brew install ffmpeg` (macOS) or `apt install ffmpeg` (Linux).
### API Gateway Proxy
Optional reverse proxy for routing API requests through third-party gateways. Useful when you need to route Claude API calls through a custom endpoint.
```bash
ANTHROPIC_PROXY_ENABLED=1 # default: 0 (disabled)
ANTHROPIC_PROXY_PORT=9877 # proxy listen port
```
Configure upstreams in `.cat-cafe/proxy-upstreams.json`:
```json
{ "my-gateway": "https://your-gateway.example.com/api" }
```
### Feishu (飞书 / Lark) Integration
Chat with your team from Feishu. Requires a self-built Feishu app.
**Step 1 — Create a Feishu app:**
Go to [Feishu Open Platform](https://open.feishu.cn/app) → Create Custom App (自建应用).
**Step 2 — Enable permissions:**
Under Permissions & Scopes (权限管理), add:
- `im:message` — read messages
- `im:message:send_as_bot` — send messages as bot
- `im:resource` — read media resources (images, files)
- `im:resource:upload` — upload media (required for native voice bubbles and image display)
> **Why `im:resource:upload`?** Without it, voice messages appear as text URLs and images are sent as links instead of native media. The bot automatically converts WAV audio to Opus format (via ffmpeg) and uploads it to Feishu for playback.
**Step 3 — Configure event subscription:**
Under Event Subscriptions (事件订阅):
- **Request URL**: `http(s)://:3004/api/connectors/feishu/webhook`
- Subscribe to event: `im.message.receive_v1`
- The system auto-responds to Feishu's URL verification challenge.
**Step 4 — Set env vars:**
```bash
FEISHU_APP_ID=cli_xxx
FEISHU_APP_SECRET=xxx
FEISHU_VERIFICATION_TOKEN=xxx # from Event Subscriptions page
```
**Step 5 — Enable the bot:**
In the Feishu app console → Bot (机器人), enable the bot capability. Users can then DM the bot to chat with your AI team.
> Currently supports DM (1:1) only. Group chat support is planned.
### Telegram Integration
> **Status: In Progress** — adapter code exists but not yet deployed/verified in production.
Chat with your team from Telegram. Requires a bot via @BotFather.
```bash
TELEGRAM_BOT_TOKEN=123456:ABC-DEF...
```
### GitHub PR Review Notifications
Get notified when GitHub review emails arrive (polls IMAP). Review comments are automatically routed to the right cat and thread.
```bash
# QQ Mail example
GITHUB_REVIEW_IMAP_USER=xxx@qq.com
GITHUB_REVIEW_IMAP_PASS= # app-specific password, not login
GITHUB_REVIEW_IMAP_HOST=imap.qq.com
GITHUB_REVIEW_IMAP_PORT=993
# Gmail example (requires 2FA + App Password)
# GITHUB_REVIEW_IMAP_USER=xxx@gmail.com
# GITHUB_REVIEW_IMAP_PASS= # Google Account → Security → App Passwords
# GITHUB_REVIEW_IMAP_HOST=imap.gmail.com
# GITHUB_REVIEW_IMAP_PORT=993
# Outlook / Hotmail example
# GITHUB_REVIEW_IMAP_USER=xxx@outlook.com
# GITHUB_REVIEW_IMAP_PASS= # Microsoft Account → Security → App Passwords
# GITHUB_REVIEW_IMAP_HOST=outlook.office365.com
# GITHUB_REVIEW_IMAP_PORT=993
# GitHub MCP tools (for PR operations + review content fetching)
GITHUB_MCP_PAT=ghp_...
```
**How routing works (3-tier):**
1. **PR Registration** (primary): Cats register PRs via `register_pr_tracking` MCP tool when they open a PR. When a review email arrives, it routes directly to that cat's thread.
2. **Title Tag** (fallback): If no registration found, the system looks for a cat name tag in the PR title (e.g., `[宪宪🐾]`) and routes to that cat's Review Inbox.
3. **Triage** (last resort): If no cat can be identified, the review goes to a Triage thread for manual assignment.
Review content is fetched via GitHub API (using `GITHUB_MCP_PAT`) for automatic severity extraction (P0/P1/P2 labeling).
### Web Push Notifications
Browser push notifications when cats need your attention.
```bash
VAPID_PUBLIC_KEY=...
VAPID_PRIVATE_KEY=...
VAPID_SUBJECT=mailto:you@example.com
```
Generate keys: `npx web-push generate-vapid-keys`
### Long-Term Memory (Evidence Store)
Project knowledge (decisions, lessons, discussions) is stored locally in SQLite — no external services required.
Each project gets its own `evidence.sqlite` file (auto-created on first run) with FTS5 full-text search. Data stays on your machine.
Cats use `search_evidence` and `reflect` MCP tools to query this store. No configuration needed — it works out of the box.
## Agent CLI Configuration
Each agent CLI (Claude Code, Codex, Gemini CLI) has its own configuration. Clowder provides project-level MCP server configs that connect agents to the platform:
- **Claude Code**: reads `.mcp.json` for MCP servers, `CLAUDE.md` for project instructions
- **Codex CLI**: reads `.codex/config.toml` for MCP servers, `AGENTS.md` for project instructions
- **Gemini CLI**: reads `.gemini/settings.json` for MCP servers, `GEMINI.md` for project instructions
### Codex CLI — "Stuck in a Box" Fix
If Codex (Maine Coon / 缅因猫) reports being unable to access files or tools, it's likely running in sandbox mode. Add these settings to your **user-level** Codex config (`~/.codex/config.toml`):
```toml
approval_policy = "on-request" # ask before dangerous ops
sandbox_mode = "danger-full-access" # allow file/network access
[sandbox_workspace_write]
network_access = true
```
> The project-level `.codex/config.toml` only contains MCP server definitions. Runtime settings like `sandbox_mode` and `approval_policy` must be set in `~/.codex/config.toml`.
## Windows Setup
Full Windows support is available via PowerShell scripts.
```powershell
# Install everything (Node.js, pnpm, Redis, CLI tools, auth)
.\scripts\install.ps1
# Start services
.\scripts\start-windows.ps1 # Full start (build + run)
.\scripts\start-windows.ps1 -Quick # Skip rebuild
.\scripts\start-windows.ps1 -Memory # No Redis (in-memory mode)
# Stop services
.\scripts\stop-windows.ps1
```
> **Note**: `scripts/install.sh` is Linux-only (Debian/RHEL). macOS users should install prerequisites manually (`brew install node pnpm redis`) and run `pnpm install && pnpm build && pnpm start`.
## Ports Overview
| Service | Port | Required |
|---------|------|----------|
| Frontend (Next.js) | 3003 | Yes |
| API Backend | 3004 | Yes |
| Redis | 6399 | Yes (or use `--memory`) |
| ASR | 9876 | No — voice input |
| TTS | 9879 | No — voice output |
| LLM Post-process | 9878 | No — speech correction |
## Useful Commands
```bash
# === Startup ===
pnpm start # Start everything (Redis + API + Frontend) via runtime worktree
pnpm start --memory # No Redis, in-memory mode
pnpm start --quick # Skip rebuild, use existing dist/
pnpm start --daemon # Start in background (daemon mode)
pnpm start:direct # Start dev server directly (bypasses worktree)
# === Daemon Management ===
pnpm stop # Stop background daemon
pnpm start:status # Check if daemon is running
# View logs: tail -f cat-cafe-daemon.log
# === Runtime Worktree (ADR-039 passive frozen) ===
pnpm runtime:init # Create runtime worktree (first time only)
pnpm runtime:start # Single entry: sync + build + start (no standalone sync)
pnpm runtime:status # Show worktree status
# === Build & Test ===
pnpm build # Build all packages
pnpm dev # Run all packages in parallel dev mode
pnpm test # Run all tests
# === Code Quality ===
pnpm check # Biome lint + format + feature doc + env-port drift checks
pnpm check:fix # Auto-fix lint issues
pnpm lint # TypeScript type check (per-package)
pnpm check:deps # Dependency graph check (depcruise)
pnpm check:lockfile # Verify lockfile integrity
pnpm check:features # Feature doc compliance check
pnpm check:env-ports # Env-port drift detection
# === Redis ===
pnpm redis:user:start # Start Redis manually
pnpm redis:user:stop # Stop Redis
pnpm redis:user:status # Check Redis status
pnpm redis:user:backup # Manual backup
# Redis auto-backup (cron-based)
pnpm redis:user:autobackup:install # Install autobackup cron job
pnpm redis:user:autobackup:run # Run backup now
pnpm redis:user:autobackup:status # Check autobackup status
pnpm redis:user:autobackup:uninstall # Remove autobackup cron job
# === Thread Exports ===
pnpm threads:sync # Sync thread exports
pnpm threads:status # Check thread export status
pnpm threads:export:redis # Export threads from Redis
pnpm threads:export:redis:dry-run # Dry-run export
# Thread auto-save (cron-based)
pnpm threads:autosave:install # Install autosave cron job
pnpm threads:autosave:run # Run autosave now
pnpm threads:autosave:status # Check autosave status
pnpm threads:autosave:uninstall # Remove autosave cron job
# === Alpha Worktree (pre-release testing) ===
pnpm alpha:init # Create alpha worktree (../cat-cafe-alpha)
pnpm alpha:sync # Sync alpha worktree to origin/main
pnpm alpha:start # Start alpha environment (ports 3011/3012)
pnpm alpha:status # Show alpha worktree status
pnpm alpha:test # Run alpha integration tests
```
## Remote Deployment
All services are configured via environment variables — **no code changes needed** for remote deployment. Add these to your `.env`:
### Required Changes
```bash
# API must listen on all interfaces (default is 127.0.0.1 = localhost only)
API_SERVER_HOST=0.0.0.0
# Frontend URL — used for CORS and redirects
FRONTEND_URL=https://your-domain.com
# API URL — usually not needed behind a reverse proxy (auto-detected).
# Only set if you need a non-standard endpoint (e.g. separate API domain).
# NEXT_PUBLIC_API_URL=https://api.your-domain.com
# Redis — if running on a separate host
REDIS_URL=redis://your-redis-host:6399
```
### Optional: Voice Services
If voice services run on a different machine, update their URLs:
```bash
WHISPER_URL=http://your-asr-host:9876
NEXT_PUBLIC_WHISPER_URL=http://your-asr-host:9876
TTS_URL=http://your-tts-host:9879
NEXT_PUBLIC_LLM_POSTPROCESS_URL=http://your-llm-host:9878
```
> **Python services** (ASR/TTS/embed) bind to `127.0.0.1` by default. Add `--host 0.0.0.0` when starting them on a separate machine.
### CORS
The API automatically accepts requests from:
- `localhost` / `127.0.0.1` (any port)
- The `FRONTEND_URL` you set
If you open Cat Cafe directly from a LAN / Tailscale IP (for example `http://192.168.x.x:3003` or `http://100.x.x.x:3003`), also set:
```bash
API_SERVER_HOST=0.0.0.0
CORS_ALLOW_PRIVATE_NETWORK=true
```
This opt-in trusts browsers from RFC 1918 private networks (`10.x.x.x`, `172.16-31.x.x`, `192.168.x.x`) and Tailscale IPs (`100.x.x.x`). If you use a reverse proxy or a fixed `FRONTEND_URL`, you usually do not need the extra flag.
### Owner Identity for LAN/Remote Mode
When the API is accessible from non-localhost addresses (`API_SERVER_HOST=0.0.0.0`), most privileged write operations (sensitive env vars, connector credentials, skill sync, default cat) require `DEFAULT_OWNER_USER_ID` to be set. Without it, these writes are rejected with 403 to prevent unauthorized LAN access. Plugin/capability config writes remain direct-localhost-only regardless of this setting.
```bash
# Required for LAN/Tailscale/remote deployments that need privileged writes
DEFAULT_OWNER_USER_ID=your-user-id
```
Local (localhost) deployments do **not** need this — all privileged writes work without it in single-user mode.
## Troubleshooting
**`pnpm start` fails with "target path exists"?**
- The runtime worktree path `../cat-cafe-runtime` is already occupied by another project or directory
- **Quick fix:** Use `pnpm start:direct` to bypass the worktree and run directly in your checkout
- **Alternative:** Set a custom runtime path: `CAT_CAFE_RUNTIME_DIR=../my-clowder-runtime pnpm start`
- If you don't need Redis: `pnpm start:direct -- --memory`
**Redis won't start?**
- Check if port 6399 is in use: `lsof -i :6399`
- Make sure Redis is installed: `redis-server --version`
**No agents responding?**
- Check that you've added at least one provider account in **Hub → System Settings → Account Configuration**
- If using CLI auth, verify it's working (`claude --version`, `codex --version`)
- Check the API logs in terminal for auth errors
**Frontend can't connect to API?**
- For local dev, `NEXT_PUBLIC_API_URL=http://localhost:3004` should be in `.env`
- Behind a reverse proxy, the frontend auto-detects the API at the same origin — make sure Nginx proxies `/api/` and `/socket.io/` to port 3004
- API must be running before frontend loads