MicroLab
The MicroLab is an open-source, DIY, automated controlled lab reactor (CLR) that people can assemble with parts available online. We hope this will do for chemistry what the 3D printer did for manufacturing: provide a DIY, hackable, low-cost method to design and produce certain needful things that otherwise would be out of reach.
The MicroLab Suite
For the MicroLab to be accessible to the most people, it was developed as part of a hardware/software stack called the MicroLab Suite. The different software programs help take the information about a compound you want to make and translate it into a recipe (code) that the MicroLab runs to create the compound.
On the About the MicroLab and MicroLab Suite page, you can find an introduction to the project with answers to common questions like:
- What the heck is a CLR?
- What's in the MicroLab Suite?
- And...
- Why we are doing this at all?

In this repo:
solderless-microlab
├─ backend/ - Python files for the services that control the state and hardware
├─ design/  - Desktop wallpaper and other design files
├─ docker/  - Docker files
├─ docs/    - Documentation for the project including build instructions, background, parts list, and troubleshooting
├─ gui/     - React app that runs the GUI
├─ parts/   - 3d-printable part files for the 1.0+ version
├─ scripts/ - Scripts that start / stop services and flash the Arduino
│  ├─ disk-image - Scripts that build a MicroLab disk image
│  ├─ grbl       - Custom grbl code that allows the Arduino to control the hardware
Architecture
The Microlab stack
The Microlab is essentially a full-stack web application whose backend has access to control a set of hardware.
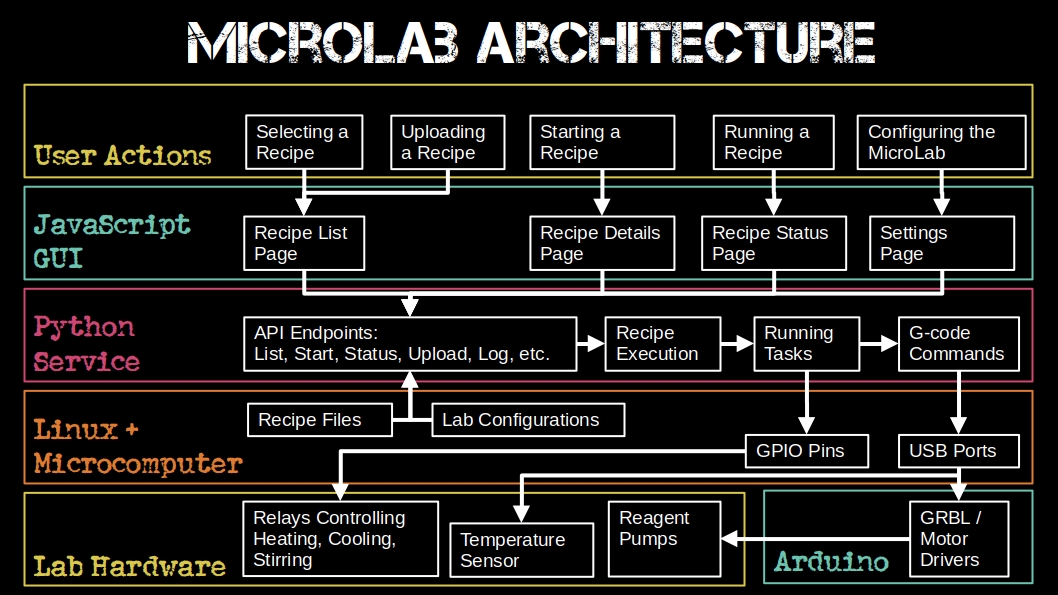
Running a Recipe
Running a recipe involves taking user input in the form of a recipe file and tapping on the touchscreen to perform a series of automated and manual tasks to execute a chemical reaction.

Getting Started Making Your MicroLab
This section is for you if you want to build a MicroLab and start using it. We tried to make building the MicroLab friendly for folks newer to electronics, but you will need some knowledge and skills with electronics (or the patience to learn a few things).
- Learn About the MicroLab and MicroLab Suite so you have an understanding of what you are building.
- Start here for How to build & use the MicroLab and MicroLab Suite
Getting Started Developing the MicroLab
This section is for you if you want to help develop the MicroLab and will need to tinker with the code base. If you're thinking about doing this, be sure to check out the development wiki and the current issues planned for development.
You will need to get a copy of the MicroLab software, set up your development environment either with a Docker container, on a Pi, or locally on your computer.
Installing the MicroLab software locally
Use the instructions below for a fresh install of the MicroLab software on your machine.
If you intend to construct a full MicroLab, we recommend using our build scripts to make a disk image. You can also find the latest release of the disk image scripts in this repo in the /scripts/disk-image directory. We do not recommend running these scripts directly on the Raspberry Pi. See below if you want to run a development environment on another computer.
Dev Environment Option 1: Docker Development
For ease of setup/experimentation we added docker containers for both the GUI and the API. If you don't have docker-compose installed on your system you can install docker desktop following these docs
git clone https://github.com/FourThievesVinegar/solderless-microlab.git
cd solderless-microlab

## To run API & GUI
docker-compose up --build gui

## Alternatively
## To run just the API
docker-compose up --build api
If you're running docker with a hardware setup you'll need to edit docker-compose.yml and uncomment the lines specified in the file.
Docker-compose mounts docker/microlab-docker.ini local file as /etc/microlab/microlab.ini in the container. To modify microlab config
just edit docker/microlab-docker.ini file and restart the container in docker-compose.
For making local development simpler - backend/ directory is also mounted as container's /app directory. Any local file change is automatically reflected in the container but in most cases you would also need to restart container anyway so the python processes load from updated files.
Dev Environment Option 2: Laptop Setup
Clone the repo:
git clone https://github.com/FourThievesVinegar/solderless-microlab.git
cd solderless-microlab
API Server
Install dependencies:
Python
(for Debian / Ubuntu)
sudo apt update
sudo apt install python3 python3-pip python-virtualenv python3-virtualenv
The backend is tested against CPython 3.9 to 3.13.
Note: some versions of Linux have dropped support for Python2 and python-virtualenv.
(for macOS)
brew update
brew install python3
pip3 install virtualenv
Set up a Python virtual environment: virtualenv -p python3 --system-site-packages .venv
cd backend
virtualenv -p python3 --system-site-packages .venv
source .venv/bin/activate
(env) $ pip install -r requirements.txt
Install needed packages
(on the Pi)
sudo apt -y install screen git python3-flask python3-pip python3-serial
Start the server
(env) $ python main.py
Web GUI
Install dependencies
(for Debian / Ubuntu)
Follow a guide to install yarn for Debian:
https://classic.yarnpkg.com/en/docs/install/#debian-stable
In summary:
curl -sS https://dl.yarnpkg.com/debian/pubkey.gpg | sudo apt-key add -
echo "deb https://dl.yarnpkg.com/debian/ stable main" | sudo tee /etc/apt/sources.list.d/yarn.list
sudo apt update
sudo apt install yarn
(for macOS)
brew update
brew install yarn
Run the GUI:
cd gui
yarn install
yarn start
The GUI will now be listening on port 3000.
MicroLab Hardware Options
Hardware Emulation
To run the software without a functioning hardware environment, go to the settings menu and change the "MicroLab Controller" setting to "simulation-pi" and "Lab Hardware Config" to "ftv_simulation_microlabv0.5.0"
MicroLab Setup - Enabling SSH
If you have a MicroLab to run the software on, you may want to enable SSH on the Pi. This makes remote development easier. Instructions for doing so can be found here: https://itsfoss.com/ssh-into-raspberry/
Start Developing
Once your environment is setup, head on over to the Backend README