
Expressive Portrait Image Animation for Live Streaming
Zhiyuan Li1,2,3 · Chi-Man Pun1,📪 · Chen Fang2 · Jue Wang2 · Xiaodong Cun3,📪
1 University of Macau 2 Dzine.ai 3 GVC Lab, Great Bay University


📋 TODO
- If you find PersonaLive useful or interesting, please give us a Star🌟! Your support drives us to keep improving.
- Fix bugs (If you encounter any issues, please feel free to open an issue or contact me! 🙏)
- [2026.05.15] 🔥 Release
training code. - [2026.02.21] 🥳 PersonaLive is accepted by CVPR2026 🎉.
- [2025.12.29] 🔥 Enhance WebUI (Support reference image replacement).
- [2025.12.22] 🔥 Supported streaming strategy in offline inference to generate long videos on 12GB VRAM!
- [2025.12.17] 🔥 ComfyUI-PersonaLive is now supported! (Thanks to @okdalto)
- [2025.12.15] 🔥 Release
paper! - [2025.12.12] 🔥 Release
inference code,config, andpretrained weights!
⚖️ Disclaimer
- This project is released for academic research only.
- Users must not use this repository to generate harmful, defamatory, or illegal content.
- The authors bear no responsibility for any misuse or legal consequences arising from the use of this tool.
- By using this code, you agree that you are solely responsible for any content generated.
⚙️ Framework
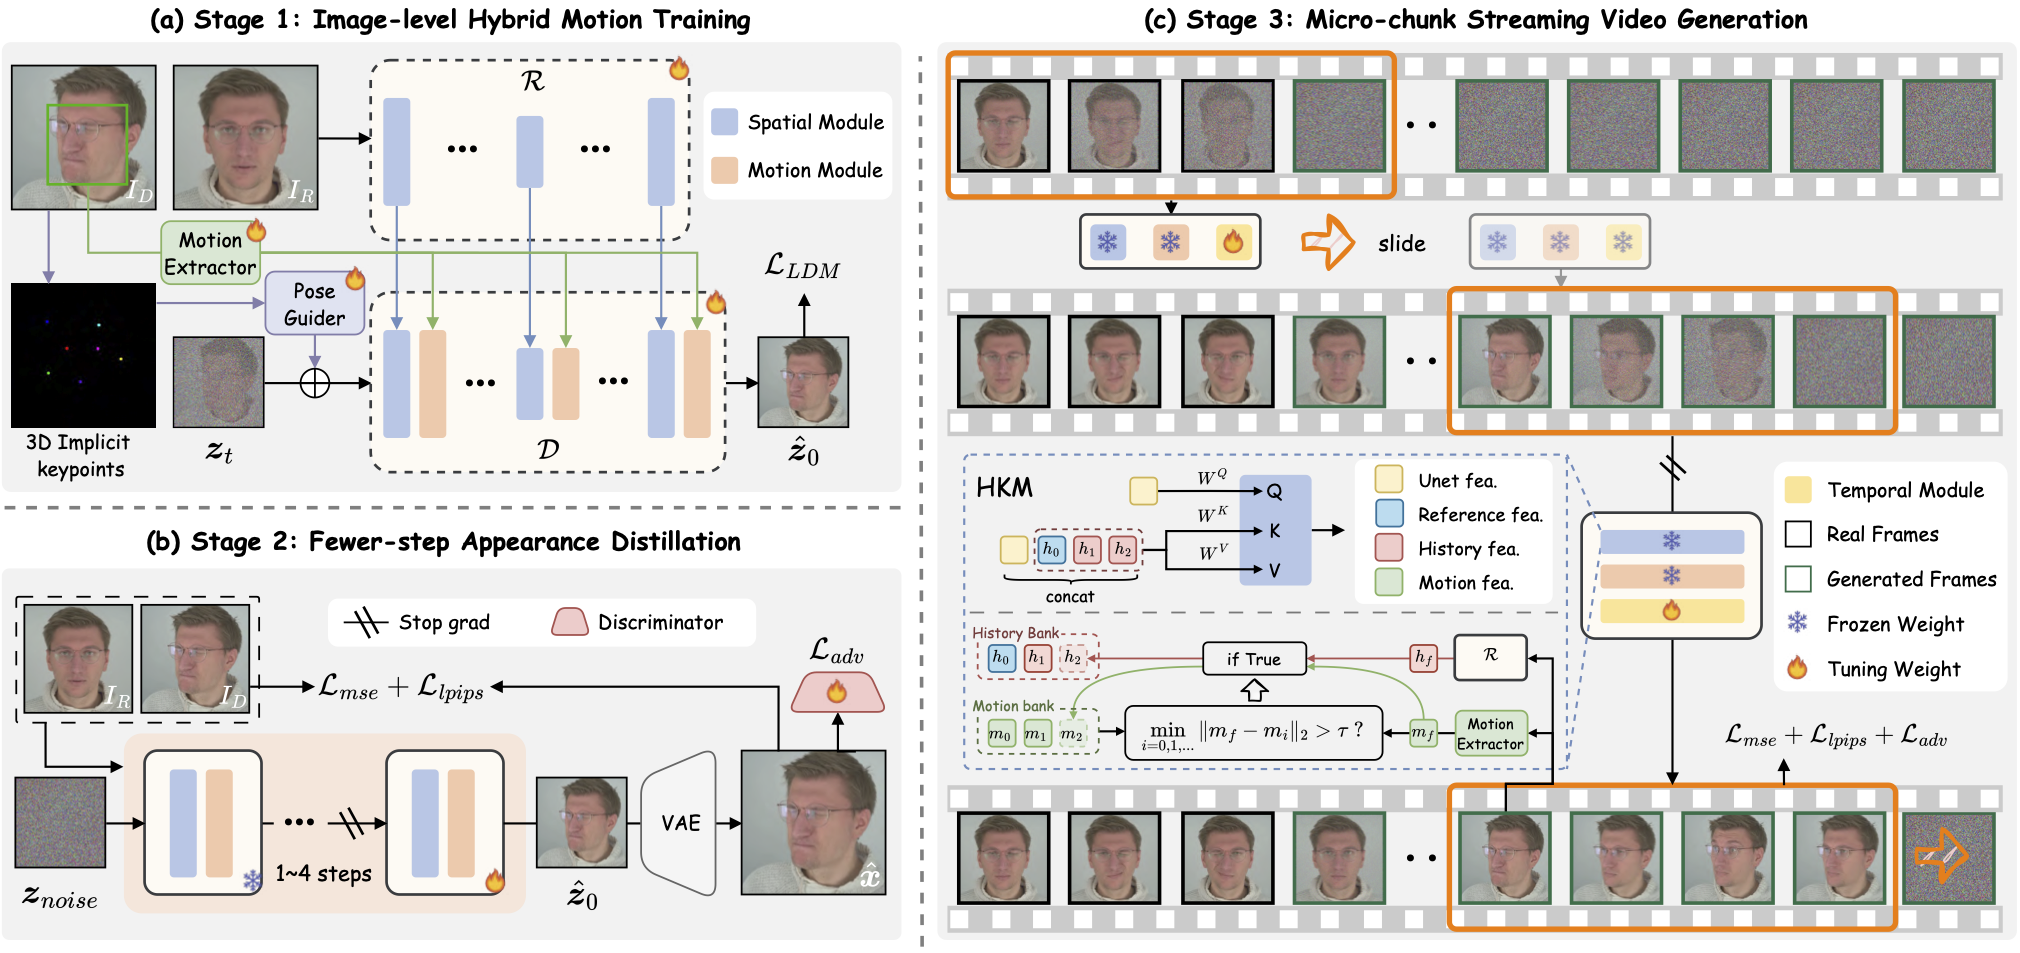
We present PersonaLive, a real-time and streamable diffusion framework capable of generating infinite-length portrait animations.
🚀 Getting Started
🛠 Installation
# clone this repo
git clone https://github.com/GVCLab/PersonaLive
cd PersonaLive

# Create conda environment
conda create -n personalive python=3.10
conda activate personalive

# Install packages with pip
pip install -r requirements_base.txt
⏬ Download weights
Option 1: Download pre-trained weights of base models and other components (sd-image-variations-diffusers and sd-vae-ft-mse). You can run the following command to download weights automatically:
python tools/download_weights.py
Option 2: Download pre-trained weights into the ./pretrained_weights folder from one of the below URLs:
Finally, these weights should be organized as follows:
pretrained_weights
├── onnx
│   ├── unet_opt
│   │   ├── unet_opt.onnx
│   │   └── unet_opt.onnx.data
│   └── unet
├── personalive
│   ├── denoising_unet.pth
│   ├── motion_encoder.pth
│   ├── motion_extractor.pth
│   ├── pose_guider.pth
│   ├── reference_unet.pth
│   └── temporal_module.pth
├── sd-vae-ft-mse
│   ├── diffusion_pytorch_model.bin
│   └── config.json
├── sd-image-variations-diffusers
│   ├── image_encoder
│   │   ├── pytorch_model.bin
│   │   └── config.json
│   ├── unet
│   │   ├── diffusion_pytorch_model.bin
│   │   └── config.json
│   └── model_index.json
└── tensorrt
    └── unet_work.engine
🎞️ Offline Inference
Run offline inference with the default configuration:
python inference_offline.py
-L: Max number of frames to generate. (Default: 100)--use_xformers: Enable xFormers memory efficient attention. (Default: True)--stream_gen: Enable streaming generation strategy. (Default: True)--reference_image: Path to a specific reference image. Overrides settings in config.--driving_video: Path to a specific driving video. Overrides settings in config.
⚠️ Note for RTX 50-Series (Blackwell) Users: xformers is not yet fully compatible with the new architecture. To avoid crashes, please disable it by running:
python inference_offline.py --use_xformers False
📸 Online Inference
📦 Setup Web UI
# install Node.js 18+
curl -o- https://raw.githubusercontent.com/nvm-sh/nvm/v0.39.1/install.sh | bash
nvm install 18

source web_start.sh
🏎️ Acceleration (Optional)
Converting the model to TensorRT can significantly speed up inference (~ 2x ⚡️). Building the engine may take about 20 minutes depending on your device. Note that TensorRT optimizations may lead to slight variations or a small drop in output quality.
# Install packages with pip
pip install -r requirements_trt.txt

# src/models/motion_encoder/FAN_temporal_feature_extractor.py
self.pos_embed.pos_embed.requires_grad = False

# Converting the model to TensorRT
python torch2trt.py
💡 PyCUDA Installation Issues: If you encounter a "Failed to build wheel for pycuda" error during the installation above, please follow these steps:
# Install PyCUDA manually using Conda (avoids compilation issues):
conda install -c conda-forge pycuda "numpy<2.0"

# Open requirements_trt.txt and comment out or remove the line "pycuda==2024.1.2"

# Install other packages with pip
pip install -r requirements_trt.txt

# Converting the model to TensorRT
python torch2trt.py
⚠️ The provided TensorRT model is from an H100. We recommend ALL users (including H100 users) re-run python torch2trt.py locally to ensure best compatibility.
▶️ Start Streaming
python inference_online.py --acceleration none (for RTX 50-Series) or xformers or tensorrt
Then open http://0.0.0.0:7860 in your browser. (*If http://0.0.0.0:7860 does not work well, try http://localhost:7860)
How to use: Upload Image ➡️ Fuse Reference ➡️ Start Animation ➡️ Enjoy! 🎉
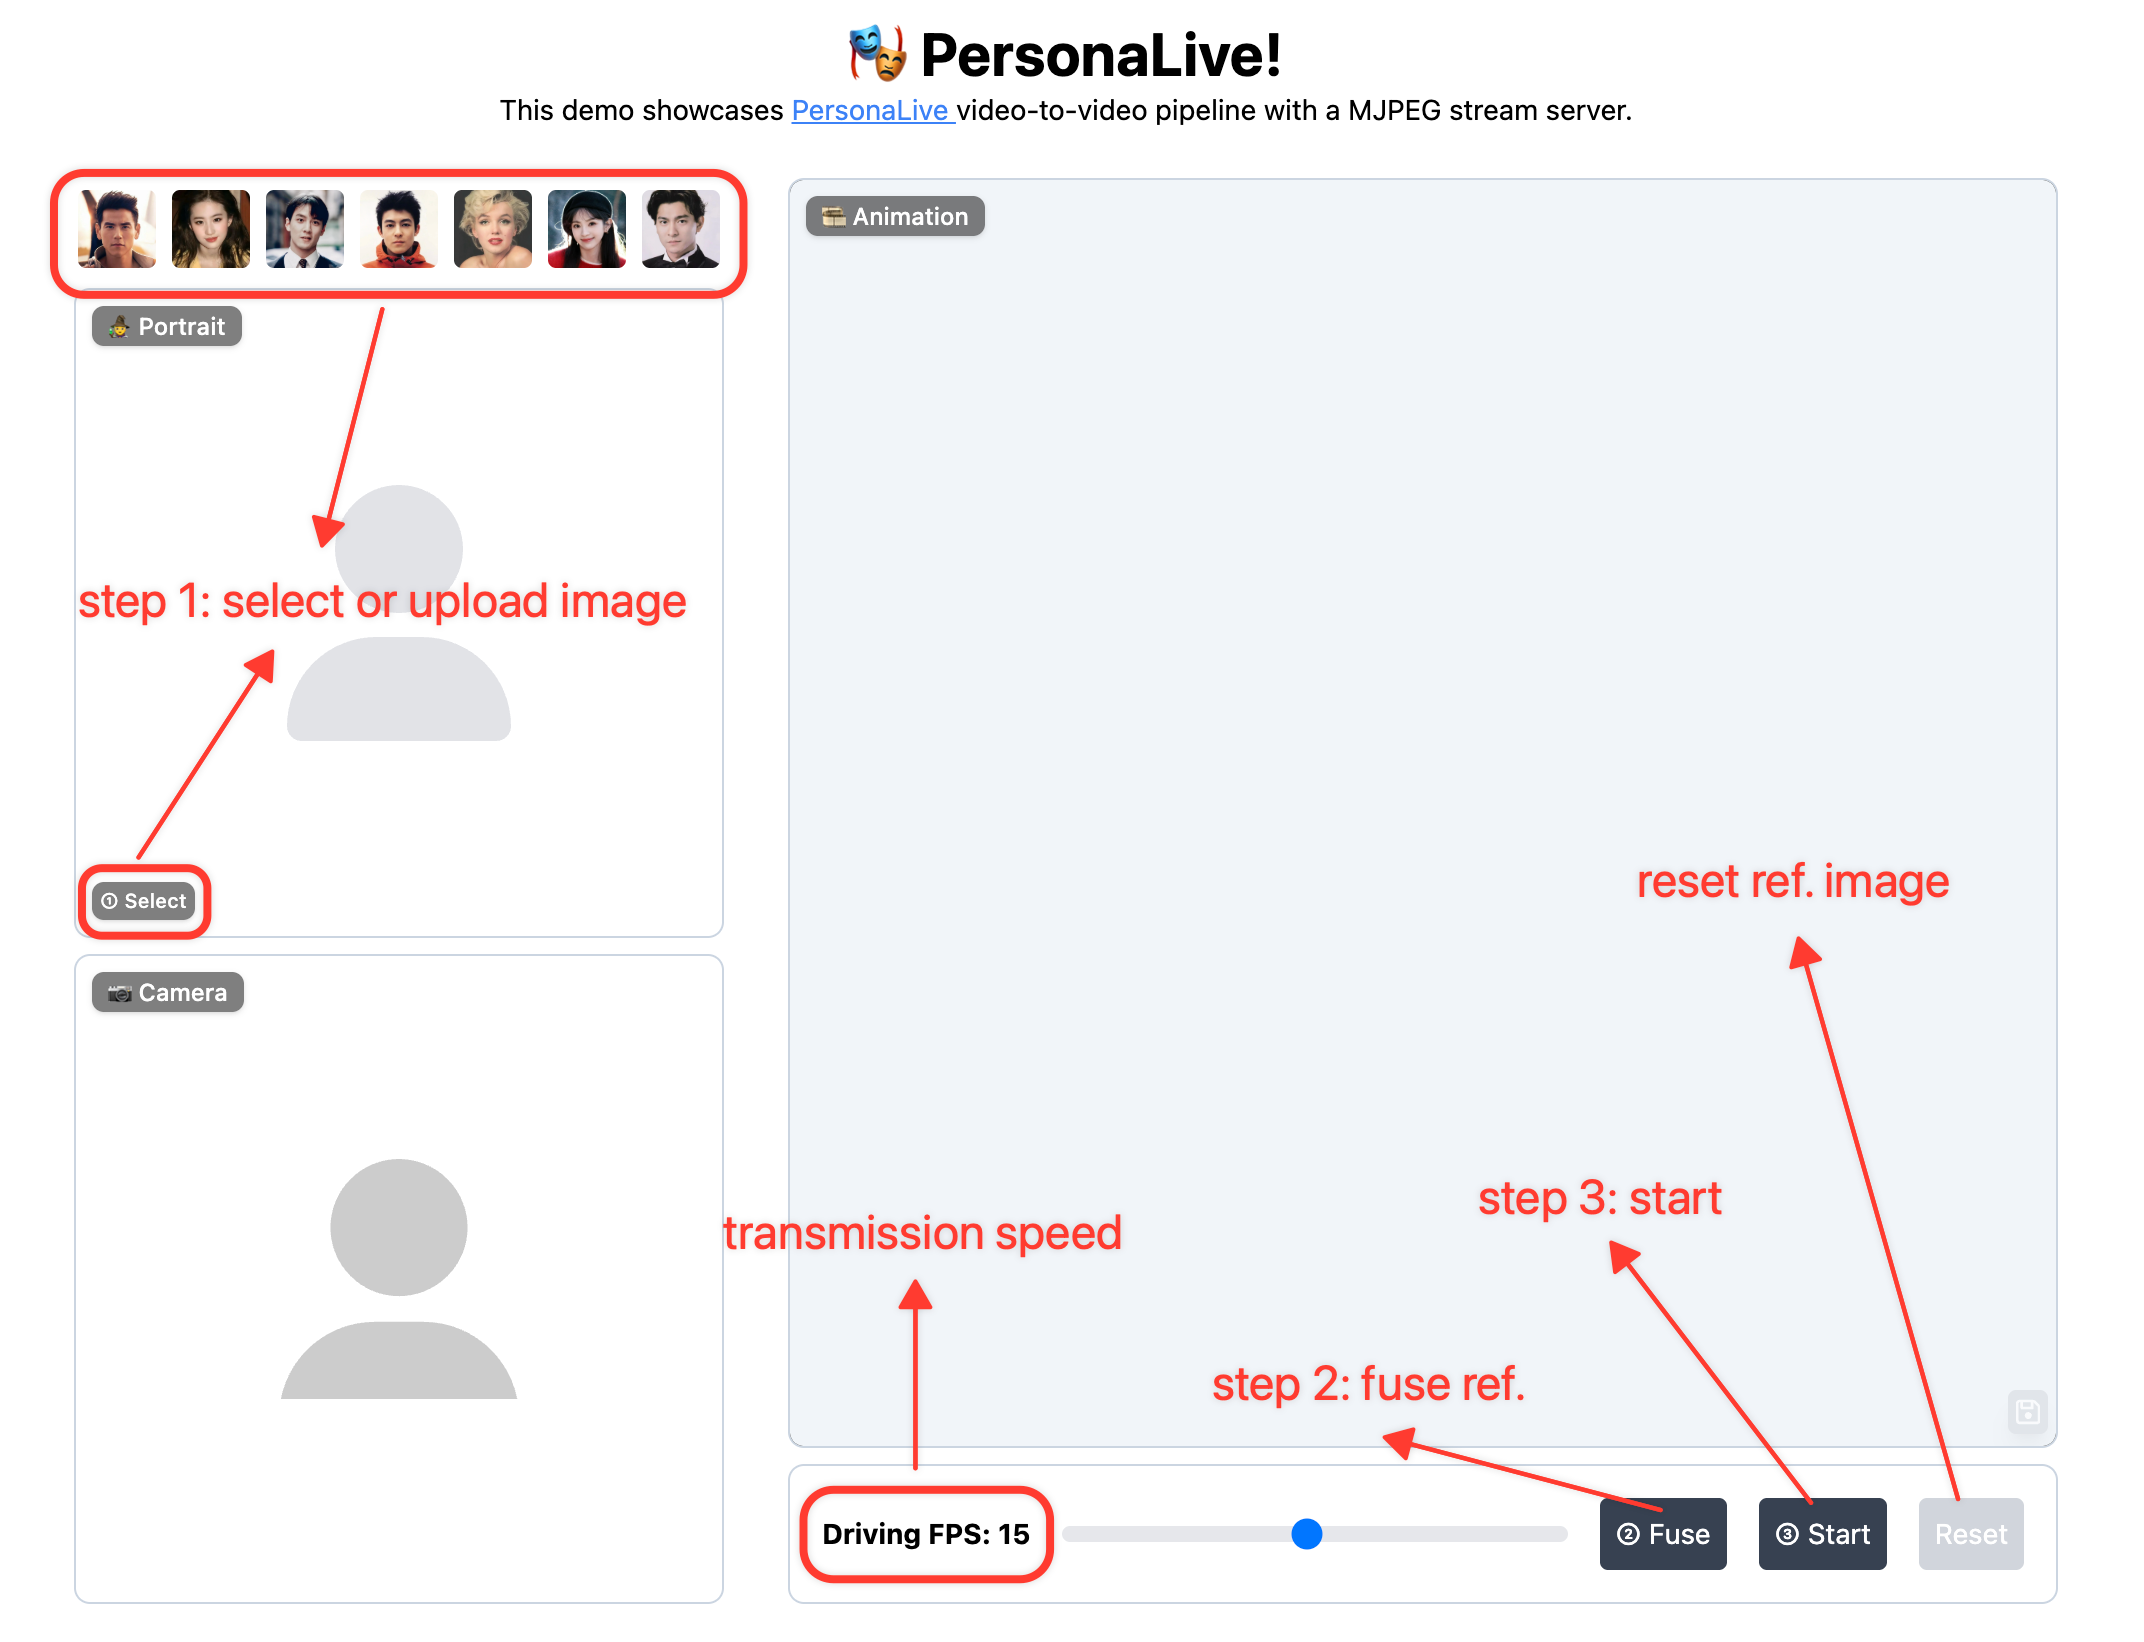
Regarding Latency: Latency varies depending on your device's computing power. You can try the following methods to optimize it:
- Lower the "Driving FPS" setting in the WebUI to reduce the computational workload.
- You can increase the multiplier (e.g., set to
num_frames_needed * 4or higher) to better match your device's inference speed. https://github.com/GVCLab/PersonaLive/blob/6953d1a8b409f360a3ee1d7325093622b29f1e22/webcam/util.py#L73
🚄 Model Training
PersonaLive training is organized into three stages. Approximate training time on 8x H100 with default configs: Stage 1 ~13h, Stage 2 ~15h, Stage 3 ~20h.
1️⃣ Environment setup
Install base dependencies first (see installation section), then install training-only packages:
pip install -r requirements_train.txt
If you use multi-GPU or multi-node training, configure Accelerate once before launching training:
accelerate config
2️⃣ Data preparation
Your dataset should contain a videos directory and a matching boxes directory:
Datasets
├── VFHQ
│   ├── videos
│   │   ├── example1.mp4
│   │   ├── example2.mp4
│   │   └── ...
│   └── boxes
│       ├── example1.pt
│       ├── example2.pt
│       └── ...
└── ...
Preprocessing example:
# 1) Extract face / eye / mouth boxes from each frame
python tools/get_boxes.py --video_dir ./Datasets/VFHQ/videos --save_dir ./Datasets/VFHQ/boxes --workers 8

# 2) Generate meta json: [{"video_path": ".../videos/xxx.mp4"}, ...]
python tools/extract_meta_info.py --root_path ./Datasets/VFHQ --dataset_name VFHQ
Then set data.meta_paths in each training config:
data:
  meta_paths:
    - "./data/VFHQ_meta.json"
    - "./data/OtherDataset_meta.json"
3️⃣ Download weights
Download the training initialization weights: X-NeMo, pose_guider, and stylegan2_discriminator.
pretrained_weights
├── xnemo
│   ├── xnemo_motion_encoder.pth
│   ├── xnemo_denoising_unet.pth
│   ├── xnemo_reference_unet.pth
│   └── xnemo_temporal_module.pth
├── sd-vae-ft-mse
│   ├── diffusion_pytorch_model.bin
│   └── config.json
├── sd-image-variations-diffusers
│   ├── image_encoder
│   │   ├── pytorch_model.bin
│   │   └── config.json
│   ├── unet
│   │   ├── diffusion_pytorch_model.bin
│   │   └── config.json
│   └── model_index.json
├── pose_guider.pth
└── stylegan2_discriminator_ffhq512.pth
4️⃣ Training workflow
Stage 1: Image-level warm-up
Run:
accelerate launch train_stage1.py --config ./configs/train/personalive_stage1.yaml
Default output folder: ./exp_output/personalive_stage1/
Stage 2: Image-level adversarial refinement
Update configs/train/personalive_stage2.yaml to point to Stage 1 outputs:
motion_encoder_path: './exp_output/personalive_stage1/motion_encoder-xxxxx.pth'
denoising_unet_path: './exp_output/personalive_stage1/denoising_unet-xxxxx.pth'
reference_unet_path: './exp_output/personalive_stage1/reference_unet-xxxxx.pth'
pose_guider_path: './exp_output/personalive_stage1/pose_guider-xxxxx.pth'
Run:
accelerate launch train_stage2.py --config ./configs/train/personalive_stage2.yaml
Default output folder: ./exp_output/personalive_stage2/
Stage 3: Temporal module fine-tuning for streaming
Update configs/train/personalive_stage3.yaml to point to Stage 2 outputs:
motion_encoder_path: './exp_output/personalive_stage2/motion_encoder-xxxxx.pth'
denoising_unet_path: './exp_output/personalive_stage2/denoising_unet-xxxxx.pth'
reference_unet_path: './exp_output/personalive_stage2/reference_unet-xxxxx.pth'
pose_guider_path: './exp_output/personalive_stage2/pose_guider-xxxxx.pth'
discriminator_path: './exp_output/personalive_stage2/discriminator-xxxxx.pth'
Run:
accelerate launch train_stage3.py --config ./configs/train/personalive_stage3.yaml
Default output folder: ./exp_output/personalive_stage3/
📚 Community Contribution
Special thanks to the community for providing helpful setups! 🥂
-
Windows + RTX 50-Series Guide: Thanks to @dknos for providing a detailed guide on running this project on Windows with Blackwell GPUs.
-
TensorRT on Windows: If you are trying to convert TensorRT models on Windows, this discussion might be helpful. Special thanks to @MaraScott and @Jeremy8776 for their insights.
-
ComfyUI: Thanks to @okdalto for helping implement the ComfyUI-PersonaLive support.
-
Useful Scripts: Thanks to @suruoxi for implementing
download_weights.py, and to @andchir for adding audio merging functionality.
🎬 More Results
👀 Visualization results
🤺 Comparisons
⭐ Citation
If you find PersonaLive useful for your research, welcome to cite our work using the following BibTeX:
@article{li2025personalive,
  title={PersonaLive! Expressive Portrait Image Animation for Live Streaming},
  author={Li, Zhiyuan and Pun, Chi-Man and Fang, Chen and Wang, Jue and Cun, Xiaodong},
  journal={arXiv preprint arXiv:2512.11253},
  year={2025}
}
❤️ Acknowledgement
This code is mainly built upon Moore-AnimateAnyone, X-NeMo, StreamDiffusion, RAIN and LivePortrait, thanks to their invaluable contributions.