Quip Network Experimental Node
WARNING: This is experimental demonstration software provided without warranty of any kind. It is not intended for production use. Use at your own risk.
This project implements a quantum blockchain using quantum annealing for proof-of-work consensus. It features competitive mining between quantum computers (QPU) and classical simulated annealing (SA) with a dynamic difficulty adjustment mechanism.
Overview
The blockchain demonstrates:
- Quantum Annealing PoW: Using Ising model optimization as the mining puzzle
- Competitive Mining: Multiple miners (QPU and SA) compete to mine blocks
- Multi-Miner Support: Configure any number of QPU and SA miners
- Dynamic Difficulty: Inverted difficulty mechanism that prevents miner monopolization
- Streak Rewards: Consecutive wins increase block rewards
- Solution Diversity: Requires multiple diverse solutions to prevent trivial mining
- Individual Miner Tracking: Each miner has unique ID and performance stats
Current Scope
The current implementation:
- Quantum PoW only - No transactions, accounts, or other typical blockchain features
- Demonstration signatures - The signature system is not yet production-secure; it demonstrates the hybrid ECDSA + WOTS+ approach but requires proper integration
Roadmap
We plan to build a complete blockchain by forking an existing battle tested codebase to maximize development velocity.
Phase 1: Core Integration
- Fork a battle-tested blockchain codebase
- Integrate our quantum proof-of-work mechanism (Ising model optimization, difficulty adjustment, block time targets already defined)
- Target: Testnet deployment
Phase 2: Signature System
- Integrate our hybrid signature system: classical ECDSA combined with post-quantum WOTS+ signatures
- Implement stateful signature management
- Wire signatures into transaction processing and consensus
Phase 3: Subnet Architecture
- Implement a subnet system with objective, measurable metrics for validation
- Subnets will solve computational problems (scientific computing, cryptographic proofs, etc.) with verifiable results
- Define subnet registration, validation mechanisms, and reward distribution
Phase 4: Smart Contracts
- Add smart contract support via EVM compatibility (Solidity/Vyper) and/or Rust-based WebAssembly runtime
- Later: Enable contracts to interact with subnet computational results
Open Technical Decisions
- Which blockchain codebase to fork?
- How to structure subnets for different computational problem types?
- How to validate objective metrics across the decentralized network?
- Performance targets (TPS, finality time, subnet throughput)?
Getting Started
You can run your own node using the "latest" release, see the README in the docker directory for instructions on how to run the node in a container.
Setup
-
Create and activate a virtual environment (Python 3.10+):
python3 -m venv .quip source .quip/bin/activate # Windows: .venv\Scripts\activate -
Install the package in editable mode:
pip install -U pip setuptools wheel
pip install -e .
This will install all dependencies from pyproject.toml and register console scripts.
-
Set up D-Wave API credentials (optional, for QPU access):
echo "DWAVE_API_KEY=your_api_key_here" > .env
Project Structure
quip-protocol/
├── quip_cli.py                # Main CLI entry point
├── blockchain_base.py         # Base classes for miners
├── shared/                    # Core modules
│   ├── network_node.py       # P2P networking (QUIC protocol)
│   ├── node.py               # Node state management
│   ├── block.py              # Block and header dataclasses
│   ├── block_signer.py       # ECDSA + WOTS+ signatures
│   ├── quantum_proof_of_work.py  # Ising model PoW
│   ├── base_miner.py         # Abstract miner interface
│   └── ...                   # Additional utilities
├── CPU/                       # CPU-based miners
│   ├── sa_miner.py           # Simulated annealing miner
│   └── sa_sampler.py         # SA sampler implementation
├── GPU/                       # GPU-accelerated miners
│   ├── cuda_miner.py         # CUDA GPU miner
│   ├── metal_miner.py        # Apple Metal/MPS miner
│   └── modal_miner.py        # Modal Labs cloud GPU
├── QPU/                       # Quantum processor miners
│   ├── dwave_miner.py        # D-Wave QPU miner
│   └── dwave_sampler.py      # D-Wave sampler wrapper
├── docker/                    # Docker deployment files
├── tests/                     # Test suite
├── reference/                 # Reference implementation
└── benchmarks/                # Performance benchmarks
quip-network-node
Run a single P2P node of a specific type. Subcommands: cpu, gpu, qpu.
- Always enables competitive mode
- Implies a single miner of that type (num-sa/num-gpu/num-qpu = 1)
- Supports a top-level --config TOML that can choose a default subcommand
- Global settings provide host, port, peer, and auto_mine
- CPU supports --num-cpus to cap threads via OMP/MKL/BLAS env vars
- GPU supports multi-device via [gpu] in TOML (backend=local|modal); --device forces single device
- QPU supports D-Wave settings via CLI or TOML under [qpu]
Examples:
# CPU node (bootstrap), limit to 4 threads
quip-network-node cpu --port 8080 --num-cpus 4

# GPU node joining bootstrap with device 0
quip-network-node gpu --port 8082 --peer localhost:8080 --device 0

# Use TOML config to choose default subcommand and flags
quip-network-node --config ./QUIP-node.example.toml

# Modal backend example via TOML
# [gpu]
# backend = "modal"
# types = ["t4", "a10g"]
TOML structure:
[global]
default = "gpu"  # or "cpu"/"qpu"
# Global network options
host = "0.0.0.0"
port = 8082
peer = "localhost:8080"
auto_mine = 0

[cpu]
# Limit CPU worker threads; max is number of logical CPUs
num_cpus = 4

[gpu]
# Backend selection: "local" (default) uses local GPUs (CUDA/ROCm/MPS). "modal" uses Modal cloud GPUs.
backend = "local"
# For local backend: list devices to use (CUDA ordinals like "0", "1"). If omitted, runtime may auto-detect.
devices = ["0", "1"]
# For modal backend: list GPU types to use (e.g., ["t4", "a10g"]).
# types = ["t4", "a10g"]

[qpu]
# Provide any of these to configure D-Wave access; can also pass on CLI
# dwave_api_key = "..."
# dwave_api_solver = "Advantage_system6.4"
# dwave_region_url = "https://na-west-1.cloud.dwavesys.com/sapi/v2/"  # default
See a working example in QUIP-node.example.toml.
quip-network-simulator
Launches multiple nodes for testing different network scenarios:
# Mixed (approx. 3 CPU, 2 GPU, 1 QPU)
quip-network-simulator --scenario mixed

# CPU-only with 4 nodes
quip-network-simulator --scenario cpu

# GPU-only with overrides and base port (print only)
quip-network-simulator --scenario gpu --num-gpu 2 --base-port 9000 --print-only
Systemd Service Installation
You can run quip-network-node as a systemd service for production deployment with automatic restarts and proper logging.
Service Configuration
Create the systemd service file at /etc/systemd/system/quip-network-node.service:
[Unit]
Description=QUIP Network Node
After=network.target
Wants=network.target

[Service]
Type=simple
User=QUIP
Group=QUIP
Environment=PATH=/usr/local/bin:/usr/bin:/bin
Environment=PYTHONPATH=/usr/local/lib/python3.10/site-packages
ExecStart=/usr/local/bin/quip-network-node cpu --config /etc/QUIP.network/config.toml
Restart=always
RestartSec=5
StandardOutput=journal
StandardError=journal
SyslogIdentifier=quip-network-node

# Security settings
NoNewPrivileges=yes
PrivateTmp=yes
ProtectSystem=strict
ProtectHome=yes
ReadWritePaths=/var/log/QUIP-node /var/lib/QUIP-node
ProtectKernelTunables=yes
ProtectControlGroups=yes

# Resource limits
MemoryLimit=2G
CPUQuota=200%

[Install]
WantedBy=multi-user.target
Installation Steps
-
Create directories and user:
sudo mkdir -p /etc/quip.network sudo mkdir -p /var/log/quip.network sudo mkdir -p /opt/quip sudo useradd --system --shell /bin/false --home /var/lib/quip.network --create-home quip sudo chown -R quip:quip /var/log/quip.network /var/lib/quip.network /etc/quip.network /opt/quip -
Install Python virtual environment:
# Create virtual environment at /opt/quip sudo -u quip python3 -m venv /opt/quip # Install quip-protocol in the virtual environment (includes all dependencies) sudo -u quip /opt/quip/bin/pip install -U pip setuptools wheel cd /path/to/quip-protocol sudo cp -r . /opt/quip/src sudo chown -R quip:quip /opt/quip/src sudo -u quip /opt/quip/bin/pip install -e /opt/quip/src # Note: Replace /path/to/quip-protocol with actual path to your source code # The pip install -e command will automatically install all dependencies from pyproject.toml -
Copy and configure:
sudo cp quip-node.example.toml /etc/quip.network/config.toml sudo chown quip:quip /etc/quip.network/config.toml sudo cp genesis_block_public.json /etc/quip.network/genesis_block.json sudo chown quip:quip /etc/quip.network/genesis_block.json # Edit /etc/quip.network/config.toml as needed - all configuration goes here -
Install and enable service:
sudo cp quip-network-node.service /etc/systemd/system/ sudo systemctl daemon-reload sudo systemctl enable quip-network-node sudo systemctl start quip-network-node -
Monitor the service:
sudo systemctl status quip-network-node
journalctl -u quip-network-node -f
Configuration Options
The service can be customized by modifying the ExecStart line:
- CPU mining:
quip-network-node cpu --config /etc/QUIP.network/config.toml - GPU mining:
quip-network-node gpu --config /etc/QUIP.network/config.toml - QPU mining:
quip-network-node qpu --config /etc/QUIP.network/config.toml
All miner-specific configuration (D-Wave credentials, GPU settings, CPU limits, etc.) should be set in /etc/QUIP.network/config.toml:
[global]
node_name = "Production Node"
listen = "0.0.0.0"
port = 20049
log_level = "INFO"
node_log = "/var/log/QUIP-node/node.log"
http_log = "/var/log/QUIP-node/http.log"

[cpu]
num_cpus = 4

[gpu]
backend = "local"
devices = ["0", "1"]

[qpu]
dwave_api_key = "your_key_here"
dwave_api_solver = "Advantage_system6.4"
Service Management
# View logs
sudo journalctl -u quip-network-node -n 50

# Restart service
sudo systemctl restart quip-network-node

# Stop service
sudo systemctl stop quip-network-node

# Disable service
sudo systemctl disable quip-network-node
Troubleshooting
- Service fails to start: Check permissions on
/etc/QUIP.network/config.toml - Python import errors: Verify PYTHONPATH and package installation
- Permission denied: Ensure the
QUIPuser has access to necessary directories - Network issues: Check firewall settings for the configured port (default: 20049)
The systemd service provides production-ready deployment with automatic restarts, proper logging, and security hardening. All configuration is centralized in the TOML file for easier management.
Usage
Single-node blockchain
Use these to test blockchain mining in an isolated single-node network on different platforms.
CPU node
quip-network-node cpu --listen 127.0.0.1 --port 8085 --public-host 127.0.0.1:8085 --auto-mine --peer 127.0.0.1:8085 --genesis-config genesis_block_public.json
GPU node (CUDA)
quip-network-node gpu --listen 127.0.0.1 --port 8085 --public-host 127.0.0.1:8085 --auto-mine --peer 127.0.0.1:8085 --gpu-backend local --genesis-config genesis_block_public.json
Mac Metal node
quip-network-node gpu --listen 127.0.0.1 --port 8085 --public-host 127.0.0.1:8085 --auto-mine --peer 127.0.0.1:8085 --gpu-backend mps --genesis-config genesis_block_public.json
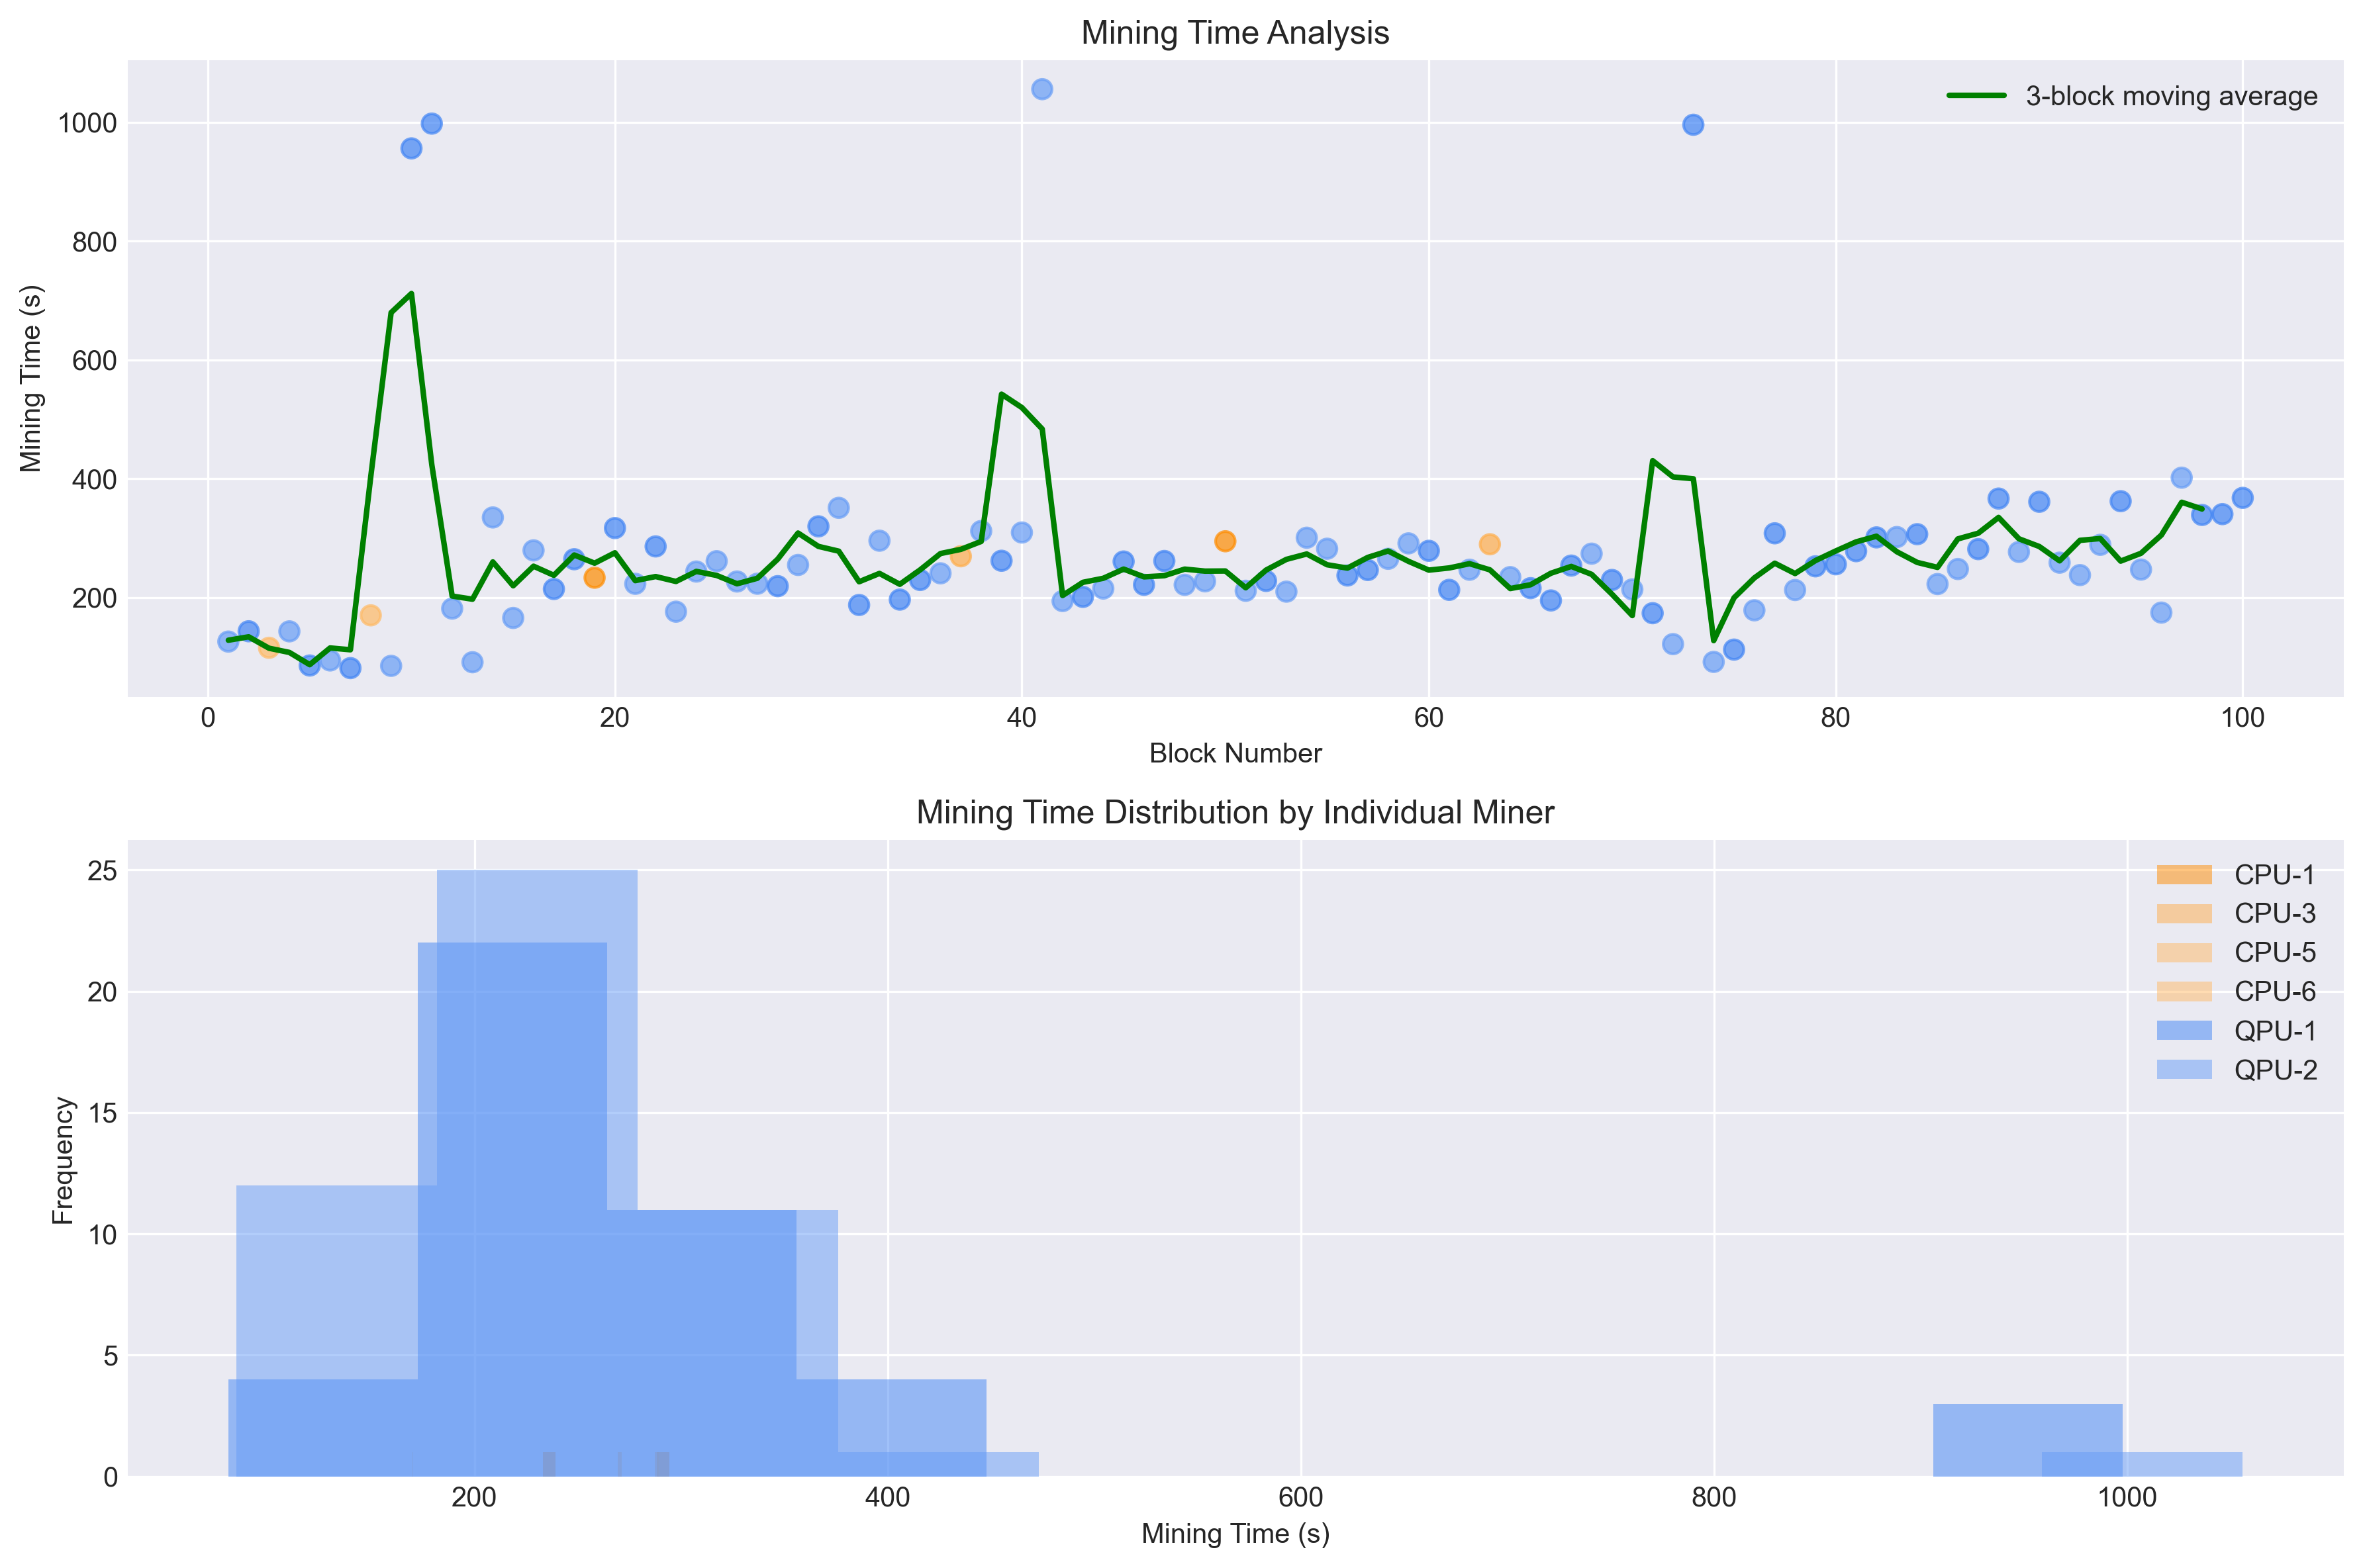
Run Performance Benchmarks
python benchmarks/benchmark_quantum_pow.py
Generates comprehensive benchmarks comparing QPU vs SA performance:

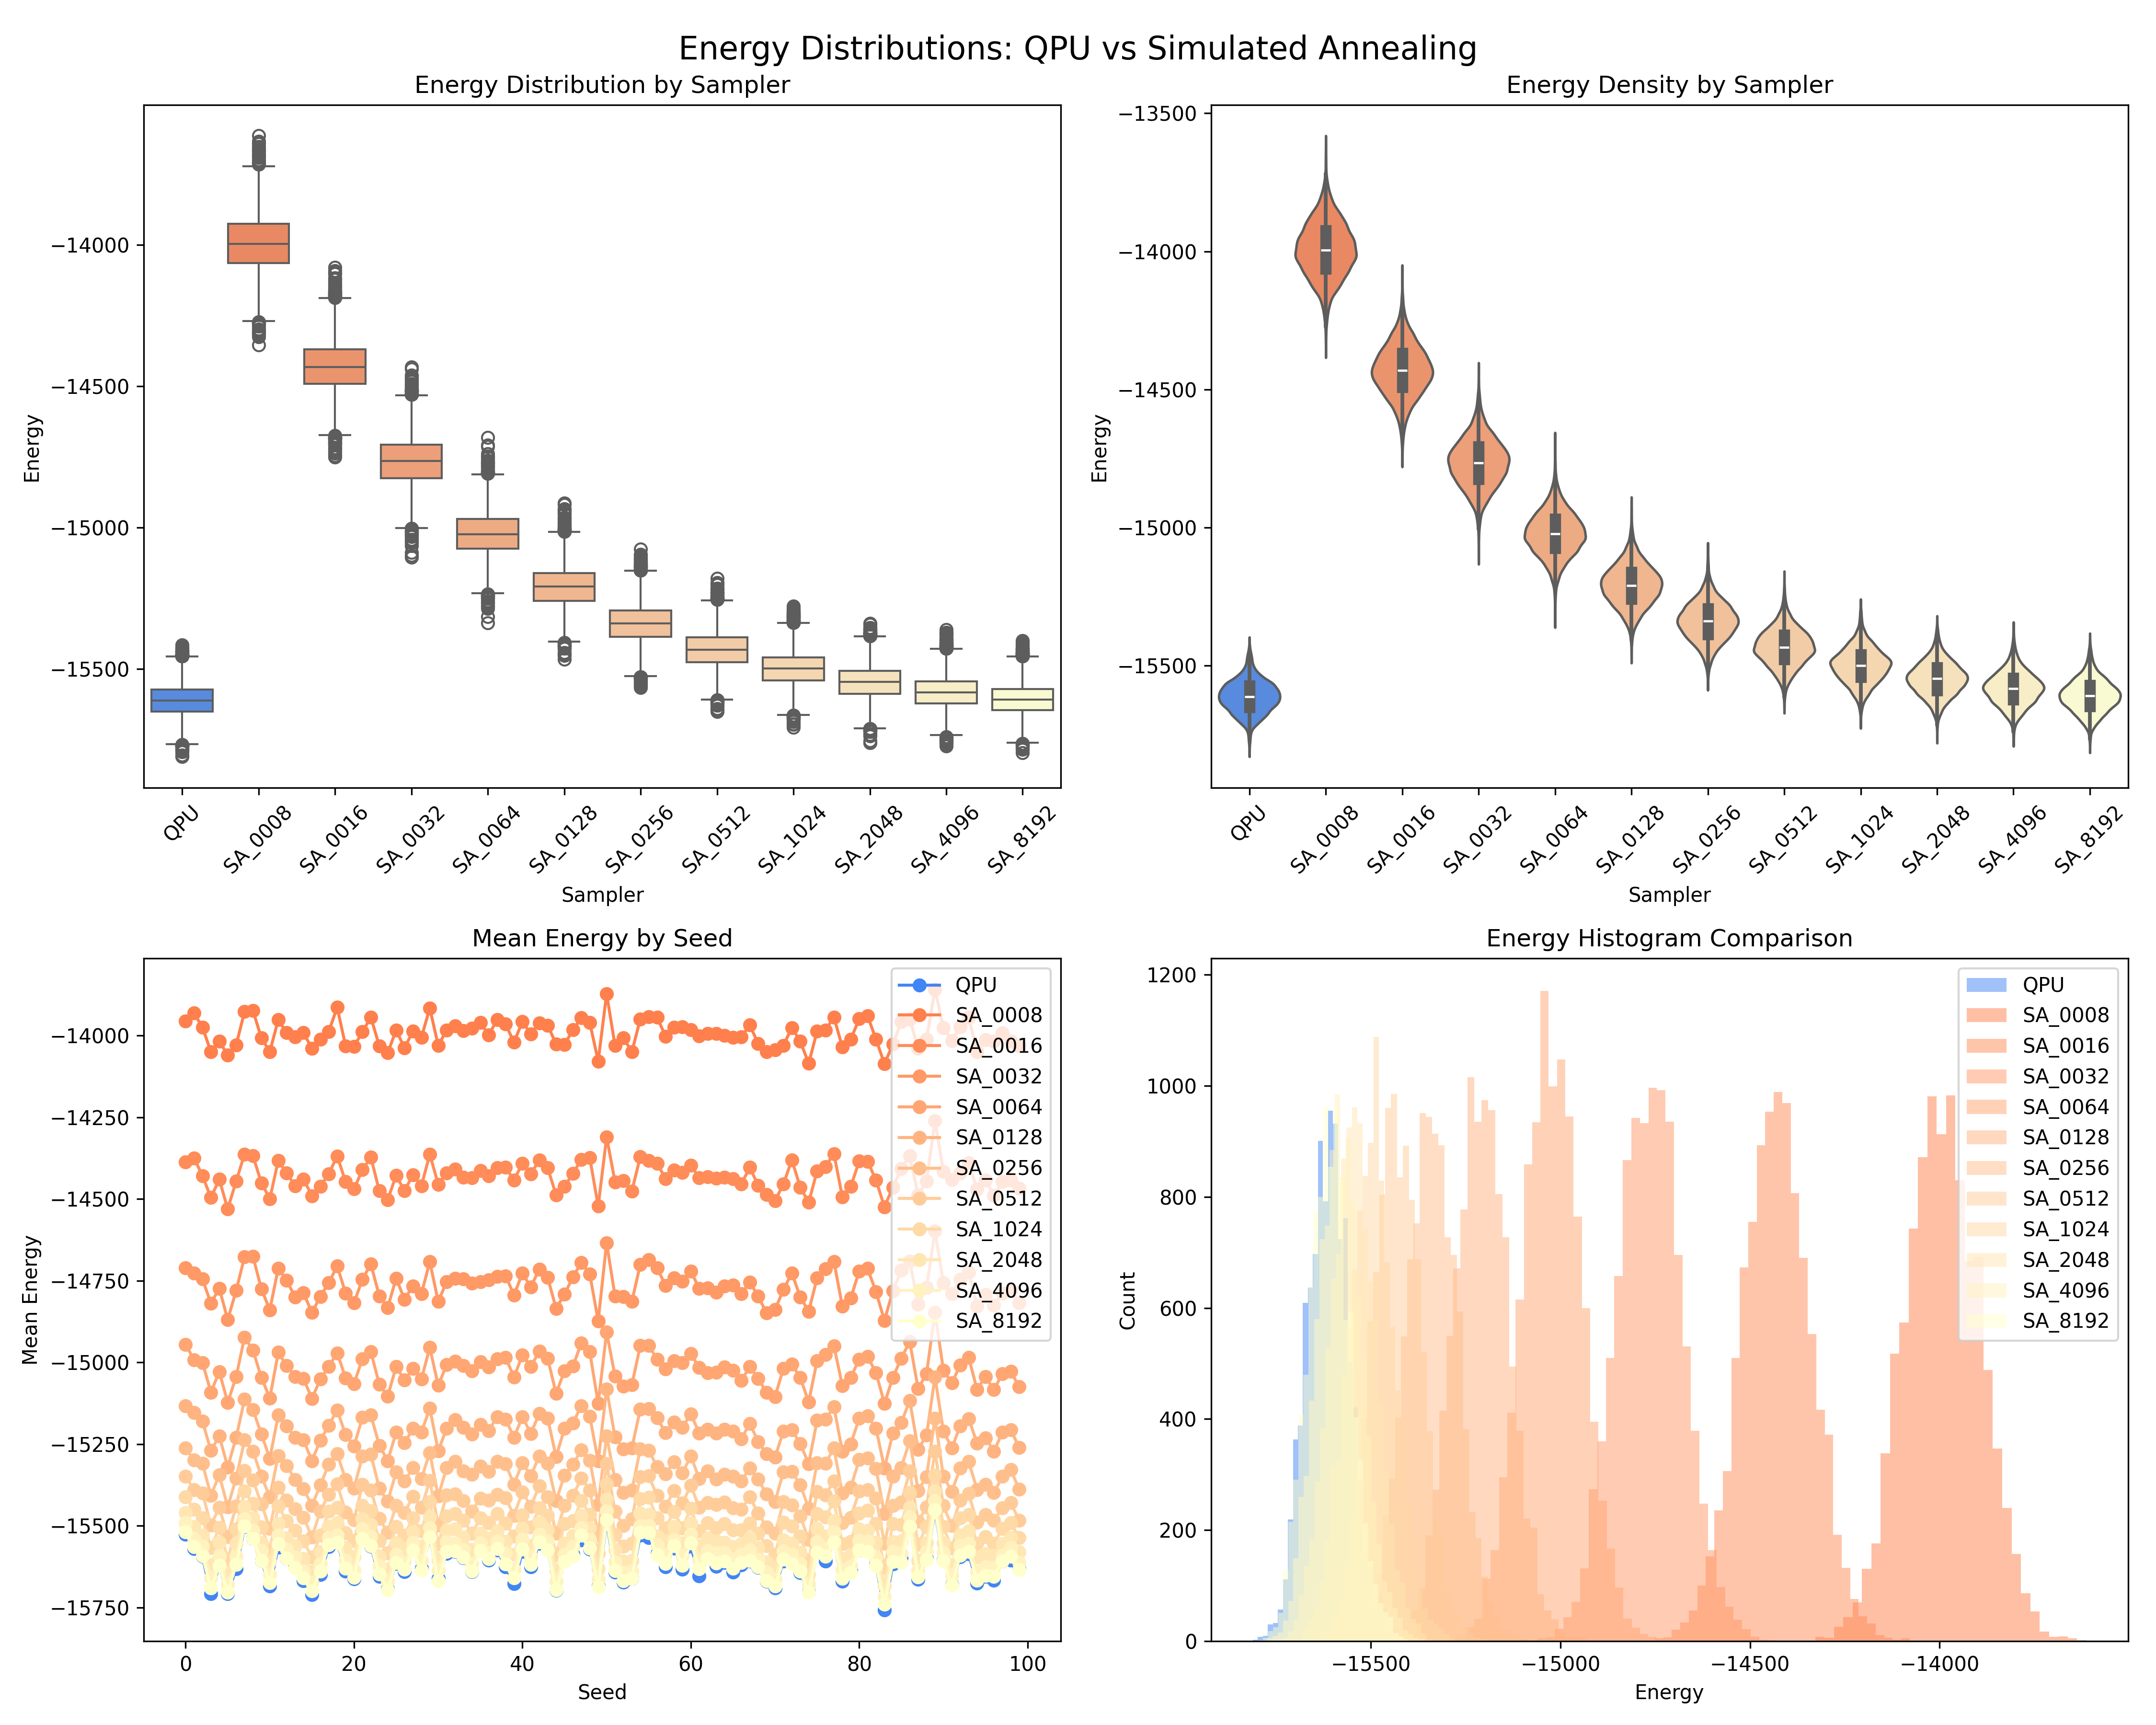
Quantum Proof-of-Work Mechanism
Core Concepts
-
Ising Model Generation: Each block generates a unique Ising problem based on:
- Block header hash
- Mining nonce
- Deterministic random seed
-
Solution Requirements:
- Energy Threshold: Solutions must have energy < difficulty_energy
- Solution Diversity: Multiple solutions with minimum Hamming distance
- Minimum Solutions: At least N valid solutions required
-
Mining Process:
- Miners iterate through nonces
- For each nonce, sample the quantum annealer
- Check if solutions meet all criteria
- First miner to find valid solutions wins
Dynamic Difficulty (Inverted Mechanism)
The blockchain implements an inverted difficulty adjustment:
Initial State: HARD (QPU-favored)
├── Energy: -1150
├── Diversity: 0.45
└── Solutions: 15

Consecutive Wins → EASIER
└── Reduces requirements progressively

New Winner → HARDER
└── Increases difficulty based on previous streak
This mechanism:
- Starts with QPU-favorable difficulty
- Makes mining easier for consecutive winners
- Immediately hardens when a new miner wins
- Prevents long-term monopolization
Competitive Mining Results
The inverted difficulty mechanism produces balanced mining distribution:
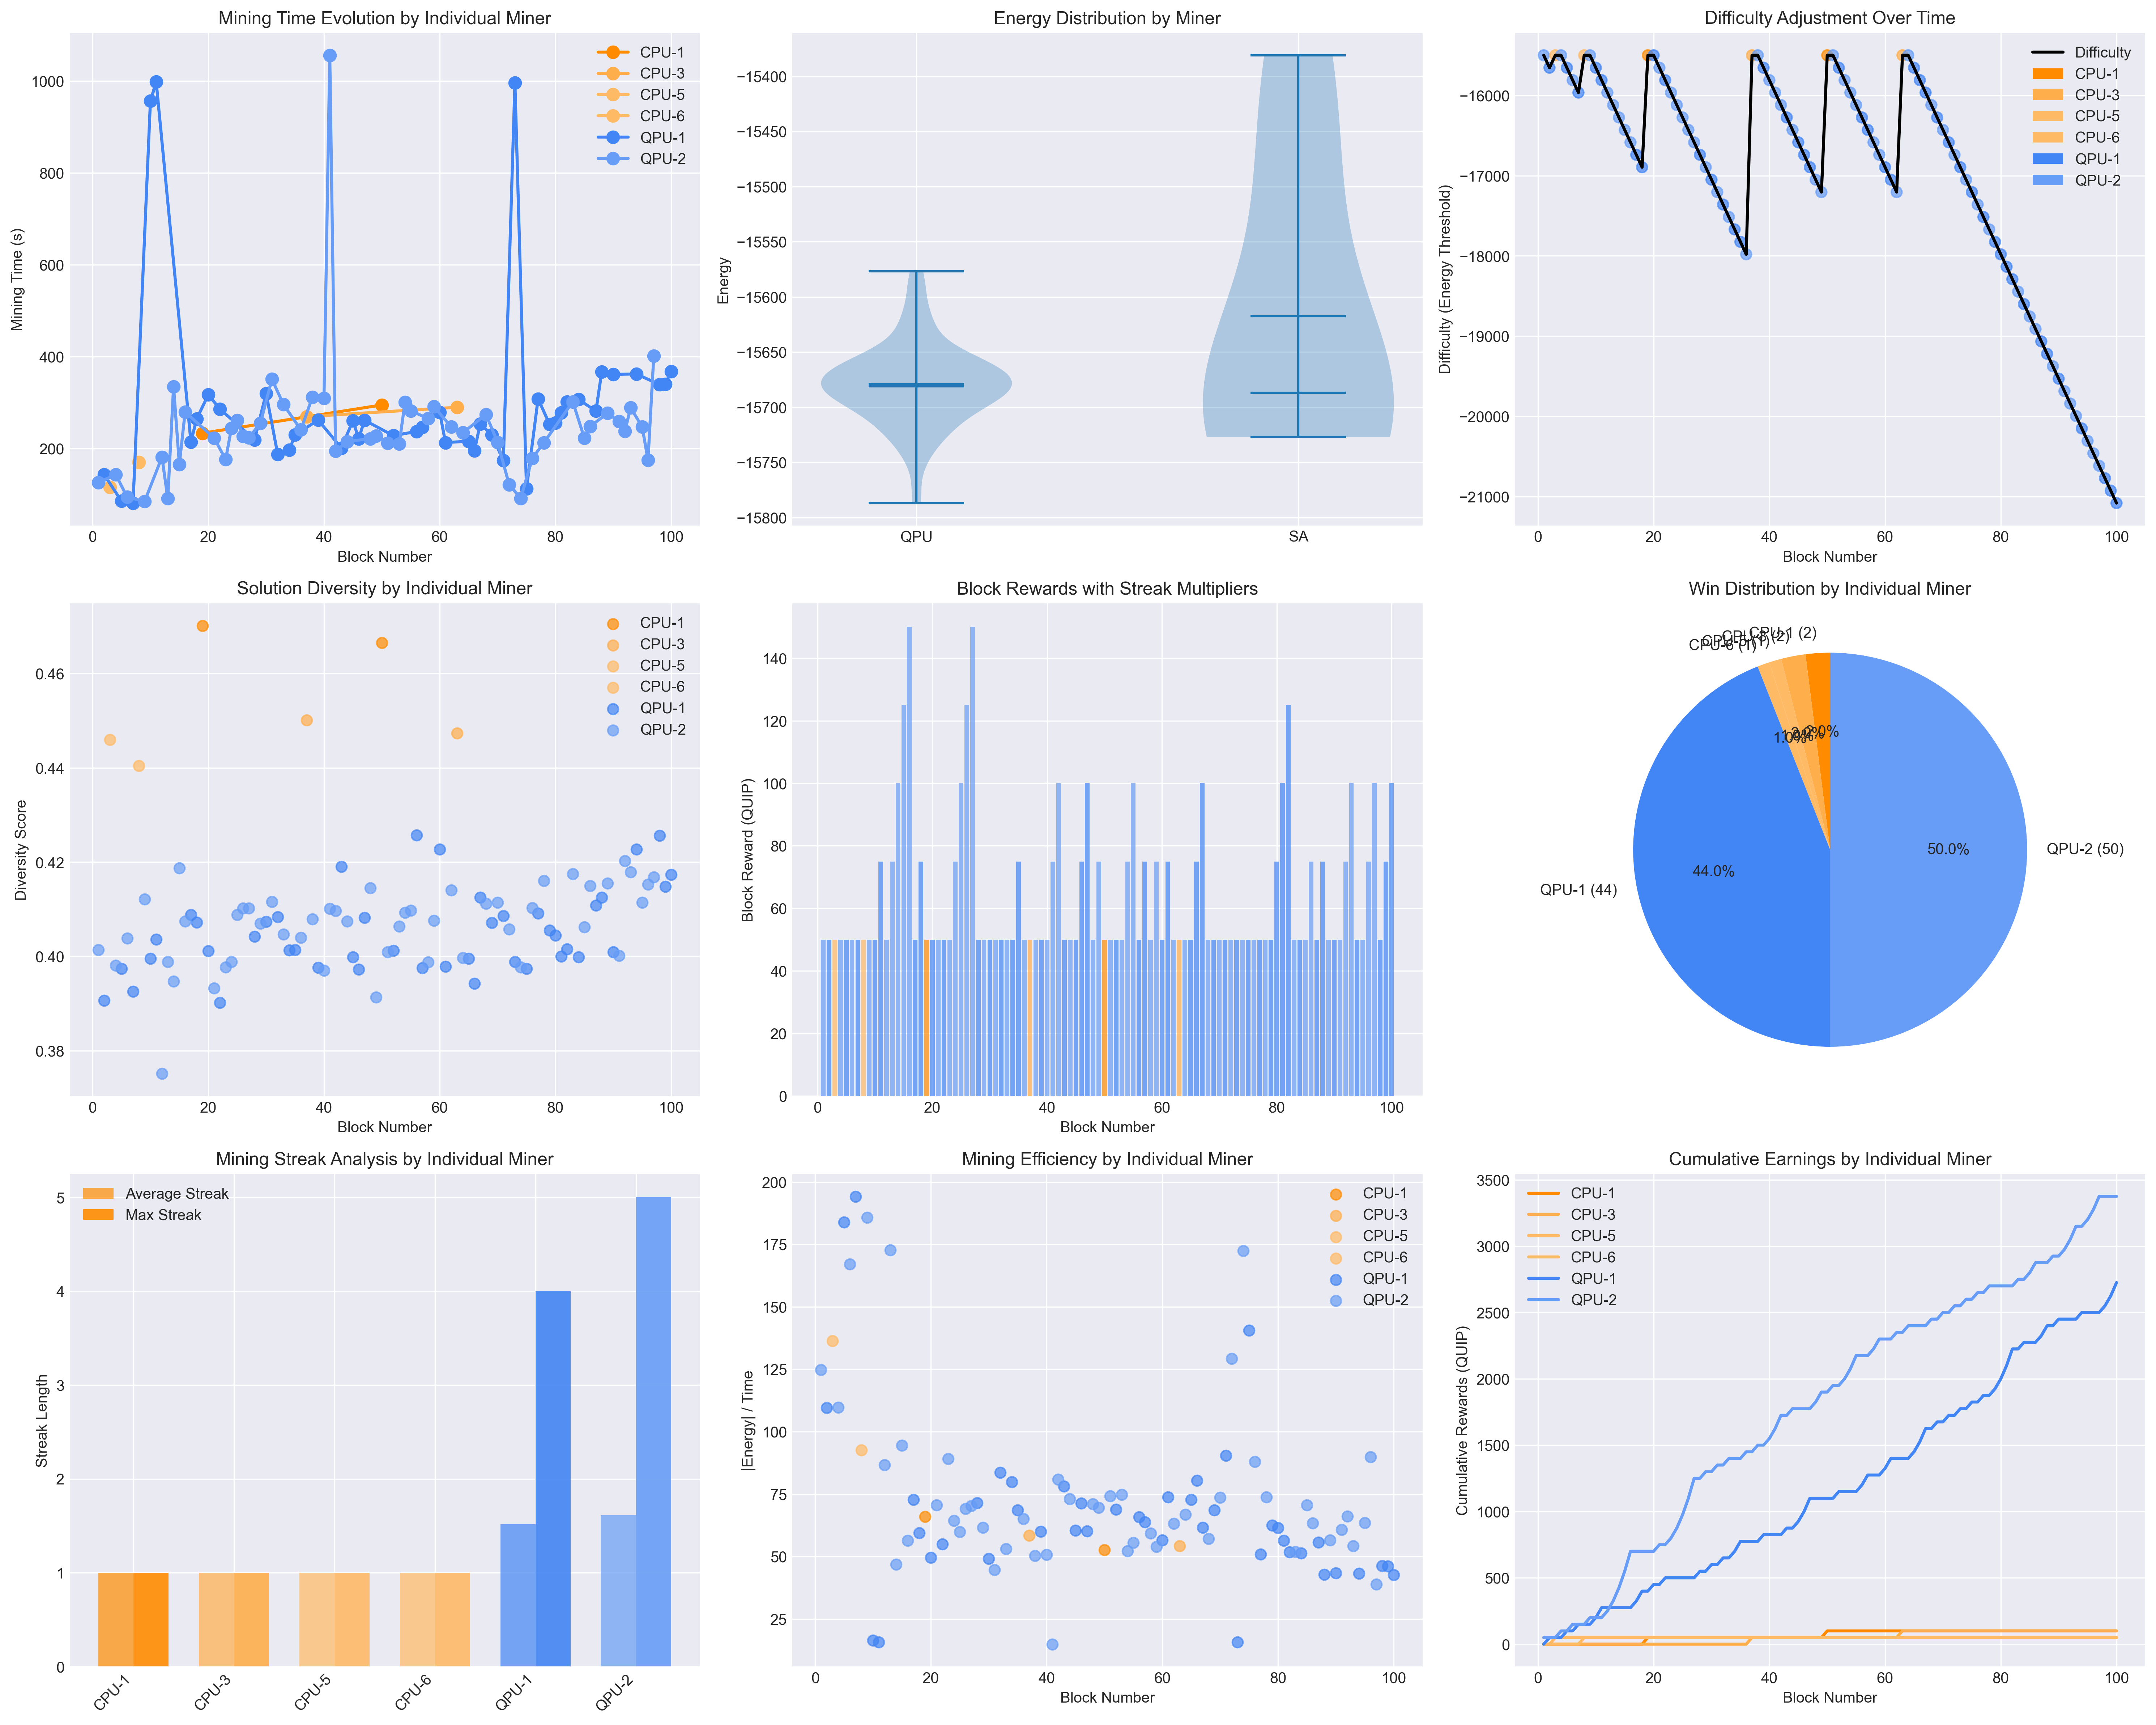
Key outcomes:
- QPU: ~70% of blocks (leverages quantum advantage initially)
- SA: ~30% of blocks (catches up as difficulty eases)
- Streak Rewards: Up to 5x multiplier for consecutive wins
- Dynamic Balance: Self-adjusting difficulty maintains competition
Technical Parameters
Shared Mining Parameters
difficulty_energy = -1000.0  # Energy threshold
min_diversity = 0.28         # Solution diversity requirement
min_solutions = 10           # Minimum valid solutions
Miner-Specific Settings
- QPU: Uses D-Wave quantum processor (when available)
- SA: num_sweeps=4096 for optimal performance
- Both: 64 reads per mining attempt
Difficulty Adjustment
energy_adjustment_rate = 0.10  # 10% change per streak level
max_streak_multiplier = 5      # Maximum reward multiplier
Key Features
- Decentralized Consensus: All miners use identical difficulty parameters
- Quantum-Classical Competition: Fair competition between QPU and SA
- Anti-Monopolization: Dynamic difficulty prevents single miner dominance
- Performance Monitoring: Comprehensive metrics and visualizations
- Solution Quality: Enforces diversity to prevent trivial solutions
GPU Mining Support
The blockchain supports GPU-accelerated mining using Modal Labs cloud infrastructure, providing a cost-effective middle ground between CPU-based SA miners and QPU miners.
GPU Mining Setup
-
Install Modal (includes $30/month free credits):
pip install modal modal token new # Opens browser for authentication -
Run GPU Node:
# Local CUDA GPU
quip-network-node gpu --gpu-backend local --auto-mine

# Modal Labs cloud GPU
quip-network-node gpu --gpu-backend modal --auto-mine
GPU Types and Performance
| GPU Type | Cost/Hour | Performance vs SA | Best Use Case |
|---|---|---|---|
| T4 | ~$0.10 | 3x faster | Cost-conscious mining |
| A10G | ~$0.30 | 8x faster | Balanced performance |
| A100 | ~$1.00 | 25x faster | Maximum performance |
GPU Mining Features
- CUDA Acceleration: Uses CuPy for GPU-optimized annealing
- Automatic Fallback: Falls back to SA if GPU unavailable
- Individual Tracking: Each GPU miner has unique ID (GPU-1, GPU-2, etc.)
- Color Coding: GPU miners shown in green shades in benchmark plots
- Cost Optimization: Start with T4, scale up as needed
GPU Benchmarking
Run standalone GPU benchmarks:
modal run benchmarks/gpu_benchmark_modal.py
This compares different GPU types and provides cost/performance analysis.
P2P Network
The blockchain uses QUIC protocol for peer-to-peer communication with built-in TLS 1.3 encryption.
Features
- QUIC Protocol: Low-latency UDP-based transport with TLS 1.3
- Automatic Node Discovery: Nodes broadcast new peers to the network
- Heartbeat Mechanism: 15s interval, 60s timeout for liveness
- Block Propagation: New blocks broadcast via GOSSIP messages
- Chain Synchronization: Automatic sync with peers on join
Protocol Messages
The QUIC protocol uses binary message types:
JOIN_REQUEST/JOIN_RESPONSE: Node discoveryHEARTBEAT: Liveness checksGOSSIP: Block propagationBLOCK_REQUEST/BLOCK_SUBMIT: Block operationsSTATUS_REQUEST/STATS_REQUEST: Node status
Default port: 20049
Example Network Setup
# Terminal 1: Bootstrap CPU node
quip-network-node cpu --port 20049 --auto-mine

# Terminal 2: Join as CPU miner
quip-network-node cpu --port 20050 --peer localhost:20049 --auto-mine

# Terminal 3: Join as GPU miner (CUDA)
quip-network-node gpu --port 20051 --peer localhost:20049 --auto-mine

# Terminal 4: Join as GPU miner (Metal/MPS on Mac)
quip-network-node gpu --gpu-backend mps --port 20052 --peer localhost:20049 --auto-mine
Network Simulator
Launch multiple nodes for testing:
# Mixed network (CPU + GPU)
quip-network-simulator --scenario mixed

# CPU-only network
quip-network-simulator --scenario cpu --base-port 9000
Security
QUIC Transport Security
The P2P network uses QUIC protocol which includes mandatory TLS 1.3 encryption:
- Built-in TLS 1.3: All connections are encrypted by default
- Self-signed certificates: Automatically generated for development
- TOFU (Trust On First Use): Peer certificates stored in
trust.db
Production Certificates
For production deployments, configure custom certificates in TOML:
[global]
tls_cert_file = "/path/to/certificate.pem"
tls_key_file = "/path/to/private_key.pem"
Future Enhancements
- Consensus mechanism for longest chain rule
- Block validation and quantum proof verification
- Persistent blockchain storage and peer list
- Transaction validation and smart contracts
- Multiple QPU support
- Advanced difficulty algorithms
- Real-time mining pool statistics
- Client certificate authentication for enhanced security
License
GNU Affero General Public License v3.0 - See LICENSE file for details