MapAnything: Universal Feed-Forward Metric
3D Reconstruction
Nikhil Keetha1,2 Norman Müller1 Johannes Schönberger1 Lorenzo Porzi1 Yuchen Zhang2
Tobias Fischer1 Arno Knapitsch1 Duncan Zauss1 Ethan Weber1 Nelson Antunes1
Jonathon Luiten1 Manuel Lopez-Antequera1 Samuel Rota Bulò1 Christian Richardt1
Deva Ramanan2 Sebastian Scherer2 Peter Kontschieder1
1 Meta 2 Carnegie Mellon University
Overview
MapAnything is an open-source research framework for universal metric 3D reconstruction. At its core is a simple, end-to-end trained transformer model that directly regresses the factored metric 3D geometry of a scene given various types of inputs (images, calibration, poses, or depth). A single feed-forward model supports over 12 different 3D reconstruction tasks including multi-image sfm, multi-view stereo, monocular metric depth estimation, registration, depth completion and more.
The framework provides the complete stack—data processing, training, inference, and profiling—with a modular design that allows different 3D reconstruction models (VGGT, DUSt3R, MASt3R, MUSt3R, Pi3-X, and more) to be used interchangeably through a unified interface.
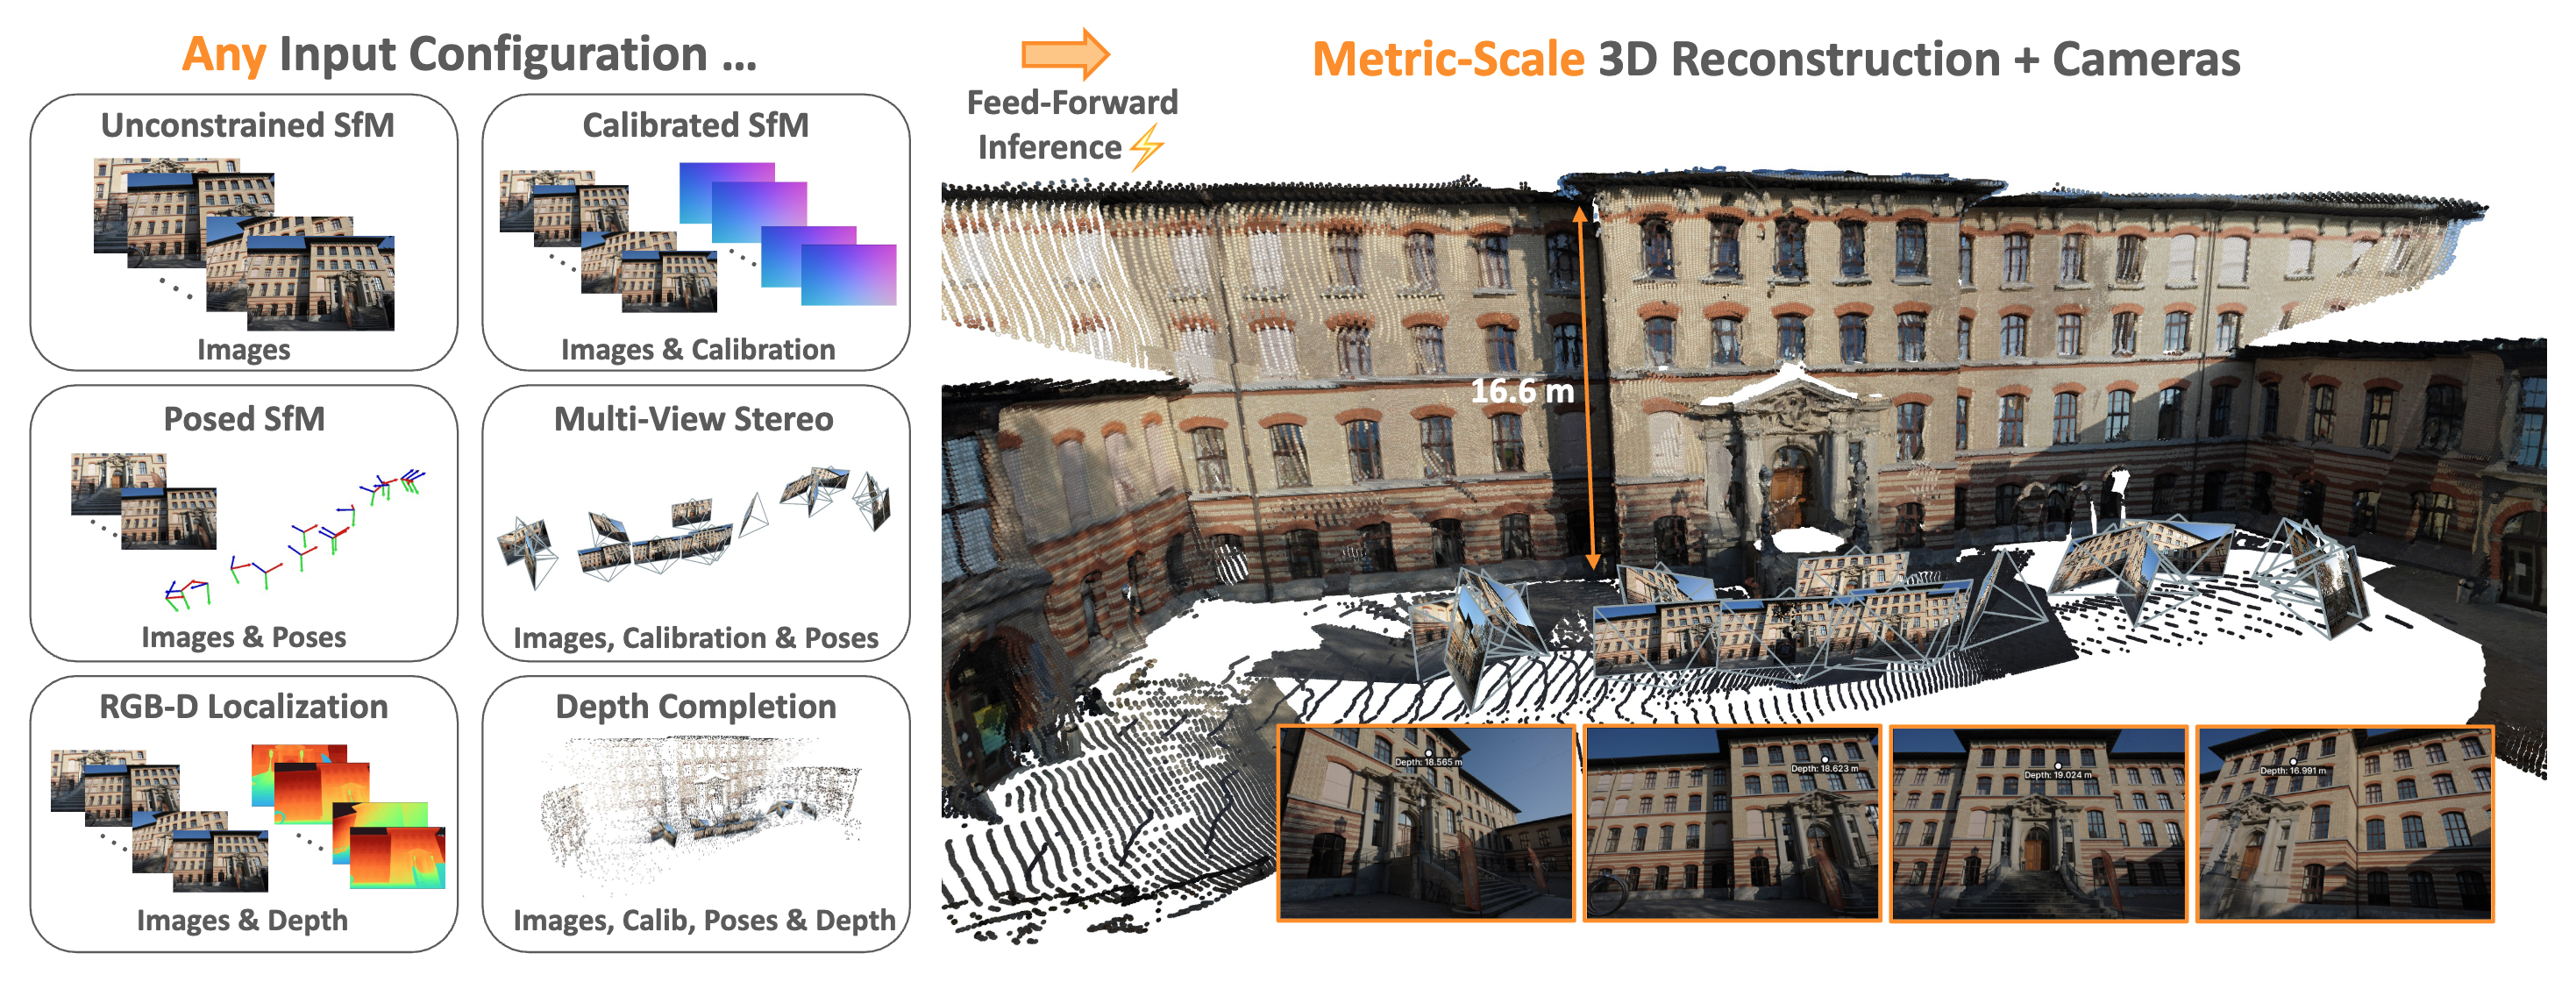
Table of Contents
- Overview
- Quick Start
- Interactive Demos
- Profiling
- COLMAP & GSplat Support
- Data Processing for Training & Benchmarking
- Training
- Benchmarking
- Code License
- Models
- Building Blocks for MapAnything
- Acknowledgments
- Citation
Quick Start
Installation
git clone https://github.com/facebookresearch/map-anything.git
cd map-anything

# Create and activate conda environment
conda create -n mapanything python=3.12 -y
conda activate mapanything

# Optional: Install torch, torchvision & torchaudio specific to your system
# Install MapAnything
pip install -e .

# For all optional dependencies
# This includes external model support (VGGT, DUSt3R, MASt3R, MUSt3R, Pi3-X, DA3, etc.)
# See "Running External Models" section for more details
# See pyproject.toml for more details on installed packages
pip install -e ".[all]"
pre-commit install
Note that we don't pin a specific version of PyTorch or CUDA in our requirements. Please feel free to install PyTorch based on your specific system.
Image-Only Inference
For metric 3D reconstruction from images without additional geometric inputs:
# Optional config for better memory efficiency
import os
os.environ["PYTORCH_CUDA_ALLOC_CONF"] = "expandable_segments:True"

# Required imports
import torch
from mapanything.models import MapAnything
from mapanything.utils.image import load_images

# Get inference device
device = "cuda" if torch.cuda.is_available() else "cpu"

# Init model - This requires internet access or the huggingface hub cache to be pre-downloaded
# For Apache 2.0 license model, use "facebook/map-anything-apache"
model = MapAnything.from_pretrained("facebook/map-anything").to(device)

# Load and preprocess images from a folder or list of paths
images = "path/to/your/images/"  # or ["path/to/img1.jpg", "path/to/img2.jpg", ...]
views = load_images(images)

# Run inference
predictions = model.infer(
    views,                            # Input views
    memory_efficient_inference=True,  # Trades off speed for more views (up to 2000 views on 140 GB). Trade off is negligible - see profiling section
    minibatch_size=None,              # Minibatch size for memory-efficient inference (use 1 for smallest GPU memory consumption). Default is dynamic computation based on available GPU memory.
    use_amp=True,                     # Use mixed precision inference (recommended)
    amp_dtype="bf16",                 # bf16 inference (recommended; falls back to fp16 if bf16 not supported)
    apply_mask=True,                  # Apply masking to dense geometry outputs
    mask_edges=True,                  # Remove edge artifacts by using normals and depth
    apply_confidence_mask=False,      # Filter low-confidence regions
    confidence_percentile=10,         # Remove bottom 10 percentile confidence pixels
    use_multiview_confidence=False,   # Enable multi-view depth consistency based confidence in place of learning-based one
)

# Access results for each view - Complete list of metric outputs
for i, pred in enumerate(predictions):
    # Geometry outputs
    pts3d = pred["pts3d"]                     # 3D points in world coordinates (B, H, W, 3)
    pts3d_cam = pred["pts3d_cam"]             # 3D points in camera coordinates (B, H, W, 3)
    depth_z = pred["depth_z"]                 # Z-depth in camera frame (B, H, W, 1)
    depth_along_ray = pred["depth_along_ray"] # Depth along ray in camera frame (B, H, W, 1)

    # Camera outputs
    ray_directions = pred["ray_directions"]   # Ray directions in camera frame (B, H, W, 3)
    intrinsics = pred["intrinsics"]           # Recovered pinhole camera intrinsics (B, 3, 3)
    camera_poses = pred["camera_poses"]       # OpenCV (+X - Right, +Y - Down, +Z - Forward) cam2world poses in world frame (B, 4, 4)
    cam_trans = pred["cam_trans"]             # OpenCV (+X - Right, +Y - Down, +Z - Forward) cam2world translation in world frame (B, 3)
    cam_quats = pred["cam_quats"]             # OpenCV (+X - Right, +Y - Down, +Z - Forward) cam2world quaternion in world frame (B, 4)

    # Quality and masking
    confidence = pred["conf"]                 # Per-pixel confidence scores (B, H, W)
    mask = pred["mask"]                       # Combined validity mask (B, H, W, 1)
    non_ambiguous_mask = pred["non_ambiguous_mask"]                # Non-ambiguous regions (B, H, W)
    non_ambiguous_mask_logits = pred["non_ambiguous_mask_logits"]  # Mask logits (B, H, W)

    # Scaling
    metric_scaling_factor = pred["metric_scaling_factor"]  # Applied metric scaling (B,)

    # Original input
    img_no_norm = pred["img_no_norm"]         # Denormalized input images for visualization (B, H, W, 3)
Multi-Modal Inference
MapAnything supports flexible combinations of geometric inputs for enhanced metric reconstruction. Steps to try it out:
Initialize the model:
# Optional config for better memory efficiency
import os
os.environ["PYTORCH_CUDA_ALLOC_CONF"] = "expandable_segments:True"

# Required imports
import torch
from mapanything.models import MapAnything

# Get inference device
device = "cuda" if torch.cuda.is_available() else "cpu"

# Init model - This requires internet access or the huggingface hub cache to be pre-downloaded
# For Apache 2.0 license model, use "facebook/map-anything-apache"
model = MapAnything.from_pretrained("facebook/map-anything").to(device)
Initialize the inputs:
# MapAnything is extremely flexible and supports any combination of inputs.
views_example = [
    {
        # View 0: Images + Calibration
        "img": image, # (H, W, 3) - [0, 255]
        "intrinsics": intrinsics, # (3, 3)
    },
    {
        # View 1: Images + Calibration + Depth
        "img": image, # (H, W, 3) - [0, 255]
        "intrinsics": intrinsics, # (3, 3)
        "depth_z": depth_z, # (H, W)
        "is_metric_scale": torch.tensor([True], device=device), # (1,)
    },
    {
        # View 2: Images + Calibration + Depth + Pose
        "img": image, # (H, W, 3) - [0, 255]
        "intrinsics": intrinsics, # (3, 3)
        "depth_z": depth_z, # (H, W)
        "camera_poses": camera_poses, # (4, 4) or tuple of (quats, trans) in OpenCV cam2world convention
        "is_metric_scale": torch.tensor([True], device=device), # (1,)
    },
    ...
]
Note that MapAnything expects the input camera poses to follow the OpenCV (+X - Right, +Y - Down, +Z - Forward) cam2world convention.
Expand to show more examples
# Example 1: Images + Camera Intrinsics
views_example = [
    {
        "img": image_tensor,  # (H, W, 3) - [0, 255]
        "intrinsics": intrinsics_tensor,  # (3, 3)
    },
    ...
]

# Example 2: Images + Intrinsics + Depth
views_example = [
    {
        "img": image_tensor, # (H, W, 3) - [0, 255]
        "intrinsics": intrinsics_tensor, # (3, 3)
        "depth_z": depth_tensor,  # (H, W)
        "is_metric_scale": torch.tensor([True]), # (1,)
    },
    ...
]

# Example 3: Images + Intrinsics + Camera Poses
views_example = [
    {
        "img": image_tensor, # (H, W, 3) - [0, 255]
        "intrinsics": intrinsics_tensor, # (3, 3)
        "camera_poses": pose_matrices,  # (4, 4) or tuple of (quats, trans) in OpenCV cam2world convention
        "is_metric_scale": torch.tensor([True]), # (1,)
    },
    ...
]

# Example 4: Images + Ray Directions + Depth (alternative to intrinsics)
views_example = [
    {
        "img": image_tensor, # (H, W, 3) - [0, 255]
        "ray_directions": ray_dirs_tensor,  # (H, W, 3)
        "depth_z": depth_tensor, # (H, W)
    }
    ...
]

# Example 5: Full Multi-Modal (Images + Intrinsics + Depth + Poses)
views_example = [
    {
        "img": image_tensor, # (H, W, 3) - [0, 255]
        "intrinsics": intrinsics_tensor, # (3, 3)
        "depth_z": depth_tensor, # (H, W)
        "camera_poses": pose_matrices, # (4, 4) or tuple of (quats, trans) in OpenCV cam2world convention
        "is_metric_scale": torch.tensor([True]), # (1,)
    }
    ...
]

# Example 6: Adaptive Mixed Inputs
views_example = [
    {
        # View 0: Images + Pose
        "img": images, # (H, W, 3) - [0, 255]
        "camera_poses": camera_poses, # (4, 4) or tuple of (quats, trans) in OpenCV cam2world convention
    },
    {
        # View 1: Images + Calibration
        "img": images, # (H, W, 3) - [0, 255]
        "intrinsics": intrinsics, # (3, 3)
    },
    {
        # View 2: Images + Calibration + Depth
        "img": images, # (H, W, 3) - [0, 255]
        "intrinsics": intrinsics, # (3, 3)
        "depth_z": depth_z, # (H, W)
        "is_metric_scale": torch.tensor([True], device=device), # (1,)
    },
    {
        # View 3: Images + Calibration + Depth + Pose
        "img": images, # (H, W, 3) - [0, 255]
        "intrinsics": intrinsics, # (3, 3)
        "depth_z": depth_z, # (H, W)
        "camera_poses": camera_poses, # (4, 4) or tuple of (quats, trans) in OpenCV cam2world convention
        "is_metric_scale": torch.tensor([True], device=device), # (1,)
    },
    ...
]
Run model inference:
from mapanything.utils.image import preprocess_inputs

# Preprocess inputs to the expected format
processed_views = preprocess_inputs(views_example)

# Run inference with any combination of inputs
predictions = model.infer(
    processed_views,                  # Any combination of input views
    memory_efficient_inference=True, # Trades off speed for more views (up to 2000 views on 140 GB). Trade off is negligible - see profiling section
    minibatch_size=None,              # Minibatch size for memory-efficient inference (use 1 for smallest GPU memory consumption). Default is dynamic computation based on available GPU memory.
    use_amp=True,                     # Use mixed precision inference (recommended)
    amp_dtype="bf16",                 # bf16 inference (recommended; falls back to fp16 if bf16 not supported)
    apply_mask=True,                  # Apply masking to dense geometry outputs
    mask_edges=True,                  # Remove edge artifacts by using normals and depth
    apply_confidence_mask=False,      # Filter low-confidence regions
    confidence_percentile=10,         # Remove bottom 10 percentile confidence pixels
    use_multiview_confidence=False,   # Enable multi-view depth consistency based confidence in place of learning-based one
    # Control which inputs to use/ignore
    # By default, all inputs are used when provided
    # If is_metric_scale flag is not provided, all inputs are assumed to be in metric scale
    ignore_calibration_inputs=False,
    ignore_depth_inputs=False,
    ignore_pose_inputs=False,
    ignore_depth_scale_inputs=False,
    ignore_pose_scale_inputs=False,
)

# Access results for each view - Complete list of metric outputs
# Outputs are the same as above (image-only input case), but with additional inputs used
Input requirements for model.infer:
img: RGB images normalized according todata_norm_typedata_norm_type: Normalization type (must match model's encoder requirements)
Optional geometric inputs supported by model.infer:
intrinsicsORray_directions: Camera calibration (cannot provide both since they are redundant)depth_z: Z-depth maps (requires calibration info)camera_poses: OpenCV (+X - Right, +Y - Down, +Z - Forward) cam2world poses as 4×4 matrices or (quaternions, translations)is_metric_scale: Whether inputs are in metric scale
Key constraints for model.infer:
- If
depth_zis provided, must also provideintrinsicsorray_directions - If any view has
camera_poses, the first view (reference) must also have them - Cannot provide both
intrinsicsandray_directionssimultaneously (they are redundant)
The above constraints are enforced in the inference API. However, if desired, the underlying model.forward can support any arbitrary combination of inputs (a total of 64 configurations; without counting per view flexibility).
Running External Models
The MapAnything codebase is modular — different 3D reconstruction models can be used interchangeably through a unified model factory interface. All model wrappers produce outputs in a unified format following MapAnything conventions (pts3d, pts3d_cam, ray_directions, depth_along_ray, cam_trans, cam_quats, conf, etc.). This enables fair comparison, benchmarking, and easy experimentation across methods.
Available Models
| Model Key | Description | Resolution | Data Norm Type | Install Extra |
|---|---|---|---|---|
mapanything | MapAnything | 518 | dinov2 | (base) |
mapanything_ablations | MapAnything ablations | 518 | dinov2 | (base) |
modular_dust3r | ModularDUSt3R | 512 | dust3r | (base) |
vggt | VGGT 1B | 518 | identity | (base) |
dust3r | DUSt3R + Global BA | 512 | dust3r | dust3r |
mast3r | MASt3R + SGA | 512 | dust3r | mast3r |
moge | MoGe | 518 | identity | (base) |
must3r | MUSt3R | 512 | dust3r | must3r |
pi3 | π³ | 518 | identity | (base) |
pi3x | π³-X | 518 | identity | pi3 |
pow3r | Pow3R | 512 | dust3r | pow3r |
pow3r_ba | Pow3R + BA | 512 | dust3r | pow3r |
anycalib | AnyCalib | - | - | anycalib |
da3 | Depth Anything 3 | 504 | dinov2 | depth-anything-3 |
Installation {#external-model-installation}
Install optional dependencies for external models:
# Install specific external model dependencies
pip install -e ".[dust3r]"           # DUSt3R
pip install -e ".[mast3r]"           # MASt3R
pip install -e ".[pi3]"              # π³-X (note: π³ base works without this)
pip install -e ".[pow3r]"            # Pow3R
pip install -e ".[anycalib]"         # AnyCalib
pip install -e ".[must3r]"           # MUSt3R
pip install -e ".[depth-anything-3]" # Depth Anything 3

# Or install all external model dependencies
pip install -e ".[all]"
Quick Start Example {#external-model-quick-start}
Example 1: Using init_model_from_config (recommended)
from mapanything.models import init_model_from_config

# Initialize model by name - handles Hydra config composition automatically
# Options are based on configs available in configs/model
# The model is returned on the specified device
model = init_model_from_config("vggt", device="cuda")

# Other examples:
# model = init_model_from_config("pi3x", device="cuda")
# model = init_model_from_config("da3_nested", device="cuda")
# Note: For MUSt3R, the values in configs/machine/default.yaml need to be populated to enable checkpoint loading
# model = init_model_from_config("must3r", device="cuda")
Example 2: Using model_factory directly
from mapanything.models import model_factory, get_available_models

# List all available models
print(get_available_models())
# ['mapanything', 'mapanything_ablations', 'modular_dust3r', 'anycalib',
#  'da3', 'dust3r', 'mast3r', 'moge', 'must3r', 'pi3', 'pi3x', 'pow3r',
#  'pow3r_ba', 'vggt']

# Initialize external model
# Requires passing in additional model config arguments as kwargs
# model = model_factory("model_name", **model_config_kwargs)
model = model_factory("vggt", name="vggt", torch_hub_force_reload=False)
model = model.to("cuda")
Running Inference
All model wrappers follow the same forward() interface. The model expects a list of view dictionaries as input and returns a list of prediction dictionaries:
import torch
from mapanything.utils.image import load_images

# Load and preprocess images from a folder
# This handles resizing and normalization based on model requirements
views = load_images(
    folder_or_list="path/to/images",  # Folder path or list of image paths
    resolution_set=518,               # Model-specific resolution (see table above)
    norm_type="dinov2",               # Model-specific normalization (see table above)
    patch_size=14,
)

# Run inference
model.eval()
with torch.no_grad():
    with torch.autocast("cuda"):
        predictions = model(views)

# predictions is a list of dicts, one per input view
# See the Unified Output Format section below for more details
Each input view dictionary must contain at minimum an img tensor of shape (B, 3, H, W) with the appropriate normalization applied. The load_images utility handles this preprocessing automatically. For more advanced inference patterns including loss computation and device handling, see the loss_of_one_batch_multi_view function in mapanything/utils/inference.py.
Unified Output Format
All model wrappers produce outputs in a consistent format:
| Output Key | Description |
|---|---|
pts3d | 3D points in world coordinates |
pts3d_cam | 3D points in camera coordinates |
ray_directions | Ray directions in camera frame |
depth_along_ray | Depth along ray |
cam_trans | Camera translation (cam2world) |
cam_quats | Camera quaternion (cam2world) |
conf | Per-pixel confidence scores |
This unified output format allows:
- Fair comparison between methods
- Easy swapping of models for experimentation
- Consistent downstream processing pipelines
Notes on Input Requirements
Different models have different input requirements:
Resolution - Longest Side:
- 518px: MapAnything, VGGT, MoGe, Pi3, Pi3X
- 512px: DUSt3R, MASt3R, MUSt3R, Pow3R
- 504px: Depth Anything 3
Data Normalization (data_norm_type):
dinov2: MapAnything, Depth Anything 3identity: VGGT, MoGe, Pi3, Pi3Xdust3r: DUSt3R, MASt3R, MUSt3R, Pow3R
For training and fine-tuning external models, see the Training README for detailed instructions.
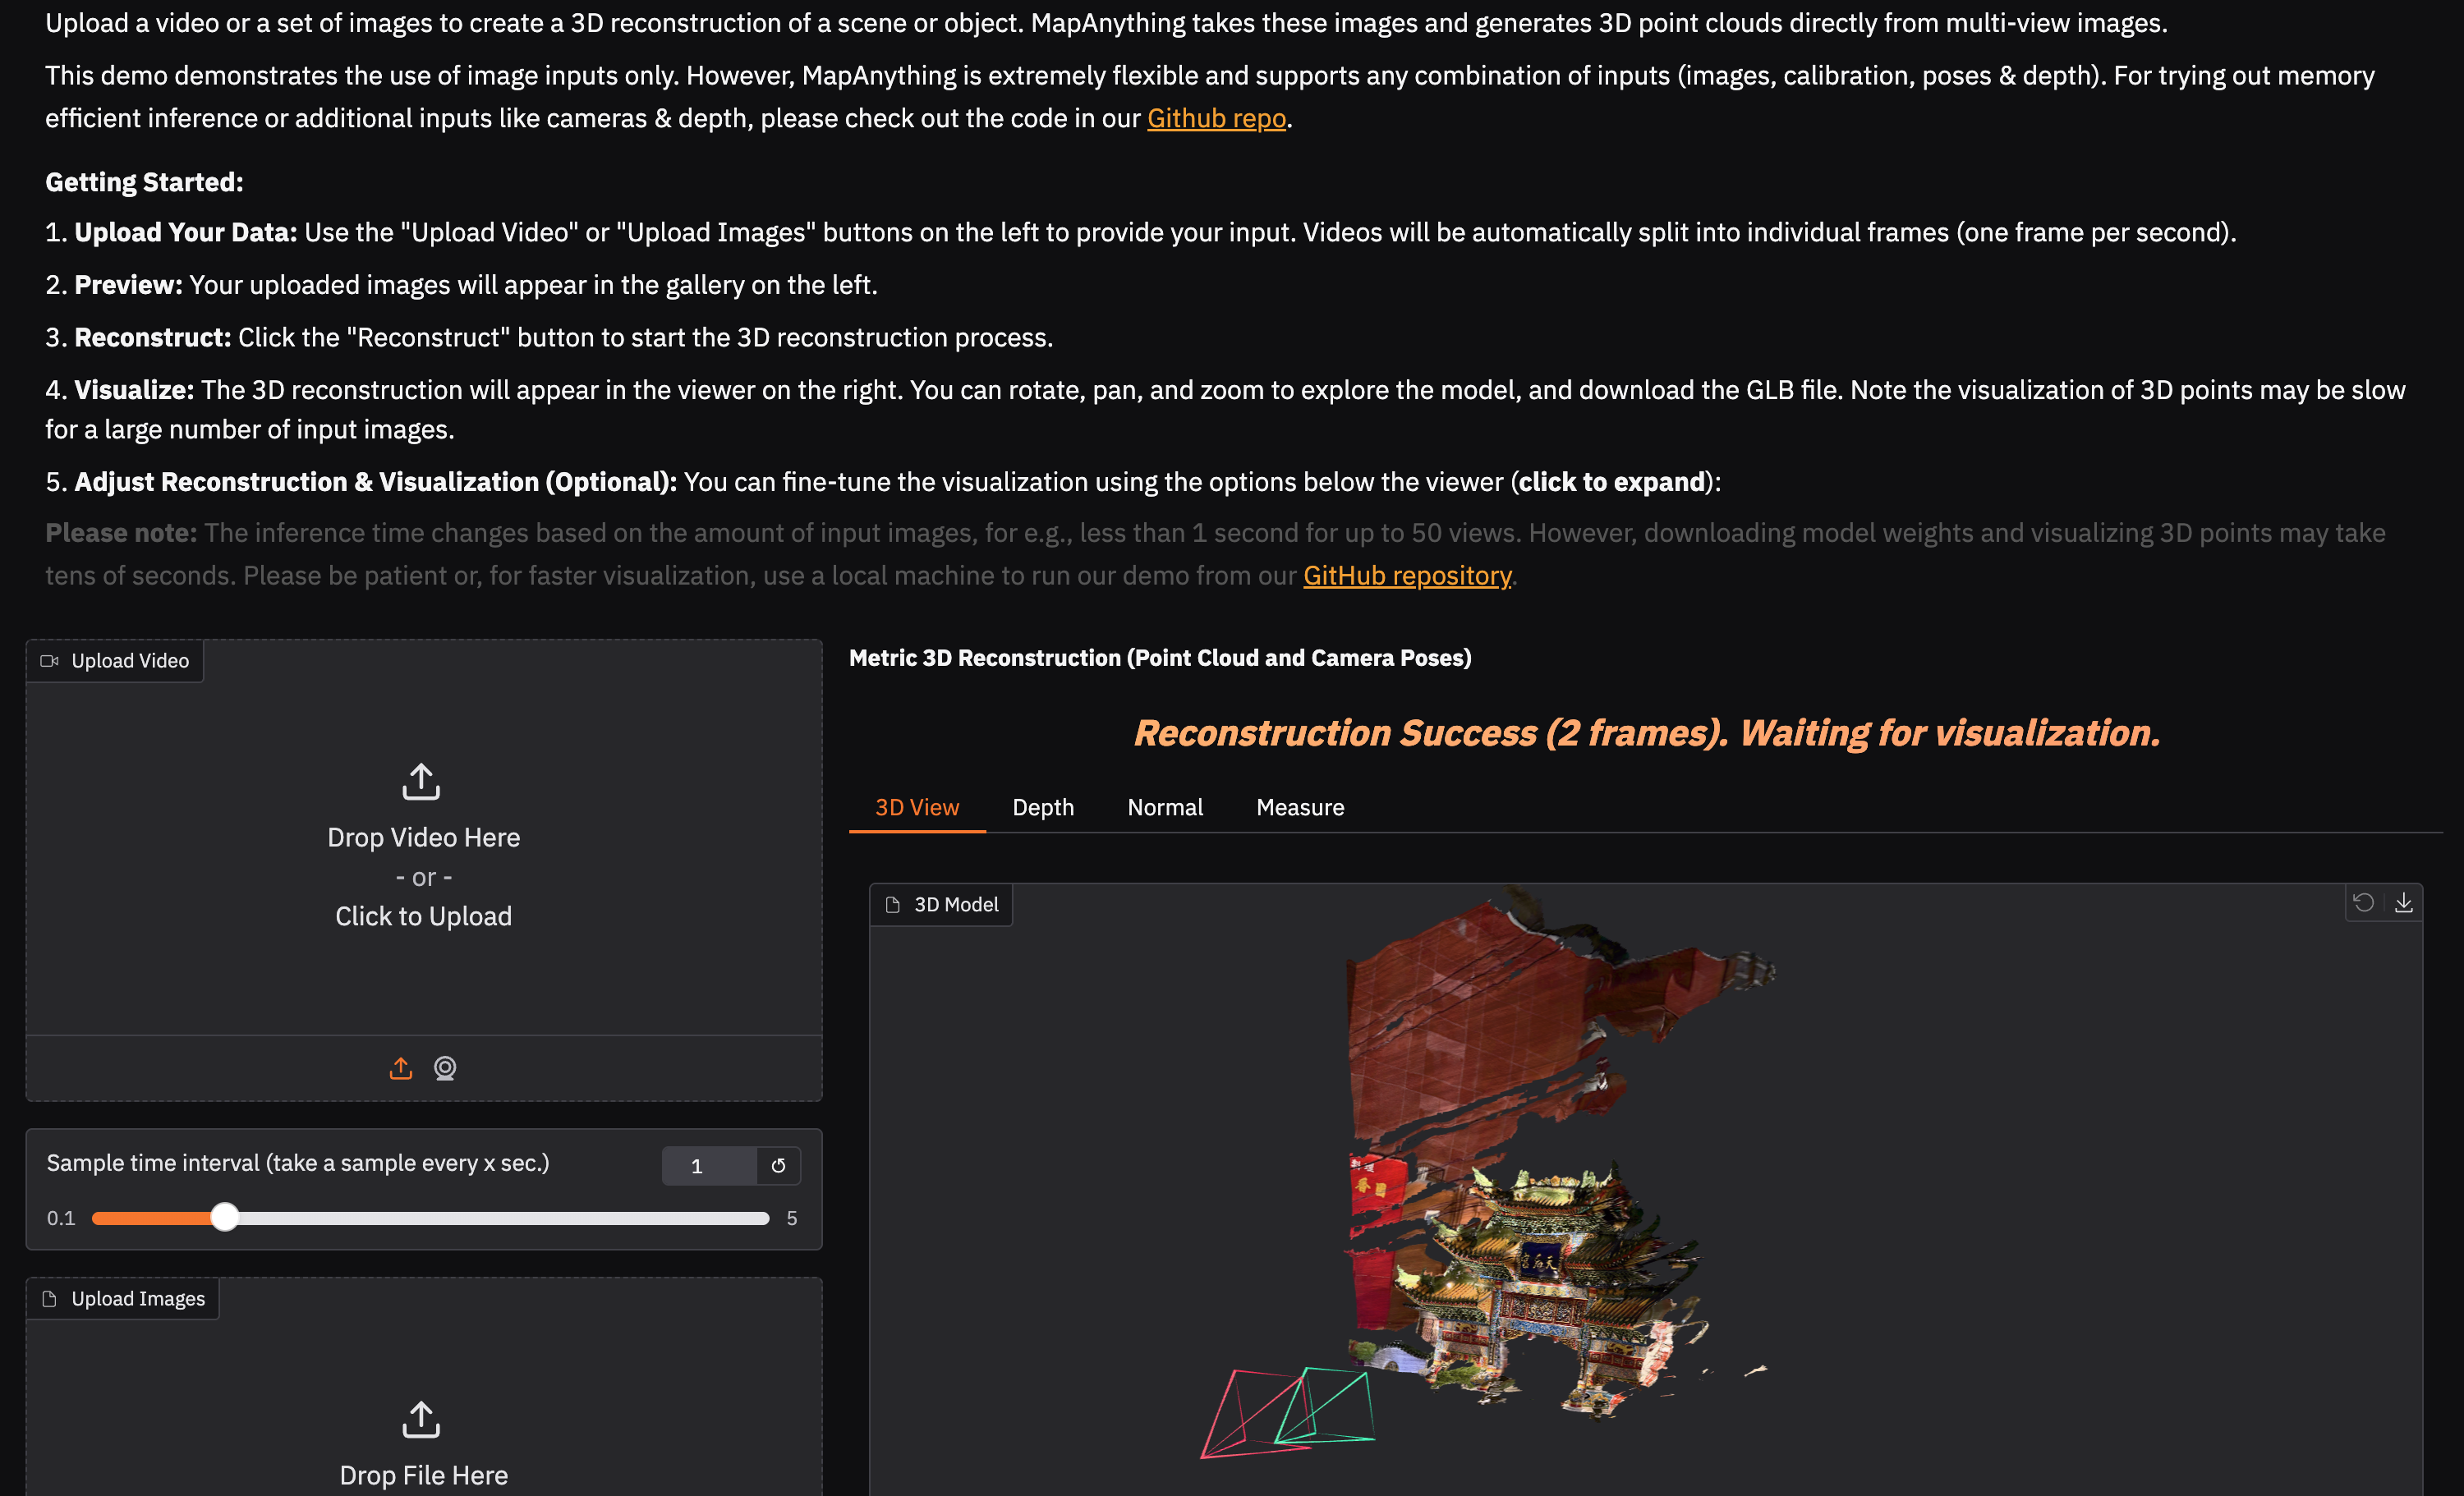
Interactive Demos
We provide multiple interactive demos to try out MapAnything!
Online Demo
Try our online demo without installation: 🤗 Hugging Face Demo
Local Gradio Demo
We provide a script to launch our Gradio app. The interface and GUI mirrors our online demo where you can upload images/videos, run reconstruction and interactively view them. You can launch this using:
# Install requirements for the app
pip install -e ".[gradio]"

# Launch app locally
python scripts/gradio_app.py
Expand to preview the Gradio demo interface
Rerun Demo
We provide a demo script for interactive 3D visualization of metric reconstruction results using Rerun.
# Terminal 1: Start the Rerun server
rerun --serve --port 2004 --web-viewer-port 2006

# Terminal 2: Run MapAnything demo
python scripts/demo_images_only_inference.py \
    --image_folder /path/to/your/images \
    --viz \
    --save_glb \
    --output_path /path/to/output.glb

# Terminal 3 or Local Machine: Open web viewer at http://127.0.0.1:2006 (You might need to port forward if using a remote server)
Additional options:
--apache: Use the Apache 2.0 licensed model--video_viz_for_rerun: Enable video-style visualization with time indexing--log_only_imgs_for_rerun_cams: Log only images for Rerun cameras (skip depth/mask)
Optionally, if rerun is installed locally, local rerun viewer can be spawned using: rerun --connect rerun+http://127.0.0.1:2004/proxy.
Demo Inference on COLMAP outputs
We provide a demo script to run MapAnything inference on COLMAP outputs. The script runs MapAnything in MVS mode by default (using COLMAP calibration and poses as input). Use the --help flag for more info.
# Terminal 1: Start the Rerun server
rerun --serve --port 2004 --web-viewer-port 2006

# Terminal 2: Run MapAnything inference on COLMAP output folder
python scripts/demo_inference_on_colmap_outputs.py \
    --colmap_path /path/to/your/colmap_output \
    --viz

# Terminal 3 or Local Machine: Open web viewer at http://127.0.0.1:2006 (You might need to port forward if using a remote server)
Additional options:
--apache: Use the Apache 2.0 licensed model--stride N: Load every Nth image (default: 1)--ext .bin/.txt: COLMAP file extension (default: .bin)--ignore_calibration_inputs: Ignore COLMAP calibration (use only images and poses)--ignore_pose_inputs: Ignore COLMAP poses (use only images and calibration)--save_colmap: Export results in COLMAP format--save_glb: Save reconstruction as GLB file--output_directory: Output directory for COLMAP or GLB exports (default: colmap_mapanything_output)--verbose: Enable verbose loading output
Optionally, if rerun is installed locally, local rerun viewer can be spawned using: rerun --connect rerun+http://127.0.0.1:2004/proxy.
Profiling
Profile GPU memory usage and inference speed of MapAnything across different view counts. The profiling script supports comparison with external models and outputs both JSON results and visualizations.
Profiling Results
MapAnything achieves the best speed and memory profile compared to existing methods, enabling efficient inference across a wide range of view counts.
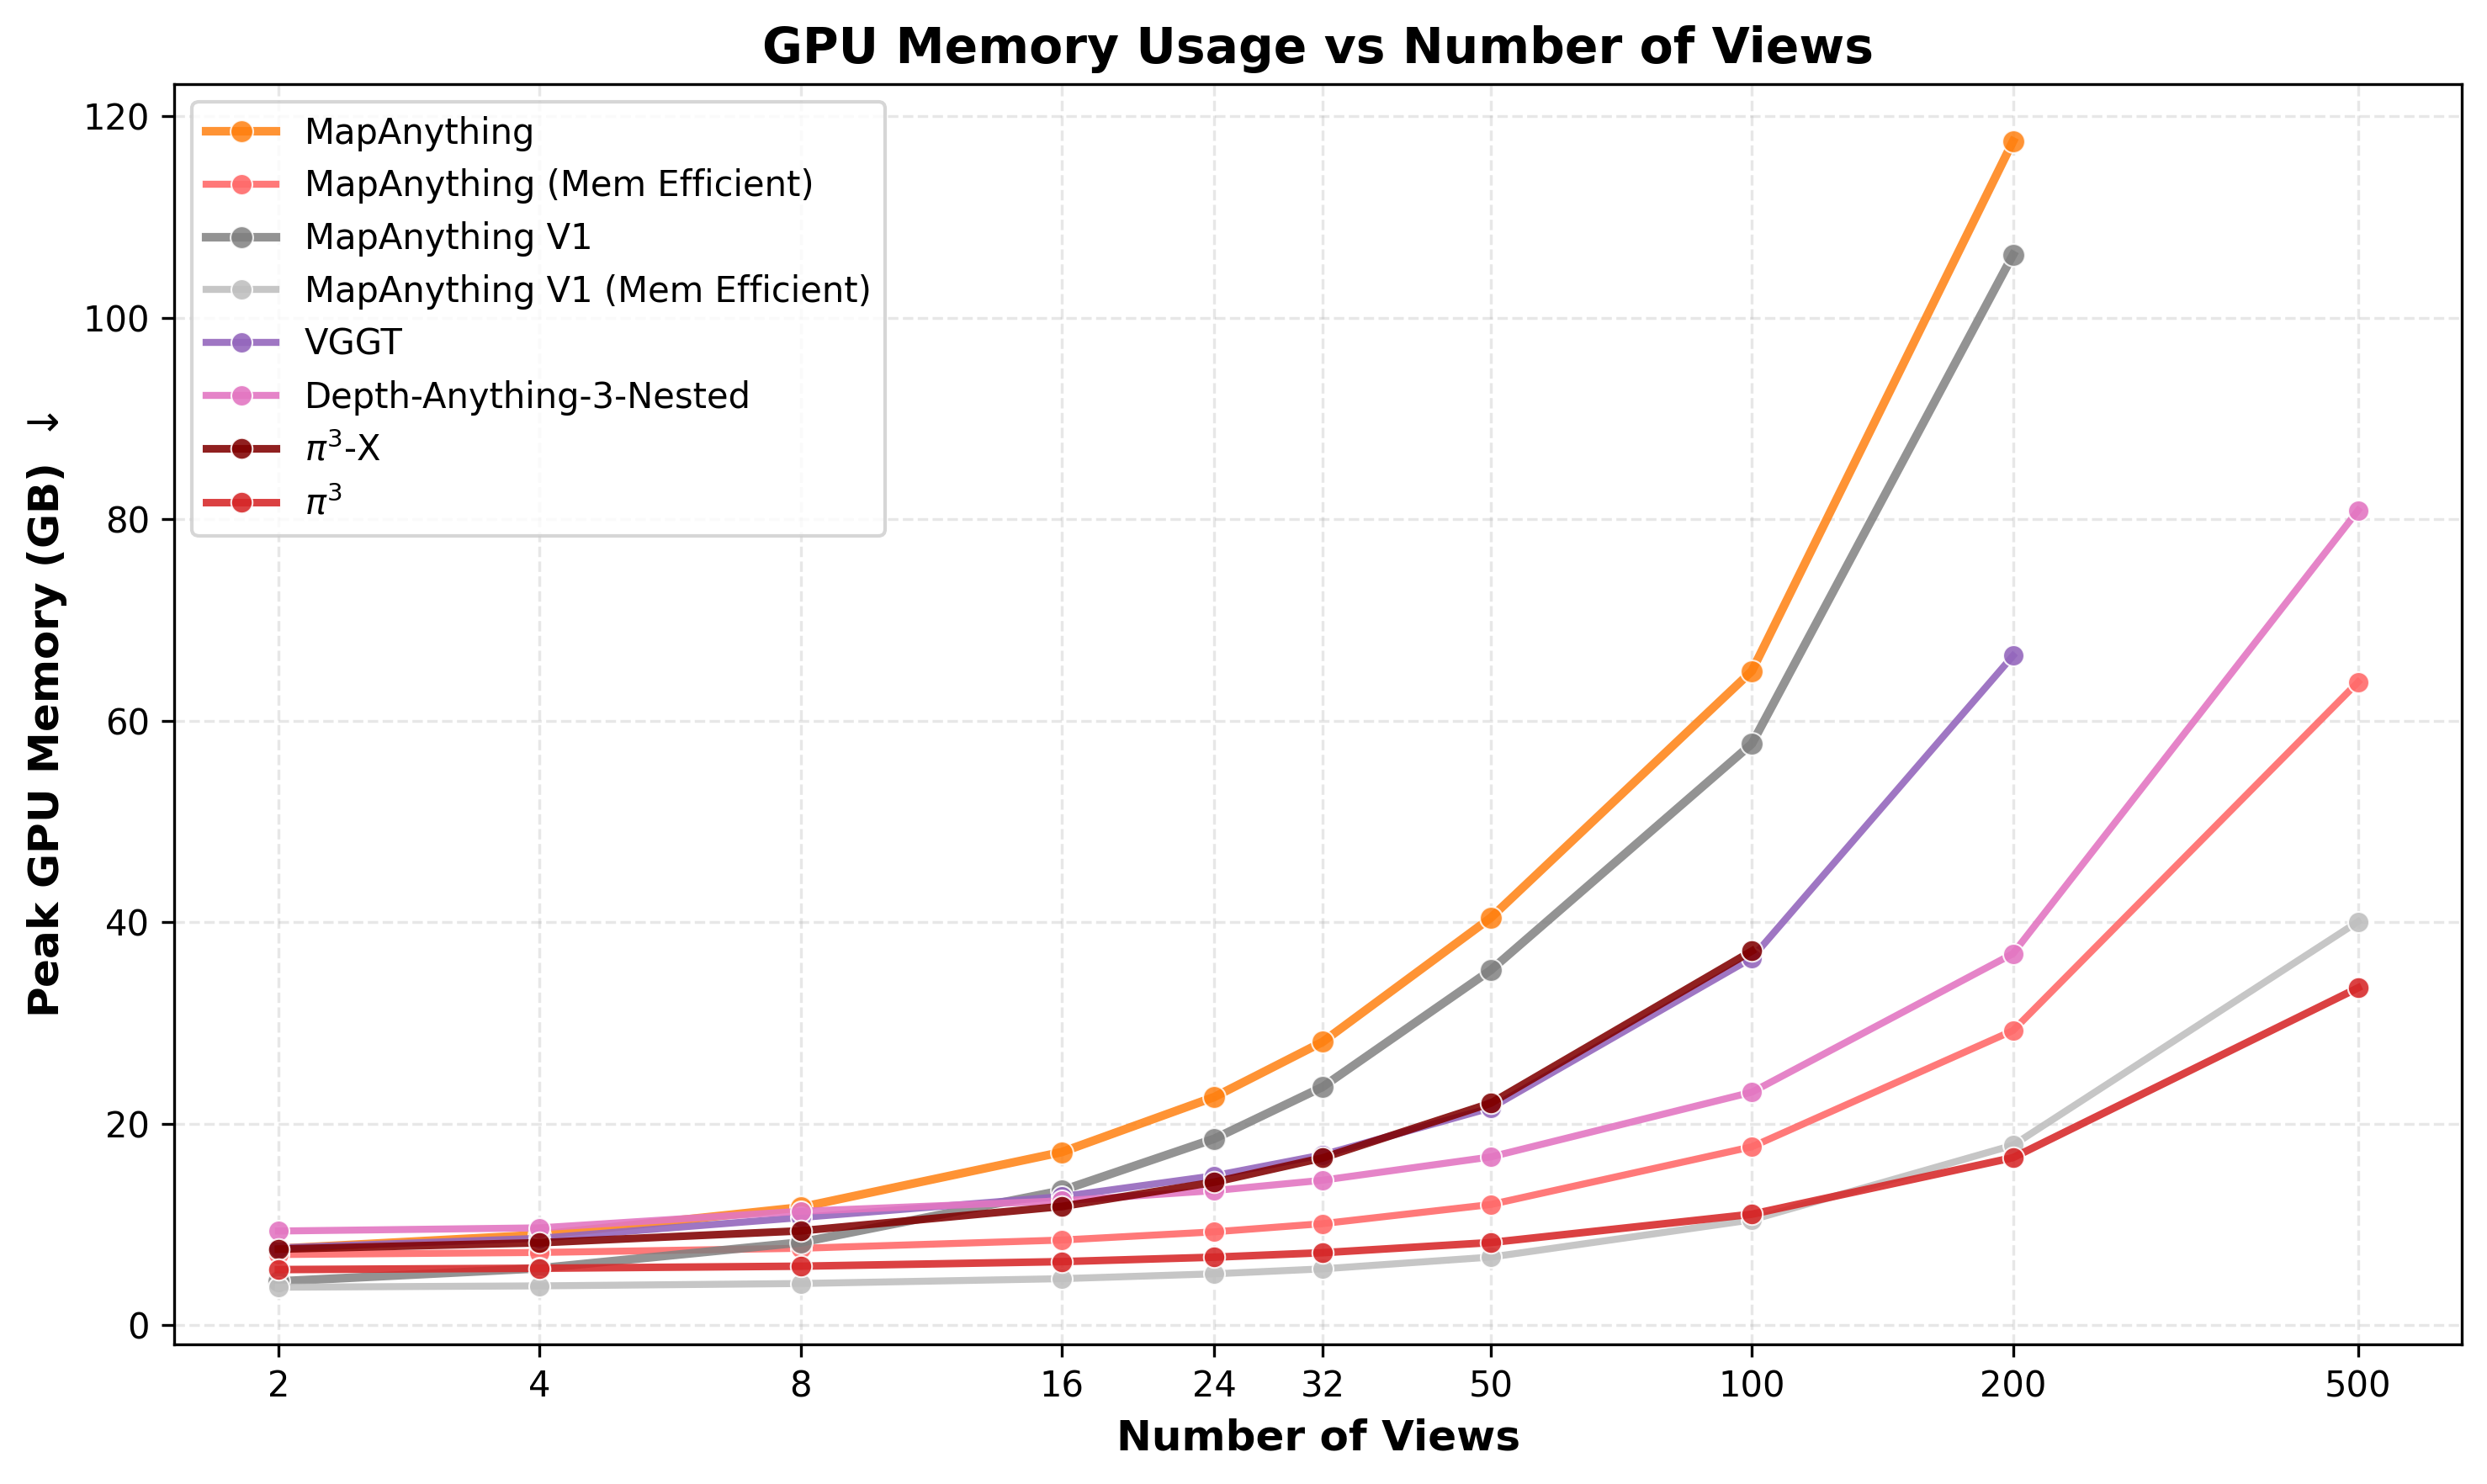 | 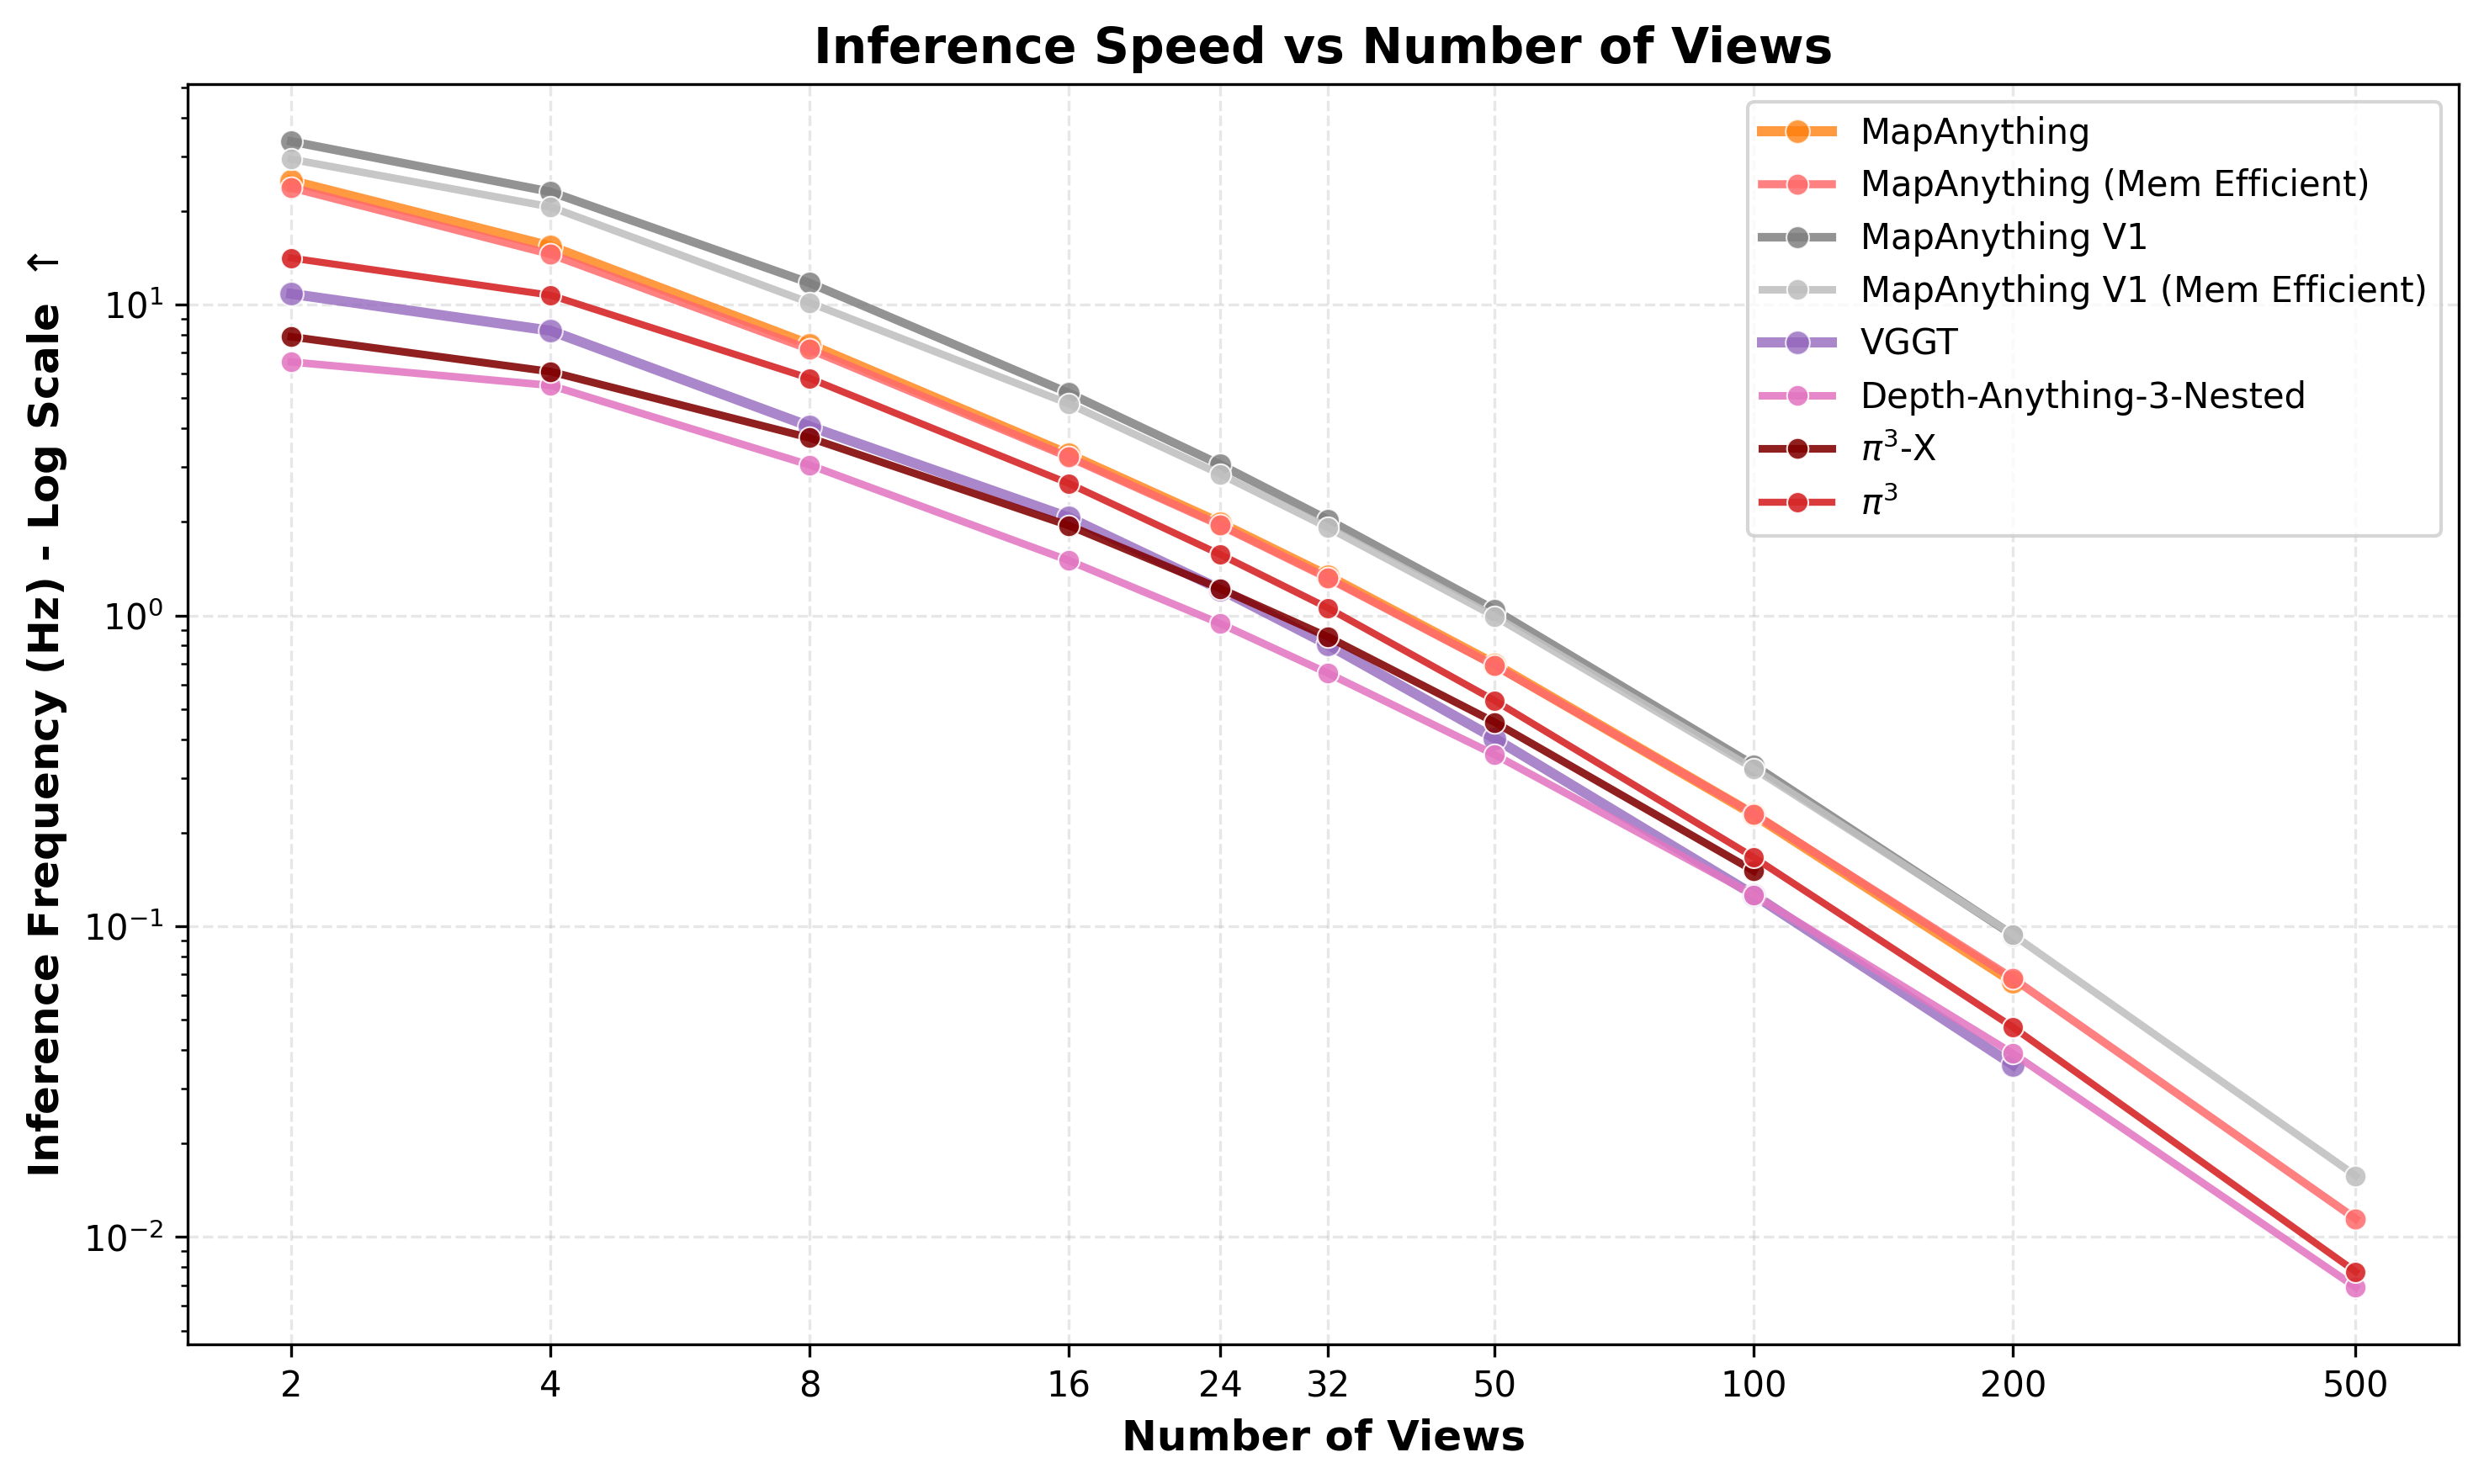 |
| Peak GPU Memory vs Number of Views | Inference Speed vs Number of Views |
Note on Memory Efficient Mode: MapAnything (Mem Efficient) in the plots refers to using memory_efficient_inference=True with mini batch size 1 in the .infer() and .forward() calls. This mode trades off speed for reduced memory consumption, enabling inference on a larger number of views (up to 2000 views on 140 GB). As seen in the plots, the speed trade off is negligible.
Basic Profiling
# Profile MapAnything (default and memory-efficient modes)
python scripts/profile_memory_runtime.py \
    --output_dir /path/to/results

# Profile with a specific checkpoint
python scripts/profile_memory_runtime.py \
    --output_dir /path/to/results \
    --mapanything_checkpoint /path/to/checkpoint.pth

# Use Apache 2.0 licensed model
python scripts/profile_memory_runtime.py \
    --output_dir /path/to/results \
    --apache
Comparing with External Models
External models are loaded using their Hydra config files from configs/model/<model_name>.yaml. Make sure the required dependencies are installed (see Running External Models).
# Compare MapAnything with external models
python scripts/profile_memory_runtime.py \
    --output_dir /path/to/results \
    --external_models vggt pi3x must3r

# Custom view counts
python scripts/profile_memory_runtime.py \
    --output_dir /path/to/results \
    --num_views 2 4 8 16 32 64
Available external models: vggt, pi3, pi3x, dust3r, mast3r, must3r, pow3r, pow3r_ba, da3, da3_nested, moge_1, moge_2
Command-Line Arguments
| Argument | Description | Default |
|---|---|---|
--output_dir | Directory to save results | Required |
--num_views | List of view counts to profile | 2 4 8 16 24 32 50 100 200 500 1000 |
--external_models | External model names to compare | None |
--mapanything_checkpoint | Path to MapAnything checkpoint | None (uses HuggingFace) |
--apache | Use Apache 2.0 licensed model | False |
--warmup_runs | Number of warmup iterations | 3 |
--timed_runs | Number of timed iterations | 5 |
--skip_mem_efficient | Skip memory-efficient mode profiling | False |
Output Files
The script generates the following outputs in the specified directory:
profiling_results.json: Raw profiling data with memory and timing statisticsprofiling_memory.png: Plot of peak GPU memory usage vs number of viewsprofiling_speed.png: Plot of inference frequency (Hz) vs number of views
COLMAP & GSplat Support
MapAnything predictions can be exported to COLMAP format for use with Gaussian Splatting and other downstream applications.
Exporting to COLMAP Format
MapAnything's predictions can directly be converted to COLMAP format by using:
# Install requirements for this specific demo
pip install -e ".[colmap]"

# Export MapAnything predictions to COLMAP format
python scripts/demo_colmap.py --images_dir=/YOUR/IMAGES_DIR/ --output_dir=/YOUR/OUTPUT_DIR/

# With custom voxel fraction (default: 0.01 = 1% of IQR-based scene extent)
python scripts/demo_colmap.py --images_dir=/YOUR/IMAGES_DIR/ --output_dir=/YOUR/OUTPUT_DIR/ --voxel_fraction=0.002

# With explicit voxel size in meters (overrides --voxel_fraction)
python scripts/demo_colmap.py --images_dir=/YOUR/IMAGES_DIR/ --output_dir=/YOUR/OUTPUT_DIR/ --voxel_size=0.01

# Use Apache 2.0 licensed model
python scripts/demo_colmap.py --images_dir=/YOUR/IMAGES_DIR/ --output_dir=/YOUR/OUTPUT_DIR/ --apache

# Also save dense reconstruction as GLB file
python scripts/demo_colmap.py --images_dir=/YOUR/IMAGES_DIR/ --output_dir=/YOUR/OUTPUT_DIR/ --save_glb

# Skip Point2D backprojection for faster export
python scripts/demo_colmap.py --images_dir=/YOUR/IMAGES_DIR/ --output_dir=/YOUR/OUTPUT_DIR/ --skip_point2d
The output is a self-contained COLMAP reconstruction with processed images (at model inference resolution) and camera parameters:
OUTPUT_DIR/
├── images/           # Processed images (matching intrinsics resolution)
│   ├── img1.jpg
│   └── img2.jpg
└── sparse/
    ├── cameras.bin
    ├── images.bin
    ├── points3D.bin
    └── points.ply
Visualizing COLMAP Reconstruction in Rerun
You can visualize the exported COLMAP reconstruction using Rerun:
# Terminal 1: Start the Rerun server
rerun --serve --port 2004 --web-viewer-port 2006

# Terminal 2: Visualize the COLMAP reconstruction
python scripts/visualize_colmap_format_in_rerun.py --scene_dir=/YOUR/OUTPUT_DIR/ --connect

# With images and keypoints
python scripts/visualize_colmap_format_in_rerun.py --scene_dir=/YOUR/OUTPUT_DIR/ --show_images --show_keypoints --connect

# Filter noisy points (by track length, primarily useful for traditional SfM outputs)
python scripts/visualize_colmap_format_in_rerun.py --scene_dir=/YOUR/OUTPUT_DIR/ --filter --min_track_length=4 --connect

# Terminal 3 or Local Machine: Open web viewer at http://127.0.0.1:2006
Optionally, if Rerun is installed locally, the local Rerun viewer can be spawned using: rerun --connect rerun+http://127.0.0.1:2004/proxy.
Integration with Gaussian Splatting
The exported COLMAP files can be directly used with gsplat for Gaussian Splatting training. Install gsplat following their official instructions (we recommend gsplat==1.3.0):
An example command to train the model is:
cd <path_to_gsplat>
python examples/simple_trainer.py  default --data_factor 1 --data_dir /YOUR/OUTPUT_DIR/ --result_dir /YOUR/RESULT_DIR/
Data Processing for Training & Benchmarking
We provide details in the Data Processing README.
Training
We provide comprehensive training instructions, scripts, and configurations to reproduce MapAnything and train custom models. See Training README for detailed training instructions, including:
- Data setup and processing for all 13 training datasets used in the paper
- Quick start examples with memory optimization tips
- All main model and ablation training scripts from the paper
- Fine-tuning support for other geometry estimation models like MoGe-2, VGGT, π³ showcasing the modularity of our framework
Benchmarking
We provide comprehensive benchmarking scripts and instructions for evaluating MapAnything across multiple tasks and datasets. All original bash scripts used for benchmarking are available in the /bash_scripts/benchmarking/ folder.
Available Benchmarks
-
Dense Up-to-N-View Reconstruction Benchmark See Dense Up-to-N-View Benchmark README for detailed instructions on evaluating dense multi-view metric reconstruction.
-
Single-View Image Calibration Benchmark See Calibration Benchmark README for detailed instructions on evaluating camera intrinsic prediction from single images.
-
RobustMVD Benchmark See RMVD Benchmark README for detailed instructions on using the RobustMVD benchmark.
Code License
This code is licensed under an open-source Apache 2.0 license.
Models
We release two variants of the pre-trained MapAnything models on Hugging Face Hub, each with different licensing based on the underlying training datasets:
🤗 Hugging Face Hub Models
- facebook/map-anything (CC-BY-NC 4.0 License)
- facebook/map-anything-apache (Apache 2.0 License)
🤗 Hugging Face Hub Models used for V1 Release in September 2025
- facebook/map-anything-v1 (CC-BY-NC 4.0 License)
- facebook/map-anything-apache-v1 (Apache 2.0 License)
Model Selection Guide
- For Research & Academic Use: Use
facebook/map-anythingfor the best performance - For Commercial Use: Use
facebook/map-anything-apachefor commercial-friendly licensing
Both models support the same API and functionality. The only difference is the training data composition and resulting license terms. Please see our paper for detailed information about the specific datasets used in each model variant.
Optional Checkpoint Conversion
The MapAnything training/benchmarking framework expects trained checkpoints in a specific format with a model key. The HuggingFace checkpoints can be easily converted to the expected format using:
# Convert default CC-BY-NC model
python scripts/convert_hf_to_benchmark_checkpoint.py \
    --output_path checkpoints/facebook_map-anything.pth

# Convert Apache 2.0 model for commercial use
python scripts/convert_hf_to_benchmark_checkpoint.py \
    --apache \
    --output_path checkpoints/facebook_map-anything-apache.pth
Building Blocks for MapAnything
UniCeption & WorldAI (WAI) Data are two crucial building blocks and have been developed for ease of use by the community:
🌍 UniCeption is a library which contains modular, config-swappable components for assembling end-to-end networks.
🌍 WAI is a unified data format for all things 3D, 4D & Spatial AI. It enables easy, scalable and reproducible data processing.
We strongly encourage the community to build on top of the tools and submit PRs! This also enables us to release stronger models (both apache and research use) as the community adds more datasets to WAI and builds on top of UniCeption/MapAnything.
Related Research
Check out our related work which also use UniCeption & WAI:
🚀 UFM: A Simple Path towards Unified Dense Correspondence with Flow
🚀 FlowR: Flowing from Sparse to Dense 3D Reconstructions
Acknowledgments
We thank the following projects for their open-source code: DUSt3R, MASt3R, RayDiffusion, MoGe, VGGSfM, VGGT, MaRePo, and DINOv2.
Citation
If you find our repository useful, please consider giving it a star ⭐ and citing our paper in your work:
@inproceedings{keetha2026mapanything,
  title={{MapAnything}: Universal Feed-Forward Metric {3D} Reconstruction},
  author={Nikhil Keetha and Norman M\"{u}ller and Johannes Sch\"{o}nberger and Lorenzo Porzi and Yuchen Zhang and Tobias Fischer and Arno Knapitsch and Duncan Zauss and Ethan Weber and Nelson Antunes and Jonathon Luiten and Manuel Lopez-Antequera and Samuel Rota Bul\`{o} and Christian Richardt and Deva Ramanan and Sebastian Scherer and Peter Kontschieder},
  booktitle={International Conference on 3D Vision (3DV)},
  year={2026},
  organization={IEEE}
}