NTSCRT
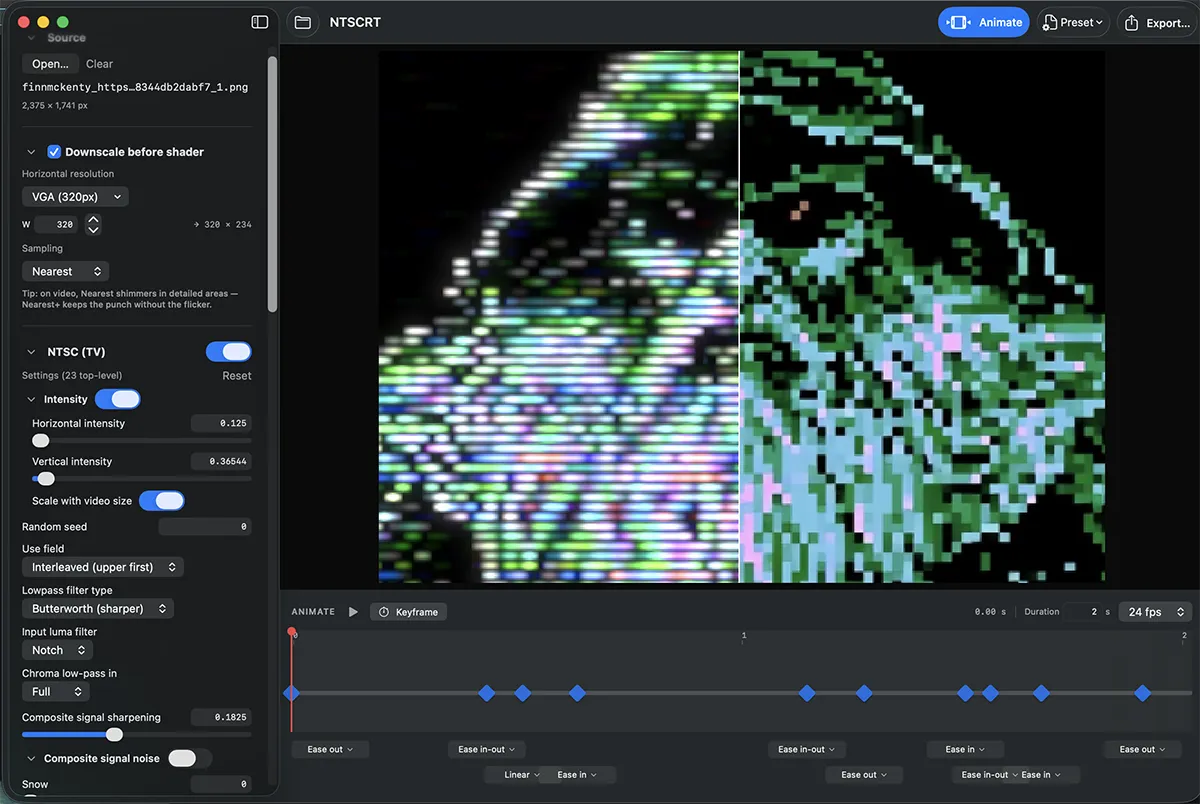
Make any image or video look like it's playing on a 1980s TV. NTSCRT runs your media through an optional digital camera and codec (webcam, video call, MiniDV), an analog signal emulation (ntsc-rs: composite artifacts, tape noise, head switching), a simulated TV and VCR for the dramatic glitches, and the CRT shaders RetroArch uses (via librashader: scanlines, phosphor masks, glow).
Full disclosure: the two hardest parts aren't mine. The signal emulation is ntsc-rs, and the CRT look is the RetroArch shader community's work. NTSCRT is the native Mac app built around them: it joins them into one pipeline and adds its own pieces on top, including the Digital video and Glitch stages, Screen Loop video feedback, cropping, a keyframe timeline, and video and GIF export.
your image/video → crop → digital camera + codec → NTSC/VHS signal (full res) → downscale to retro resolution → TV/VCR glitches → CRT shader → screen
Download
Grab the DMG from Releases, open it, and drag NTSCRT to Applications.
Requirements: macOS 14 or later. The app is a universal binary (Apple Silicon + Intel).
Intel note: I build and test NTSCRT on Apple Silicon and haven't personally tested the Intel build. Intel support exists thanks to a contributed fix (#1) verified by its author on an Intel iMac Pro — if something misbehaves on your Intel Mac, please open an issue.
Using the app
Open an image or video (⌘O, or drop it on the Source panel), shape the look in the sidebar, and export (⌘E).
The pipeline (sidebar)
The sidebar runs top to bottom in signal order. A section's checkbox or switch turns that stage off.
- Source: the loaded image (PNG, JPEG, HEIC) or video (MP4, MOV).
- Crop: cuts the picture to an aspect ratio (square, or portrait and landscape shapes from 3:4 to 1:2) before anything else sees it. Drag the picture in the preview to move the crop, or a corner to zoom in (to cut black borders, say); double-click to center.
- Downscale: the retro resolution the CRT sees (SNES 256 px, VGA 320 px, or any width). Chunky keeps hard pixel edges; Smooth is softer and steadier on video.
- Digital video (off by default): footage recorded digitally before it goes out as an analog signal, like webcam video dubbed to VHS. Pick a format (Webcam, Video call, MiniDV in the VX1000 skate-video style, Early web video, Datamosh), which also sets the Downscale resolution, then adjust the camera (fields, aliasing, exposure, color, black level, sharpening) and the compression (quality, keyframes, lost data, datamoshing). It runs a real codec, so blocks, smears and datamoshing come out of the compression rather than being drawn.
- NTSC (TV): the analog signal, with composite noise, chroma bleed, head switching, tape speed, and about sixty more settings. They're ntsc-rs's own, so presets paste both ways with the ntsc-rs app.
- Glitch: a simulated TV and VCR, for dramatic failures like rolling, tearing, bending, snow and tracking noise. The circuits themselves are simulated, so glitches combine the way real ones did. With every knob healthy, the picture is untouched.
- CRT: seven RetroArch CRT shaders (crt-royale, crt-hyllian, crt-aperture, crt-easymode, two crtglow variants, crtsim) with every parameter exposed. A grayed-out control shows which switch turns it on.
Preview
- Compare splits the view: full pipeline on the left, the original on the right. Drag the line to move the split.
- Integer scale snaps the picture to whole-pixel multiples, for perfectly even scanlines.
- The sparkles button keeps tape noise and jitter moving. Leave it on for the real experience.
- Zoom with the slider or ⌥-scroll; hold Space and drag to pan.
- Videos get a transport bar with play/pause and a frame-accurate scrubber. While a video is paused, the app renders ahead (the green line under the scrubber), so that stretch then plays back smoothly.
- The palette fades when the mouse is idle; move the mouse to bring it back.
Animating (timeline)
Click Animate in the toolbar to keyframe the whole effect chain, then export it as video.
- Move the playhead, set a look, and press Keyframe; repeat. Settings you don't change between keys hold still.
- With the playhead on a keyframe, any change you make updates that keyframe.
- Drag a diamond to retime it, and pick its easing (linear, ease in, ease out, ease in-out or hold) from the menu below it.
- Set the length and frame rate in the timeline. Changing the length stretches the whole animation.
- Space plays and pauses. On a video, the timeline is the clip: scrubbing seeks the footage.
- A still can export video even without keyframes; the tape noise and jitter move on their own.
Exporting
Click Export (⌘E). Exports use the same switches as the preview, and the same settings always give the same pixels.
- PNG: the picture, or the frame under the playhead on a video.
- Viewport: exactly what the preview shows, zoom and all, at your screen's real pixels (2× on a Retina display). Use it for close-ups that show off the scanlines.
- Video: H.264 or HEVC .mp4, or ProRes .mov, with audio. Scanlines are hard on codecs, so use High quality or above, or ProRes for editing.
- GIF: its own width and frame rate. The panel estimates the file size and warns past about 10 MB (a 5-second, 480 px GIF is around 8 MB).
- Loop repeats the content inside the file (3 turns a 6-second clip into 18 seconds), for places that don't loop video.
- Snap size to scanline grid picks a nearby size where every scanline lands evenly. Without it, exports still avoid banding by rendering larger and scaling down.
Screen Loop
Video feedback, the analog way: a camcorder filming a TV that shows the camcorder's own picture. The 1963 Doctor Who titles were made like this. Click Screen Loop in the toolbar.
- Your picture becomes a tunnel of copies. Each copy has been through your whole look once more than the one around it, so noise and color errors compound.
- Drag the green dot on the preview to set the vanishing point. Pull the blue ring out of it to make the point drift during the render.
- Zoom sets how deep the tunnel goes. Other knobs set the camera angle, handheld shake, push, spin, softness, color, and a luma key that keeps your subject solid.
- Seamless loop makes every move go out and back, so a GIF loops without a jump.
- A short draft re-renders as you work. Render… writes the full file with your export settings.
- Screen Loop presets are saved separately from looks.
Presets
- Preset in the toolbar saves or loads your whole setup as a JSON file: every section, plus the timeline and its keyframes.
- The bundled presets are listed in the same menu. Loading one with keyframes opens the timeline.
- A preset saved with a crop brings it back. One without a crop leaves yours alone.
Tips
- Every number next to a slider is a text field: click it and type.
- Double-click a slider's knob to send it to its weakest setting.
- Analog artifacts show best on contrast: dark backgrounds, bright sprites, hard edges.
- For high-resolution sources, turn on Intensity → Scale with video size in the NTSC panel, so artifacts keep their size.
Limitations
- The Intel half of the universal build is community-tested, not author-tested (see the note up top).
- The NTSC stage runs on the CPU at your source's full resolution, so 4K sources slow the preview down. Exports always render every frame.
- Video playback runs in real time and drops the occasional frame under heavy settings. The render-ahead cache holds up to a quarter of memory (at most 1 GB).
- A few crt-royale parameters are switched off inside the shader itself (marked "static in this shader build"). They do nothing in RetroArch either.
- No undo. Save a preset before big experiments.
Building from source
See DEVELOPMENT.md for the full developer setup (Swift + Rust toolchains, vendored dependencies, CLI tools, release pipeline).
Credits
- ntsc-rs — the NTSC/VHS signal emulation (MIT/ISC/Apache-2.0)
- librashader by SnowflakePowered — the RetroArch-compatible shader runtime (MPL-2.0)
- analogtv by Trevor Blackwell (xscreensaver) — the design the Glitch stage's receiver simulation follows: glitches as the response of simulated TV circuits
- libretro/slang-shaders and the RetroArch community — the CRT shaders themselves: crt-royale by TroggleMonkey, crt-easymode and crt-aperture by EasyMode, crt-hyllian by Hyllian, crtsim, crtglow (various licenses, largely GPL)