Building RL Environments with OpenEnv
A hands-on course for ML engineers, researchers, and hobbyists who want to use and build RL environments for LLM training.
5 modules · ~45-60 min each · Markdown + Jupyter notebooks
Prerequisites
- Basic Python
- Familiarity with the Hugging Face ecosystem
- No RL experience required
How to Use This Course
Each module has two parts:
- README.md — Concepts, architecture, context. Read this first.
- notebook.ipynb — Hands-on code. Open in Google Colab and run top-to-bottom.

Modules
| # | Module | What You'll Learn | Notebook |
|---|---|---|---|
| 1 | Why OpenEnv? | The RL loop, why Gym falls short, OpenEnv architecture | Open → |
| 2 | Using Existing Environments | Environment Hub, type-safe models, policies, competition | Open → |
| 3 | Deploying Environments | Local dev, Docker, HF Spaces, openenv push | Open → |
| 4 | Building Your Own Environment | The 3-component pattern, scaffold → deploy | Open → |
| 5 | Training with OpenEnv + TRL | GRPO, reward functions, Wordle training | Open → |
Quick Start
# Install OpenEnv core
pip install openenv-core

# Clone the OpenEnv repo to get typed environment clients
git clone https://github.com/meta-pytorch/OpenEnv.git
import sys, os
repo = os.path.abspath('OpenEnv')
sys.path.insert(0, repo)
sys.path.insert(0, os.path.join(repo, 'src'))
# Echo environment — uses MCP tool-calling interface
from envs.echo_env import EchoEnv
with EchoEnv(base_url="https://openenv-echo-env.hf.space").sync() as env:
env.reset()
response = env.call_tool("echo_message", message="Hello, OpenEnv!")
print(response) # Hello, OpenEnv!
# OpenSpiel environments — use standard reset/step interface
from envs.openspiel_env import OpenSpielEnv
from envs.openspiel_env.models import OpenSpielAction
with OpenSpielEnv(base_url="https://openenv-openspiel-catch.hf.space").sync() as env:
result = env.reset()
result = env.step(OpenSpielAction(action_id=1, game_name="catch"))
print(result.observation.legal_actions)Every standard OpenEnv environment uses the same 3-method interface: reset(), step(), state().
Links
Bonus: Scaling OpenEnv
For production workloads beyond a single container, see the scaling appendix below.
WebSocket vs HTTP
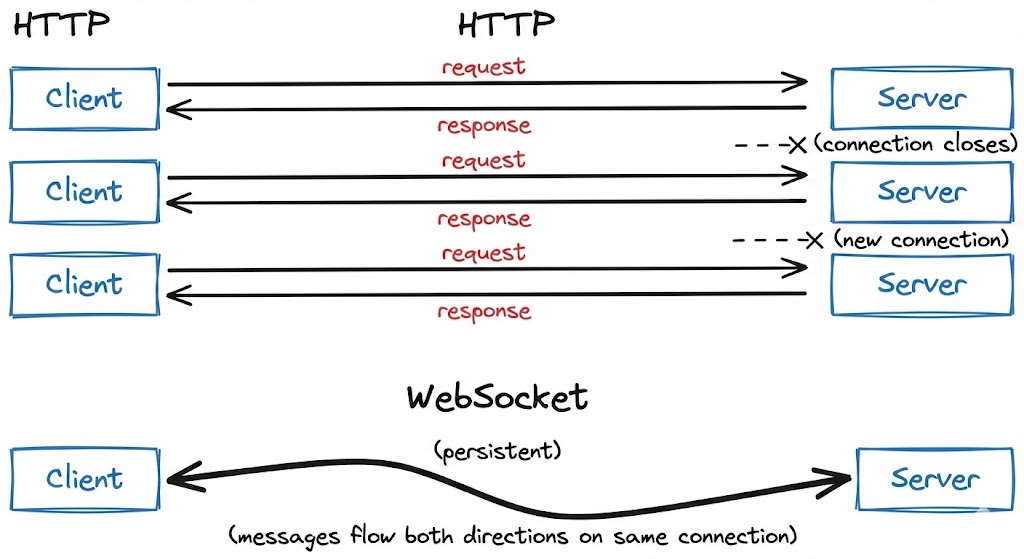
OpenEnv uses WebSocket (/ws) for persistent sessions instead of stateless HTTP. Each step() call is a lightweight frame (~0.1ms overhead) over an existing connection, vs TCP handshake overhead (~10-50ms) with HTTP.
One container handles many isolated sessions — each WebSocket connection gets its own environment instance server-side.
Single Container Scaling
Before adding containers, maximize a single deployment:
| Variable | Default | Description |
|---|---|---|
WORKERS | 4 | Uvicorn worker processes |
MAX_CONCURRENT_ENVS | 100 | Max WebSocket sessions per worker |
With 8 workers, a single container can handle ~2,048 concurrent sessions for simple text environments.
Multi-Container with Load Balancing
When a single container isn't enough, deploy multiple containers behind Envoy:
| Setup | Containers | Sessions/container | Total capacity |
|---|---|---|---|
| Single | 1 | 100 | 100 |
| 4× containers | 4 | 100 | 400 |
| 8× containers | 8 | 100 | 800 |
Benchmark Results
| Infrastructure | Max Concurrent (WS) | Cores | Sessions/Core |
|---|---|---|---|
| HF Spaces (free) | 128 | 2 | 64 |
| Local Uvicorn | 2,048 | 8 | 256 |
| Local Docker | 2,048 | 8 | 256 |
| SLURM multi-node | 16,384 | 96 | 171 |
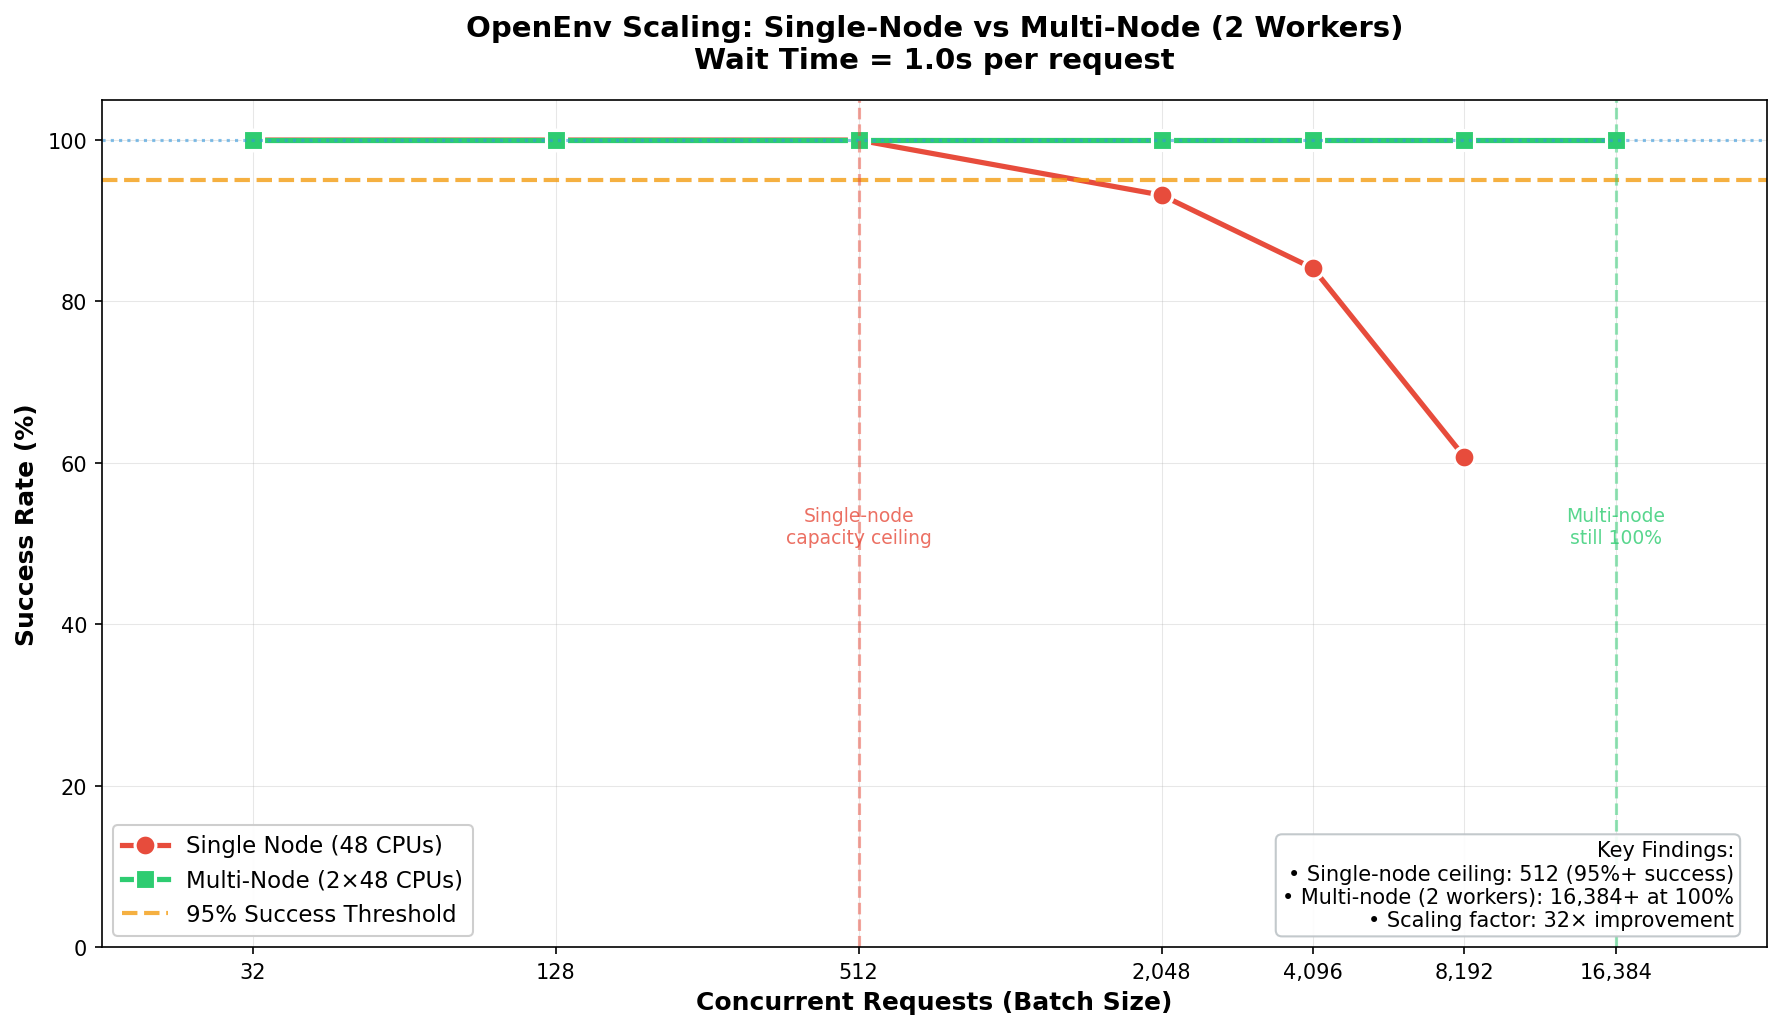
For full scaling experiments and code, see burtenshaw/openenv-scaling.
Recommendations
- Development / moderate load (<2K concurrent): Single Uvicorn or Docker container. Best per-core efficiency (256 sessions/core).
- Demos and published environments: HF Spaces free tier, reliable up to 128 concurrent sessions.
- Large-scale training (>2K concurrent): Multi-node with Envoy load balancer. See tutorial/03-scaling.md.