
LiveKit WakeWord
![]()
![]()
An open-source wake word library for creating voice-enabled applications. Based on openWakeWord with streamlined training: generate synthetic data, augment, train, and export from a single YAML config.
Features:
- Conv-Attention classifier: 1D temporal convolutions + multi-head self-attention replace openWakeWord's flat DNN head, preserving temporal structure across the 16-frame embedding window for better accuracy and fewer false positives (see comparison below)
- Backward compatible with openWakeWord models and library
- Multilingual support: over 30 languages via VoxCPM synthetic data generation
- Train anywhere: local machine, cloud, or spawn SkyPilot jobs
- Zero dependency headaches: uv handles everything
Quick Links:
- Why livekit-wakeword
- Using a Pre-trained Model
- Training a Custom Wake Word
- Multilingual Support
- Python API
- Example: Wake Word–Triggered Agent
Why livekit-wakeword
Both livekit-wakeword and openWakeWord share the same audio front-end: mel spectrograms are fed through frozen Google speech embedding and openWakeWord embedding models to produce a (16, 96) feature matrix (16 timesteps × 96-dim embeddings). The difference is the classification head that sits on top.
Architecture
openWakeWord flattens the (16, 96) matrix into a 1536-d vector and feeds it through a small fully-connected DNN:
Flatten(16×96=1536) → Dense → Dense → Sigmoid
While the positional information is technically still present in the flattened vector, the dense layer has no inductive bias for temporal structure and must learn any sequential patterns from scratch.
livekit-wakeword introduces a Conv-Attention (conv_attention) classifier:
Conv1D blocks → MultiheadAttention → Mean pool → Linear(1) → Sigmoid
- 1D Convolutions (kernel size 3) slide across the 16 timesteps, capturing local temporal patterns (e.g., syllable transitions).
- Multi-Head Self-Attention models long-range dependencies across the full temporal window, letting the model learn which timestep relationships matter.
- Mean pooling aggregates attended features into a fixed-size vector for the final sigmoid output.
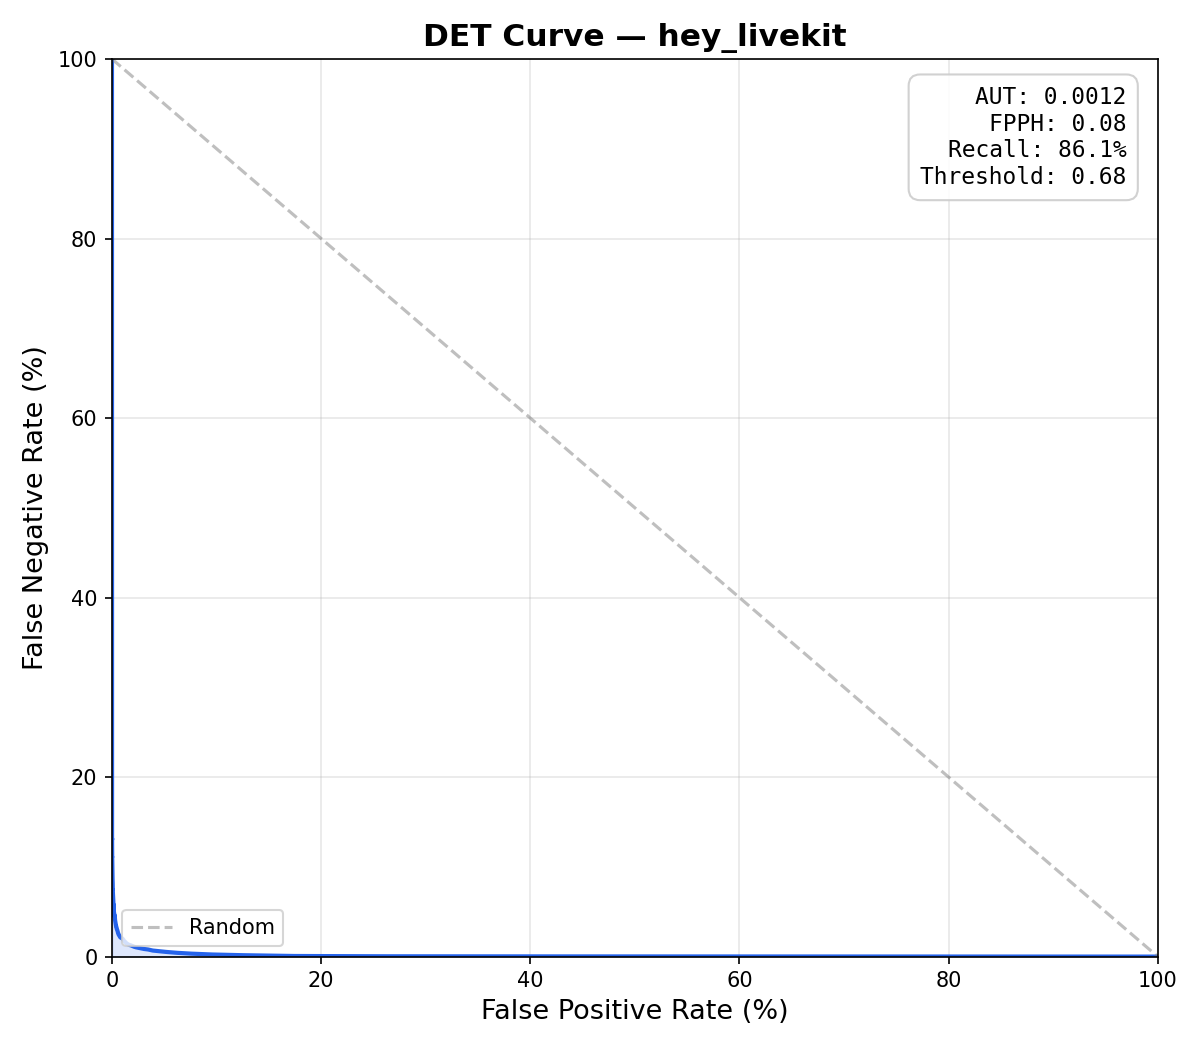
Results
To compare, we evaluated an openWakeWord DNN, a livekit-wakeword DNN (same architecture, better training pipeline), and a livekit-wakeword conv-attention model on the same "hey livekit" validation set (15,000 positive clips, 45,084 negative clips, 25 hours of audio). The livekit-wakeword models were trained with the prod config.
| Metric | openWakeWord (DNN) | livekit-wakeword (DNN) | livekit-wakeword (conv-attention) |
|---|---|---|---|
| AUT* | 0.0720 | 0.0423 | 0.0012 |
| FPPH* | 8.50 | 3.07 | 0.08 |
| Recall* | 68.6% | 85.3% | 86.1% |
| Optimal Threshold* | 0.01 | 0.01 | 0.68 |
| openWakeWord (DNN) | livekit-wakeword (DNN) | livekit-wakeword (conv-attention) |
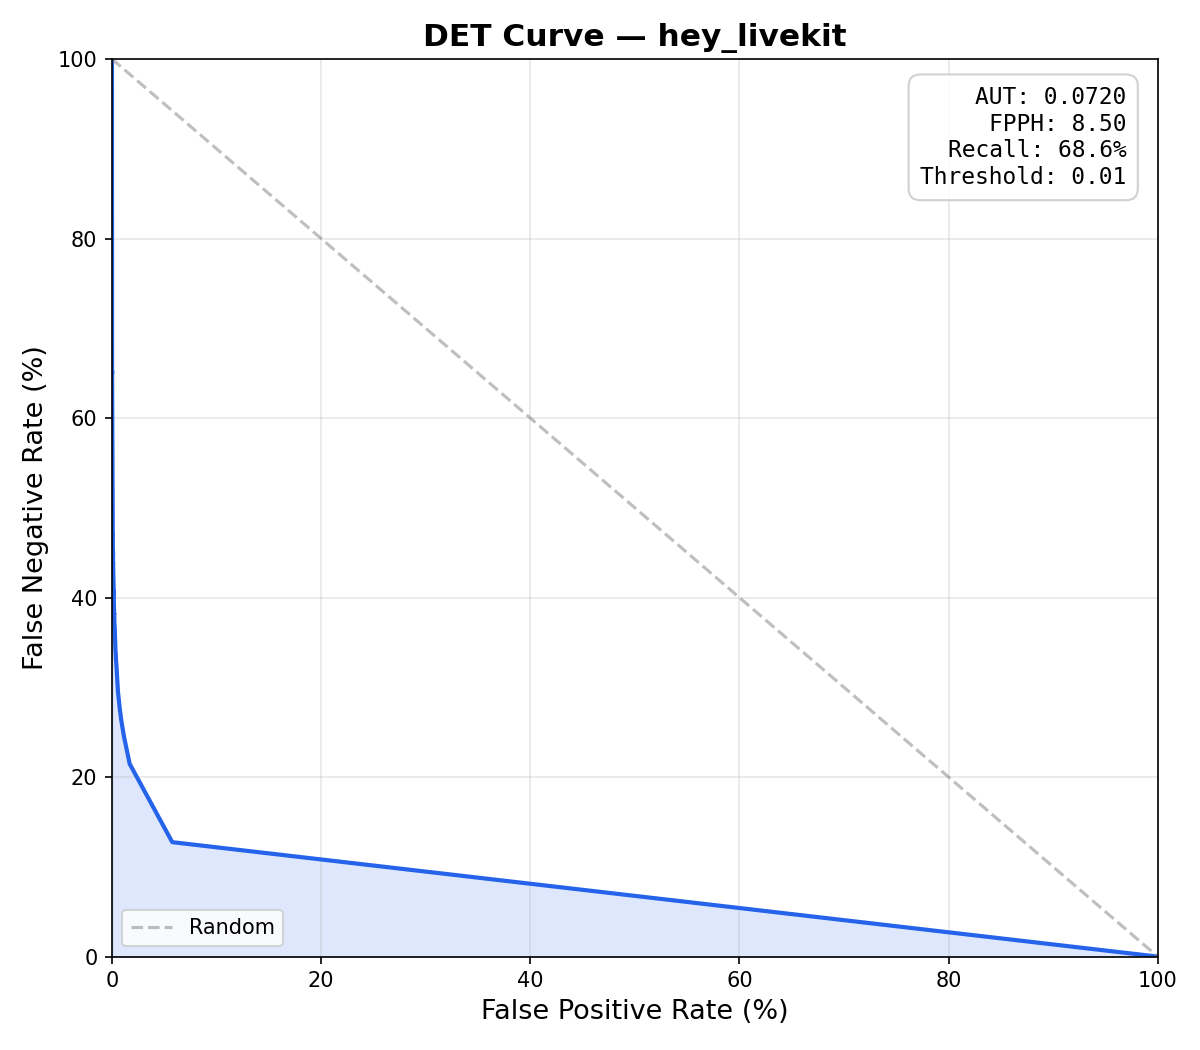 | 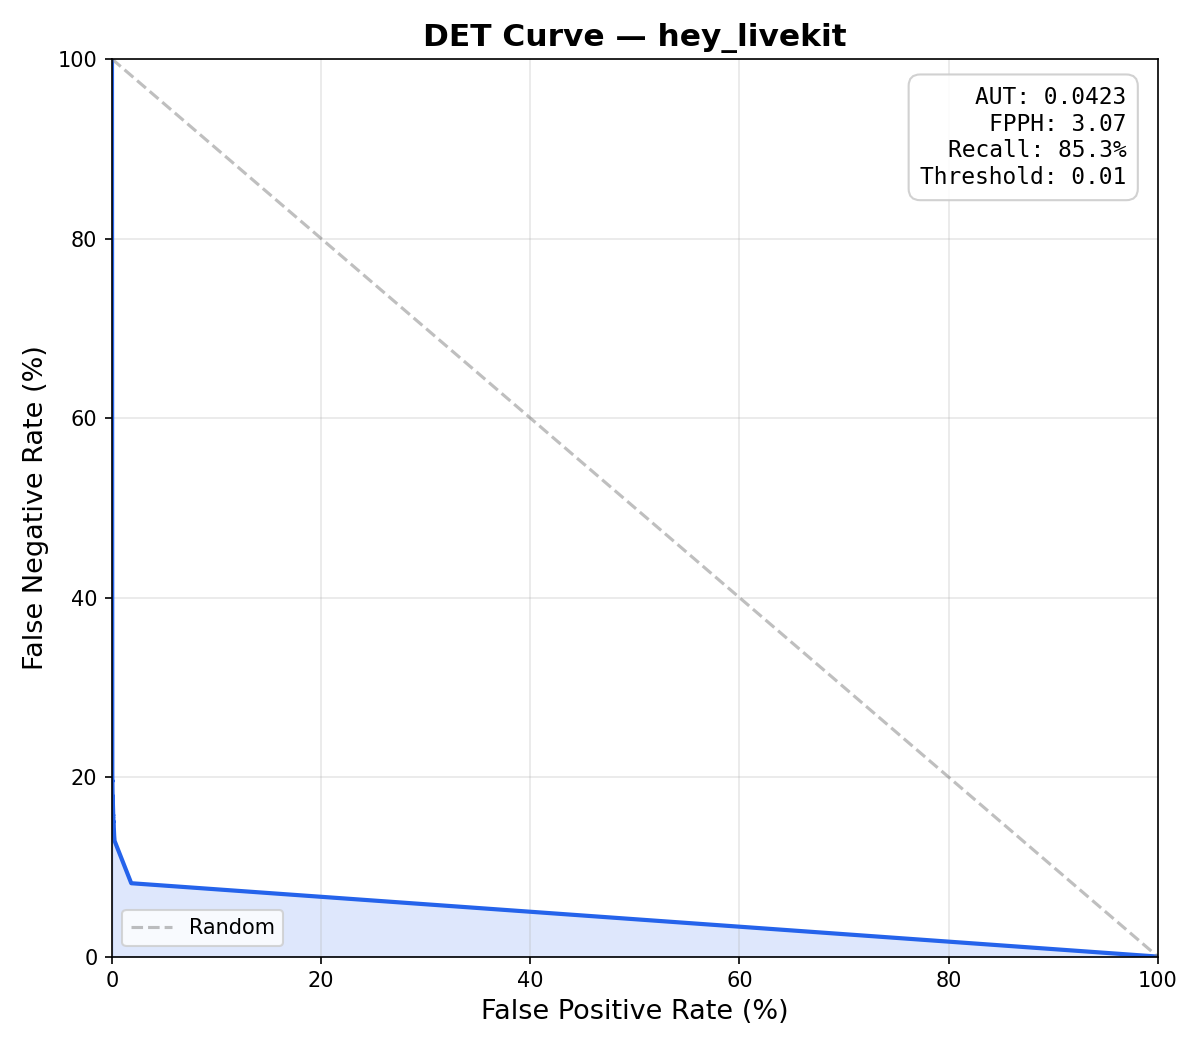 |  |
The livekit-wakeword DNN already outperforms openWakeWord's DNN thanks to the improved training pipeline (focal loss, embedding mixup, 3-phase training, checkpoint averaging). However, both DNN models fail to meet the FPPH target: their optimal thresholds fall to 0.01, meaning no operating point can keep false positives low enough.
The conv-attention head is what unlocks the low false positive rate: 60x lower AUT and 100x fewer false positives per hour than openWakeWord, while detecting 17% more wake words.
*AUT (Area Under the DET curve): summarizes the full DET (Detection Error Tradeoff) curve, which plots false positive rate vs false negative rate across all thresholds. Lower is better (0 = perfect). A DET curve that hugs the bottom-left corner indicates strong separation between wake words and non-wake-words.
*FPPH (False Positives Per Hour): how many times the model falsely triggers per hour of non-wake-word audio. Lower is better. For production use, < 0.5 FPPH is typical.
*Recall: the percentage of actual wake words correctly detected. Higher is better.
*Optimal Threshold: the detection threshold that maximizes recall while keeping FPPH at or below the target (configurable, default 0.1). A threshold of 0.01 indicates no threshold could meet the FPPH target; the evaluator fell back to the highest balanced accuracy.
Why conv-attention wins
- Temporal awareness: the conv-attention model sees the order of speech events, not just their presence, reducing false triggers from phonetically similar but differently ordered phrases.
- Better accuracy at the same model size: attention lets a small model selectively focus on discriminative time regions rather than learning dense connections over the full flattened input.
- Lower false-positive rates: temporal structure helps reject partial or reordered matches that a flat DNN would accept.
The conv-attention head is the default. You can switch to the original DNN or an RNN head via model_type in your config:
model:
  model_type: conv_attention # conv_attention (default) | dnn | rnn
  model_size: small # tiny, small, medium, large
Using a Pre-trained Model
Python
System dependencies (for microphone listener):
# macOS
brew install portaudio

# Ubuntu/Debian
sudo apt install portaudio19-dev
Installation:
pip install livekit-wakeword
# or
uv add livekit-wakeword
For microphone listening, install with the listener extra:
pip install livekit-wakeword[listener]Basic inference:
from livekit.wakeword import WakeWordModel

model = WakeWordModel(models=["hey_livekit.onnx"])

# Feed audio frames (16kHz, int16 or float32)
scores = model.predict(audio_frame)
if scores["hey_livekit"] > 0.5:
    print("Wake word detected!")
Async listener with microphone:
import asyncio
from livekit.wakeword import WakeWordModel, WakeWordListener

model = WakeWordModel(models=["hey_livekit.onnx"])

async def main():
    async with WakeWordListener(model, threshold=0.5, debounce=2.0) as listener:
        while True:
            detection = await listener.wait_for_detection()
            print(f"Detected {detection.name}! ({detection.confidence:.2f})")

asyncio.run(main())
Rust
For Rust applications, use the livekit-wakeword crate:
[dependencies]
livekit-wakeword = "0.1"
use livekit_wakeword::WakeWordModel;
let mut model = WakeWordModel::new(&["hey_livekit.onnx"], 16000)?;
// Feed ~2s PCM audio chunks (i16, at configured sample rate)
let scores = model.predict(&audio_chunk)?;
if scores["hey_livekit"] > 0.5 {
println!("Wake word detected!");
}The mel spectrogram and speech embedding models are compiled into the binary; only the wake word classifier ONNX file is loaded at runtime. Audio at supported sample rates (22050–384000 Hz) is automatically resampled to 16 kHz.
Swift
For Swift applications on iOS 16+ / macOS 14+, add the LiveKitWakeWord Swift package:
// Package.swift
.package(url: "https://github.com/livekit/livekit-wakeword", branch: "main"),
Basic inference:
import LiveKitWakeWord

let classifier = Bundle.main.url(forResource: "hey_livekit", withExtension: "onnx")!
let model = try WakeWordModel(models: [classifier], sampleRate: 16_000)

// Feed ~2 s PCM chunks (Int16, at the configured sample rate):
let scores = try model.predict(audioChunk)
if (scores["hey_livekit"] ?? 0) > 0.5 {
    print("Wake word detected!")
}
Async listener with microphone:
import LiveKitWakeWord

let classifier = Bundle.main.url(forResource: "hey_livekit", withExtension: "onnx")!
let model = try WakeWordModel(models: [classifier], sampleRate: 16_000)
let listener = WakeWordListener(model: model, threshold: 0.5, debounce: 2.0)

try await listener.start()
for await detection in listener.detections() {
    print("Detected \(detection.name)! (confidence=\(String(format: "%.2f", detection.confidence)))")
}
The mel spectrogram and speech embedding .onnx models ship inside the Swift package; only the classifier ships with your app. Audio at any sample rate is resampled to 16 kHz internally via AVAudioConverter (matches the Rust crate's 22050–384000 Hz input range); the listener handles mic-hardware resampling automatically. ONNX Runtime with the CoreML Execution Provider dispatches to ANE / GPU / CPU by default (override via executionProvider:).
Add NSMicrophoneUsageDescription to Info.plist (and com.apple.security.device.audio-input on sandboxed macOS apps) for listener use. A runnable SwiftUI demo (iOS + macOS) lives in examples/ios_wakeword/.
Training a Custom Wake Word
CLI quick start
System dependencies:
# macOS
brew install espeak-ng ffmpeg portaudio

# Ubuntu/Debian
sudo apt install espeak-ng libsndfile1 ffmpeg sox portaudio19-dev
Installation (with pip):
pip install livekit-wakeword[train,eval,export]Installation (with uv):
uv tool install livekit-wakeword[train,eval,export]Installation (from source):
# Install uv (if you don't have it)
curl -LsSf https://astral.sh/uv/install.sh | sh

# Clone and install
git clone https://github.com/livekit/livekit-wakeword
cd livekit-wakeword
uv sync --all-extras
Download models and data:
livekit-wakeword setup --config configs/prod.yamlTrain a wake word:
livekit-wakeword run configs/prod.yamlOr run stages individually:
livekit-wakeword generate configs/prod.yaml  # TTS synthesis + adversarial negatives
livekit-wakeword augment configs/prod.yaml   # Augment + extract features
livekit-wakeword train configs/prod.yaml     # 3-phase adaptive training
livekit-wakeword export configs/prod.yaml    # Export to ONNX (default)
livekit-wakeword eval configs/prod.yaml      # Evaluate model (DET curve, AUT, FPPH)
The export format defaults to ONNX. Pass --format tflite (or set output_format: tflite in the config) to also emit an openWakeWord-compatible TFLite model — this requires the tflite extra and currently supports the dnn head only. See Export & Inference for details.
pip install livekit-wakeword[tflite]
livekit-wakeword export configs/prod.yaml --format tflite
You can also evaluate any compatible ONNX model (e.g., one trained with openWakeWord):
livekit-wakeword eval configs/prod.yaml -m /path/to/other_model.onnxEval produces a DET curve plot and metrics JSON in the output directory. See Evaluation for details.
Configuration
The full pipeline runs based on a single YAML configuration file. Example configs:
| Config | Wake word | Use |
|---|---|---|
| configs/prod.yaml | "hey livekit" | Production-scale for English with Piper TTS backbone |
| configs/test.yaml | "hey livekit" | Small end-to-end test run with Piper TTS backbone |
| configs/prod_voxcpm.yaml | "你好 livekit" | Production-scale multilingual with VoxCPM backbone |
| configs/test_voxcpm.yaml | "你好 livekit" | Small end-to-end test run with VoxCPM backbone |
The bare minimum configuration required is as follows:
model_name: hey_livekit
target_phrases:
  - "hey livekit"

n_samples: 10000 # training samples per class
model:
  model_type: conv_attention # conv_attention, dnn, or rnn
  model_size: small # tiny, small, medium, large
steps: 50000
target_fp_per_hour: 0.2
Multilingual
We support training wake words in 30 languages with VoxCPM2 TTS synthetic data generation:
Arabic, Burmese, Chinese, Danish, Dutch, English, Finnish, French, German, Greek, Hebrew, Hindi, Indonesian, Italian, Japanese, Khmer, Korean, Lao, Malay, Norwegian, Polish, Portuguese, Russian, Spanish, Swahili, Swedish, Tagalog, Thai, Turkish, Vietnamese

Chinese Dialect: 四川话, 粤语, 吴语, 东北话, 河南话, 陕西话, 山东话, 天津话, 闽南话
To use this, add tts_backend in your configuration YAML:
tts_backend: voxcpmAnd install livekit-wakeword with the voxcpm optional dependency:
pip install livekit-wakeword[train,eval,export,voxcpm][!WARNING] Multilingual models currently achieve lower accuracy than English models. This is due to two factors: (1) the frozen Google speech embedding model was trained predominantly on English data, so its representations are weaker for other languages, and (2) VoxCPM produces less diverse synthetic speech compared to the large Piper TTS speaker pool available for English.
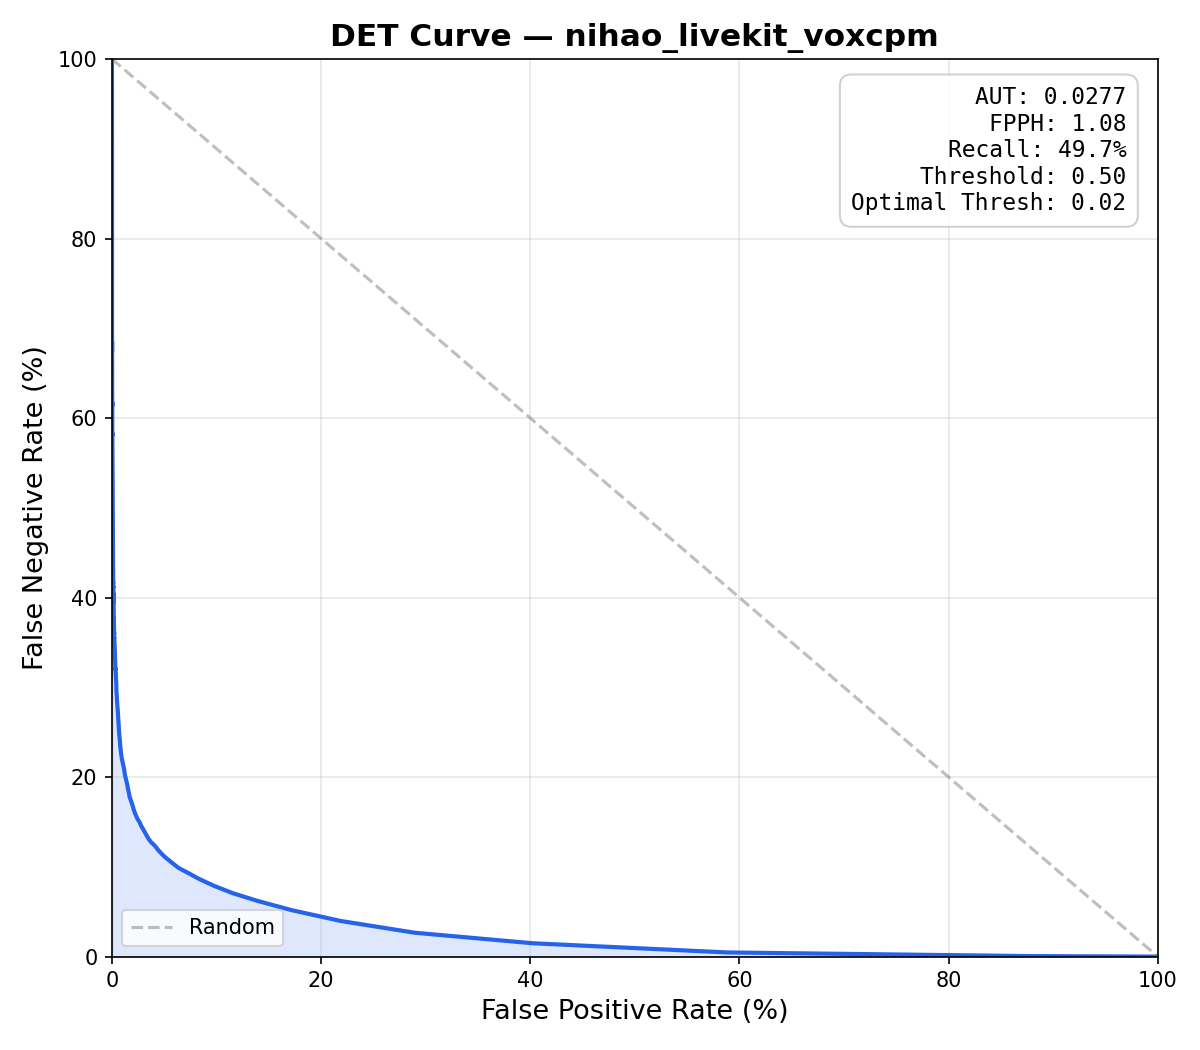
DET curve for "你好 livekit" trained with VoxCPM — note the higher error rates compared to the English "hey livekit" results above.
To improve multilingual performance, increase the number of
voice_design_prompts(50–100) andn_samplesin your config so the model sees a wider range of speaker and prosody variation:n_samples: 50000 # ↑ from 25000 n_samples_val: 10000 # ↑ from 5000 voxcpm_tts: voice_design_prompts: # Add 50-100 diverse prompts covering age, gender, pitch, pace, accent, energy, etc. - "A young adult woman, clear mid-pitch voice, moderate pace, calm and professional" - "A young adult man, warm baritone, steady pace, friendly and articulate" - "A middle-aged woman, slightly low pitch, measured pace, confident tone" # ... add more prompts for wider speaker diversity
More detail: docs/data-generation.md (Piper, VoxCPM, setup).
Python API
The full training pipeline is available as a Python API, so you can import and drive it from your own code instead of using the CLI:
from livekit.wakeword import (
    WakeWordConfig,
    load_config,
    run_generate,
    run_augment,
    run_extraction,
    run_train,
    run_export,
    run_eval,
)

# Load from YAML or construct directly
config = load_config("configs/prod.yaml")

# Or build a config programmatically
config = WakeWordConfig(
    model_name="hey_robot",
    target_phrases=["hey robot"],
    n_samples=5000,
    steps=30000,
)

# Run individual stages
run_generate(config)     # TTS synthesis + adversarial negatives
run_augment(config)      # Add noise, reverb, pitch shifts
run_extraction(config)   # Extract mel spectrograms + speech embeddings → .npy
run_train(config)        # 3-phase adaptive training
onnx_path = run_export(config)       # Export to ONNX

# Evaluate the exported model
results = run_eval(config, onnx_path)
print(f"AUT={results['aut']:.4f}  FPPH={results['fpph']:.2f}  Recall={results['recall']:.1%}")
This is useful for integrating wake word training into larger pipelines, automating model iteration, or building custom tooling on top of the data generation and training stages.
Cloud GPUs with SkyPilot
See skypilot/train.yaml for an example training job on Nebius.
sky launch skypilot/train.yamlFurther Reading
- Architecture Overview: system design and data flow
- Data Generation: TTS synthesis and adversarial negatives
- Augmentation: audio transforms and alignment
- Feature Extraction: mel spectrograms and embeddings
- Training: 3-phase training and checkpoint averaging
- Export & Inference: ONNX export and Python API
- Evaluation: DET curves, AUT, and model comparison
License
This project is licensed under the Apache License 2.0. See the LICENSE file for details.
| LiveKit Ecosystem | |
|---|---|
| Agents SDKs | Python · Node.js |
| LiveKit SDKs | Browser · Swift · Android · Flutter · React Native · Rust · Node.js · Python · Unity · Unity (WebGL) · ESP32 · C++ |
| Starter Apps | Python Agent · TypeScript Agent · React App · SwiftUI App · Android App · Flutter App · React Native App · Web Embed |
| UI Components | React · Android Compose · SwiftUI · Flutter |
| Server APIs | Node.js · Golang · Ruby · Java/Kotlin · Python · Rust · PHP (community) · .NET (community) |
| Resources | Docs · Docs MCP Server · CLI · LiveKit Cloud |
| LiveKit Server OSS | LiveKit server · Egress · Ingress · SIP |
| Community | Developer Community · Slack · X · YouTube |