Windows Copilot API: a free LLM API powered by Microsoft Copilot
Using your own Microsoft Copilot account. No API key, no credits, no paid plan: it turns the free chat at copilot.microsoft.com into an API you can call from code.
You can use it in two ways:
- 🐍 As a Python library: just call
client.chat("Hi"). Supports streaming and multi-turn conversations. - 🔌 As a local OpenAI-compatible API: runs a server at
http://localhost:8000/v1that speaks the OpenAI format, so the officialopenaiSDK (and any OpenAI-compatible app) works as a drop-in, withlocalhostin place of OpenAI.
You sign in once in a browser with your Microsoft or Google account; your session is saved and refreshed automatically after that.
Unofficial project. Not affiliated with or endorsed by Microsoft. It automates the consumer Copilot web experience for personal use, so use it responsibly and within Microsoft's terms.
Table of contents
- Why use this?
- Requirements
- Setup (2 minutes)
- Run with Docker (optional)
- Usage 1: In Python (no server)
- Usage 2: As an OpenAI-compatible server
- Command line
- Concurrency & stress test
- Rate limiting
- Project layout
- Notes & limitations
- Troubleshooting
- Collaboration & support
- License
- Star History
Why use this?
- Free: uses your normal signed-in Copilot, no API billing.
- Drop-in OpenAI replacement: point any OpenAI client at
localhostand it just works. - Works everywhere you're signed in: the signed-in path works even in regions where anonymous Copilot is blocked (e.g. India).
- Streaming + conversations: token-by-token output and multi-turn threads addressed by
conversation_id.
Requirements
- Python 3.9+
- A Microsoft account (the free one you use for Copilot is fine)
- Works on Windows, macOS, and Linux
Setup (2 minutes)
# 1. Clone the project
git clone <your-repo-url>
cd Windows-Copilot-API
2. Create and activate a virtual environment
On macOS / Linux:
python3 -m venv venv
source venv/bin/activate
On Windows (PowerShell):
python -m venv venv
venv\Scripts\Activate.ps1
On Windows you may need to allow script execution once:
Set-ExecutionPolicy -Scope CurrentUser RemoteSigned. Incmd.exeactivate withvenv\Scripts\activate.batinstead.
3. Install dependencies and sign in
# Install dependencies
pip install -r requirements.txt

# Install the browser Playwright needs (one-time)
playwright install chromium

# Sign in once: a browser opens, log into your Microsoft or Google account
python -m copilot login
The browser closes by itself once sign-in is detected — you don't need to press Enter or close it manually. After sign-in it sends one short warm-up message that mints the chat token and passes Cloudflare's "verify you're human" check in the same step (a brief "finishing setup…" appears, and a tiny throwaway chat lands in your history). If a checkbox shows up, click it in that login window. The steps are logged to session/login.log if anything goes wrong. That's it: your session is saved under session/ (git-ignored, never shared) and reused on every run — so your first request works right away.
🛠️ Run into trouble during setup or your first run? Head to the Troubleshooting section, the bundled diagnostic both fixes common issues (captcha/clearance) and logs a shareable report.
Run with Docker (optional)
Prefer a container? You can run the OpenAI-compatible server in Docker once you've signed in.
Sign in on the host first. The login step above opens a visible browser, which can't run inside the headless container — so run
python -m copilot loginon your host to populatesession/. The container mounts that folder and reuses the Cloudflare clearance earned on the host. It refreshes the chat token headlessly, but it can't earn fresh clearance without a visible browser, so when clearance expires (~30 min) it returns a503— re-runpython -m copilot loginon the host to refreshsession/.
docker compose up --build
# -> Copilot OpenAI-compatible API on http://localhost:8000
The docker-compose.yml maps port 8000 and bind-mounts your session/ so the login persists across restarts. Tune RATE_LIMIT_RPM / RATE_LIMIT_BURST there. To run without Compose, build and pass the same bindings by hand:
docker build -t windows-copilot-api .
docker run --rm -p 8000:8000 -v "$(pwd)/session:/app/session" windows-copilot-api
Usage 1: In Python (no server)
The simplest way if your code is already Python.
from copilot import CopilotClient

client = CopilotClient()                 # loads your signed-in session

# Get a full reply
reply = client.chat("Say hello in one short sentence.")
print(reply.text)

# Continue the SAME conversation — pass the id back
reply2 = client.chat("And now in French?", reply.conversation_id)
print(reply2.text)

# Stream the answer as it's typed
for chunk in client.stream("Tell me a short joke"):
    print(chunk, end="", flush=True)
chat() returns the full text plus a conversation_id; pass that id back to keep the thread going, or omit it to start fresh. stream() yields the reply piece by piece.
👉 More: examples/01_direct_chat.py, 02_direct_conversation.py, 03_direct_stream.py
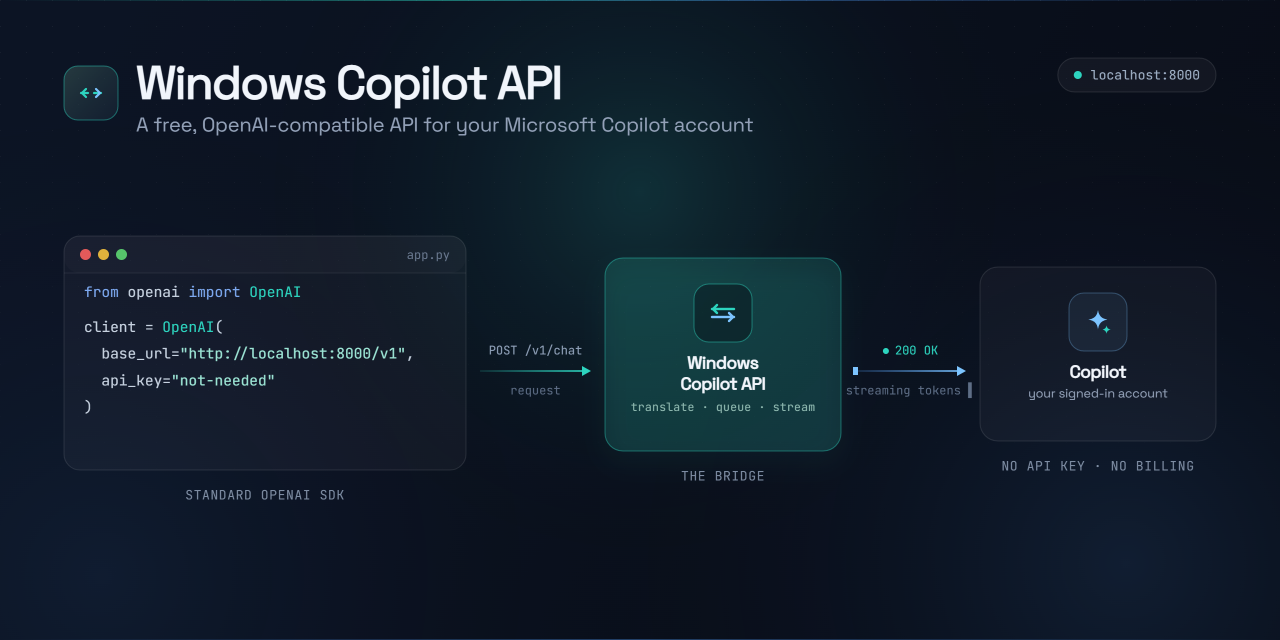
Usage 2: As an OpenAI-compatible server
Start a local server that speaks the OpenAI API, so existing OpenAI tools and SDKs work unchanged.
python app.py
# -> Copilot OpenAI-compatible API on http://127.0.0.1:8000
Then point any OpenAI client at it (the API key is required by the SDK but ignored):
from openai import OpenAI

client = OpenAI(base_url="http://localhost:8000/v1", api_key="unused")

resp = client.chat.completions.create(
    model="copilot",
    messages=[{"role": "user", "content": "Hello!"}],
)
print(resp.choices[0].message.content)
Or call it with plain HTTP / curl:
curl http://localhost:8000/v1/chat/completions \
  -H "Content-Type: application/json" \
  -d '{"messages": [{"role": "user", "content": "Hello!"}]}'
Endpoints
| Method | Path | Description |
|---|---|---|
POST | /v1/chat/completions | Chat (supports "stream": true and an optional "conversation_id") |
GET | /v1/models | Lists the single copilot model |
Change the address with env vars:
HOST=0.0.0.0 PORT=8080 python app.py, or runuvicorn server.api:app --host 0.0.0.0 --port 8080.
👉 More: examples/04_server_http.py, 05_server_stream.py, 06_server_openai_sdk.py
Command line
python -m copilot login          # sign in and save the session
python -m copilot ask "Hello!"   # quick one-shot question
Cloudflare clearance (automatic)
Copilot's chat sits behind Cloudflare. Access needs a cf_clearance cookie,
earned by passing a "verify you're human" check in a real browser, and it lasts
about half an hour. The bridge handles this for you:
- At sign-in:
python -m copilot loginearns clearance as part of the same warm-up that mints your token, so your first request works immediately. If Cloudflare shows a checkbox, click it in the login window. - When it expires: if a later request hits the gate, the bridge opens a
browser, passes the check (the checkbox is clicked automatically, or you click
it if one appears), and retries the request for you. You'll see a short
[copilot] clearance: …progress log, then the answer.
On a trusted connection the check often passes invisibly with no window at all. A datacenter/VPN IP is stricter and more likely to show the checkbox; a residential connection clears most reliably.
The server never opens a window: when clearance expires it returns a 503
(type: "clearance_required"). Re-clear out of band with python -m copilot login, then retry.
Concurrency & stress test
The server bridges a single signed-in Copilot account, and Copilot's chat socket doesn't tolerate concurrent conversations from one process. So the server serializes upstream calls: parallel HTTP requests queue behind a lock and run one at a time (see server/api.py). This is intentional, and it means throughput is sequential, not parallel.
You can measure where it breaks with the included stress test, which fires a batch of simultaneous requests and doubles the batch size every successful round until the first error:
# Start the server in one terminal
python app.py

# Ramp concurrency in another (1 → 2 → 4 → 8 → …)
python tests/stress.py
python tests/stress.py --max 64 --timeout 120 --url http://localhost:8000
Sample run (one signed-in account):
| Concurrency | Result | Wall time | Latency (min / median / max) |
|---|---|---|---|
| 1 | ✓ all ok | 3.7s | 3.7 / 3.7 / 3.7s |
| 2 | ✓ all ok | 4.6s | 3.4 / 4.6 / 4.6s |
| 4 | ✓ all ok | 8.3s | 3.7 / 6.7 / 8.3s |
| 8 | ✗ 1 failed (HTTP 502) | 13.3s | 3.5 / 9.7 / 13.3s |
Highest fully-successful concurrency: 4. Wall time roughly doubles each round
while minimum latency stays flat (~3.5s) — the signature of a serialized queue:
one request runs immediately, the rest wait their turn. The failure at 8 is an
upstream 502 (Copilot rejecting requests under load), not a server crash or
timeout — so the exact break point is flaky and may vary between runs.
Takeaway: keep concurrent in-flight requests low (≈ 1–4). This is a personal bridge, not a high-throughput gateway — and please don't hammer your account.
Rate limiting
Concurrency (above) is how many at once; the rate limit is how many per
minute, sustained. Microsoft publishes none for consumer Copilot, so the bridge
enforces a self-imposed one with a token bucket: it caps
accepted requests per minute and returns a standard 429 + Retry-After when
you exceed it. Two env vars tune it:
| Env var | Default | Meaning |
|---|---|---|
RATE_LIMIT_RPM | 12 | Requests/minute the bridge accepts. 0 disables the limit. |
RATE_LIMIT_BURST | 4 | How many requests may go back-to-back before pacing kicks in. |
RATE_LIMIT_RPM=20 RATE_LIMIT_BURST=5 python app.py # raise it; 0 to disable
The default 12 rpm sits safely below the ~15 rpm where a single account starts
seeing upstream 502s. To find your ceiling, run the server with the limiter
off (RATE_LIMIT_RPM=0) and push the probe until failures appear:
python tests/ratelimit.py --rpm 20 --minutes 3
On the client side, use exponential backoff. Both 429 (bridge limit) and
the occasional 502 (Copilot upstream hiccup) are transient — retry with
growing delays (e.g. 1s, 2s, 4s) and they almost always clear. The official
openai SDK does this automatically and honours Retry-After; with plain HTTP,
add a few retries yourself.
Project layout
| Path | What it does |
|---|---|
| copilot/ | The core library: CopilotClient, auth, browser sign-in, HTTP driver |
| server/ | The FastAPI OpenAI-compatible server |
| examples/ | Runnable examples for every feature (examples/README.md) |
| tests/ | Test scripts: the concurrency stress test (tests/stress.py) and the diagnostic & report tool (tests/diagnostic.py) |
| app.py | Starts the server |
Notes & limitations
- Sign in once, then reuse. The cached token refreshes automatically; you only re-sign-in if the session fully expires.
- No daily limit, but be reasonable. Microsoft doesn't impose a daily chat cap, but please use it in moderation, and don't spam or hammer it with automated bulk requests.
- One model. Copilot has no model picker, so the server advertises a single model named
copilot. - Roughly GPT-4 class. On GPQA Diamond (198 graduate-level questions, closed-book) it scores 40.9%, which puts it in the GPT-4 family rather than the reasoning tier (o1/o3). Measured with tests/gpqa_bench.py.
- Your session is private. Everything in
session/(cookies + token) stays on your machine and is git-ignored.
Troubleshooting
Cloudflare clearance is handled automatically (see above), so most "verify you're human" issues clear themselves. If a request still fails, run the diagnostic — it refreshes the session and writes a shareable report.
python tests/diagnostic.py                # browser capture + report
python tests/diagnostic.py --report-only  # headless/VPS: report only, no browser
The default run opens your signed-in browser and asks you to send one short message. That single action:
- Refreshes clearance: it drives a real browser on the same
session/profile/the bridge uses, so passing any "verify you're human" check earns a freshcf_clearancecookie, then snapshots the session (cookies + token) intosession/token.jsonfor the pure-HTTP driver to adopt. - Captures the protocol to
session/ws_capture.log. A clean turn goessetOptions→send→appendText…→done; a{"event":"challenge", "method":"cloudflare",…}frame means Cloudflare gated the turn.
It also writes session/diagnostic_report.txt — environment, the shape of your
session (cookie names + token length, never the values), a live chat probe, and
redacted log tails. Both files are safe to share: access tokens, cookies,
OAuth codes, and emails are redacted before anything is written. Attach
diagnostic_report.txt to a GitHub issue (skim it first) and the cause is
usually obvious.
On a headless server/VPS you can't open a browser, so clearance can't be earned there — pass
--report-only, and do the clearance step on a machine with a display (or route traffic through a residential connection, e.g. a home-PC exit node), since datacenter IPs are where Cloudflare is strictest.
Collaboration & support
Need a hand getting this running? Open a GitHub issue for bugs (for setup/auth problems, attach the redacted diagnostic_report.txt from python tests/diagnostic.py), start a discussion to share ideas, or send a pull request.
And if you're working on something interesting, or looking for someone to build it, I'm always open to a chat. Feel free to reach out:
- X: @sums001
- Email: devsum0101@gmail.com
- Discord:
sum_s_s
License
Released under the MIT License. As this is an unofficial project, you remain responsible for complying with Microsoft's terms of service.