PC-1 (Paper Console 1)
A small, self-hosted thermal printer for news, weather, puzzles, email, and more.
- No screens: output is physical thermal paper.
- No subscriptions: user-owned API keys or local algorithms.
- Quality materials: walnut, brass, and archival-grade paper.
- Universal channels: fully configurable channels (Adventure, Astronomy, Calendar, Email, History, Journal Prompt, Maze, News, QR Code, Quotes, RSS, Sudoku, System Monitor, Text / Note, Weather, Webhook)
For more information and build photos, visit travismiller.design/paper-console.
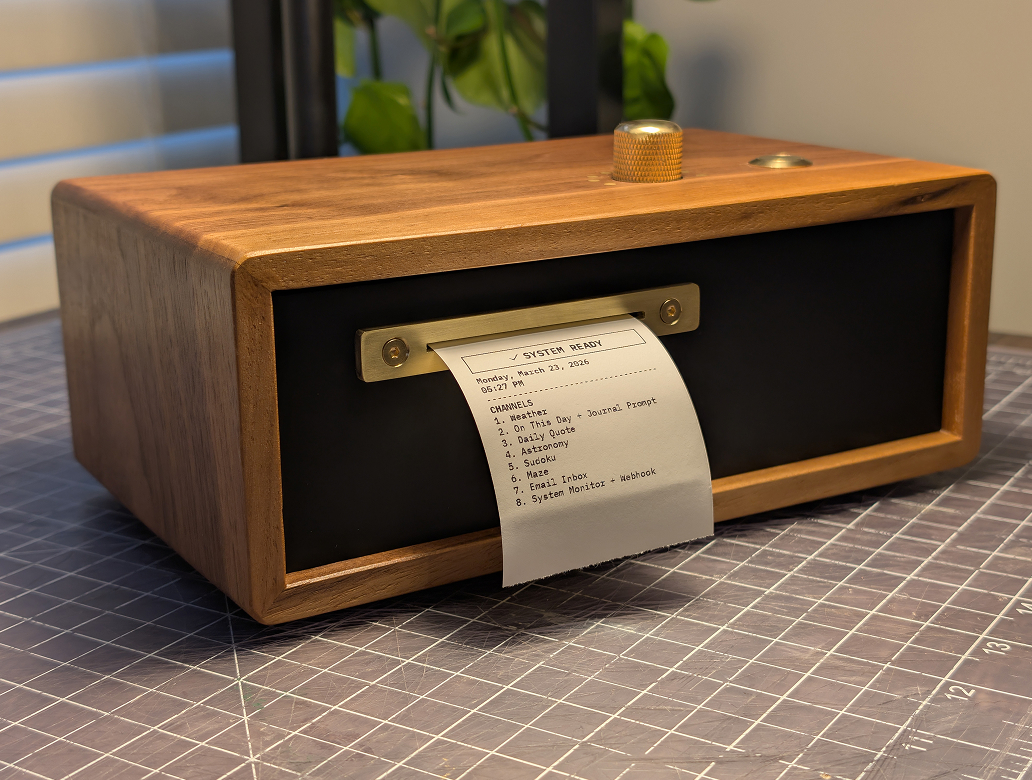 Front view showing the brass rotary dial, push button, and thermal paper output
1. Quick Start (Software)
Run the entire system on your PC without hardware to test logic and see "printer" output in the terminal. Use a Unix-like shell for project commands: Linux, macOS, or WSL on Windows
Backend:
./run.sh

# Or run directly
uvicorn app.main:app --host 0.0.0.0 --port 8000 --reload
- API Docs:
- Local: http://localhost:8000/docs
- Mock Output: Watch your Terminal window. The "Printer" writes text there.
Frontend (Settings UI):
cd web
npm install
npm run dev
Tests:
./testing/run_tests.sh
Unboxing & First-Use Experience
When a user unboxes a PC-1 and powers it on for the first time, the expected flow is:
-
First boot prints setup receipt
- The printer automatically outputs onboarding instructions.
- It includes:
- Setup SSID:
PC-1-Setup-XXXX(device-specific suffix) - Device Password (shared across setup WiFi, settings login, printed setup instructions, and SSH)
- A WiFi QR code for quickly joining the setup network on phones
- Setup URL:
http://10.42.0.1(andhttp://pc-1.local)
- Setup SSID:
-
User connects to setup WiFi
- On phone/computer, scan the printed WiFi QR code or connect to the printed SSID manually.
- If connecting manually, enter the printed Device Password.
- Many phones and laptops should open the setup page automatically as a captive portal after joining.
-
User configures home WiFi in the setup web UI
- If the setup page does not open automatically, open
http://10.42.0.1 - Choose home network and enter password.
- The UI explains that connection may drop while PC-1 switches networks.
- If the setup page does not open automatically, open
-
PC-1 joins home WiFi
- Device attempts connection in the background.
- On success, PC-1 prints a confirmation receipt.
- User reconnects their phone/computer to home WiFi.
-
User opens settings
- Visit
http://pc-1.local - Configure channels/modules and print behavior.
- Visit
-
Normal daily usage
- Turn dial to select channel (1-8)
- Press button to print selected channel
- Hold button ~5 seconds (half-line paper cue appears at threshold), then release to open Quick Actions:
1Table of Contents2System Monitor3Reprint Setup Instructions4Reset WiFi5Reset Factory Settings8Cancel
- Quick Actions are single-shot: after you pick an option, the menu exits automatically.
- If no option is selected for 2 minutes, Quick Actions auto-exits and prints a timeout note.
- Hold button ~15 seconds for Factory Reset (clears settings and reboots)
- Use Web UI anytime for editing modules, schedules, and system settings
If WiFi setup fails, PC-1 returns to setup mode so the user can try again.
2. Software Installation
Development Environment
Project commands assume a Unix-like shell environment. On Windows, use WSL.
First-time setup:
python3 -m venv .venv
./.venv/bin/python -m pip install -r requirements-dev.txt
cd web && npm install
-
Install Python Dependencies:
./.venv/bin/python -m pip install -r requirements-dev.txtThis installs the app dependencies plus test tooling. It intentionally excludes Raspberry Pi-only GPIO packages.
-
Run the Server:
./run.sh
# Or: uvicorn app.main:app --host 0.0.0.0 --port 8000 --reload
Raspberry Pi Deployment
-
Install Python Dependencies:
./.venv/bin/python -m pip install -r requirements-pi.txt -
Run Setup Script:
cd ~/paper-console
chmod +x scripts/setup_pi.sh
sudo scripts/setup_pi.sh
The script will:
- Set hostname (default:
pc-1) - Install Nginx (web proxy) and Avahi (mDNS)
- Configure systemd service
- Add user to
lpgroup for printer access
- Set hostname (default:
-
Access the Device: Open your browser and go to
http://pc-1.local(or your chosen hostname).
3. Configuration
Configuration is handled entirely via the Web UI at http://pc-1.local (or http://localhost:8000).
Global Settings
- Location: City name, Latitude, Longitude, Timezone (with search functionality)
- Time Format: 12-hour (AM/PM) or 24-hour format
Channel System
- 8 Channel Positions: Each position (1-8) represents a slot on the rotary dial
- Modular System: Channels are containers. You can assign multiple modules to a single channel (e.g., "News" followed by "Weather" followed by "Sudoku")
- Reordering:
- Channels: Use Up/Down arrows next to Channel title to swap entire channels
- Modules: Use arrow buttons within a channel card to change print order
- Scheduled Printing: Click the clock icon on any channel to schedule automatic printing at specific times
Module Types
Each module is an independent instance with its own configuration. See Architecture & Modules for detailed information.
Available modules: News API, RSS Feeds, Weather, Email Inbox, Sudoku, Maze, Adventure, Astronomy, Calendar, Webhook, QR Code, Text / Note, Quotes, Journal Prompt, History, System Monitor, Word of the Day
Settings Storage
- Settings File:
config.json(auto-saved, gitignored) - Reset: "Reset All Settings" button restores factory defaults
Local Validation Workflows
For non-Pi development, use the local test and snapshot workflows:
- Pytest:
./testing/run_tests.sh - Print snapshots:
./.venv/bin/python testing/render_all_prints.py --output-dir testing/artifacts/print - Settings UI snapshots:
./.venv/bin/python testing/render_settings_ui.py --output-dir testing/artifacts/ui
These workflows use mock/local paths and do not require Raspberry Pi GPIO packages.
Security & Network Environment Variables
For production deployments, configure these environment variables:
PC1_DEVICE_PASSWORD: Optional override for the unified Device Password used by setup WiFi, settings login, printed setup instructions, and SSH.
On managed PC-1 devices, the runtime password is normally stored in the device-managed credential file instead. For scripted access, clients may send headerX-PC1-Device-Password.- Settings Login Sessions: The web UI can remember a browser with a signed
HttpOnlysession cookie so users do not need to re-enter the password on every visit. PC1_CORS_ORIGINS: Comma-separated CORS origins (default is local/dev origins only).PC1_UPDATE_GITHUB_REPO: GitHub repo slug used by OTA release checks/install (default:travmiller/paper-console).PC1_UPDATE_TARBALL_SHA256: Optional expected SHA256 for OTA tarball verification.PC1_LOG_LEVEL: Backend log level (default:WARNINGon device builds).UVICORN_LOG_LEVEL: Uvicorn log level forrun.sh(default:warning).UVICORN_ACCESS_LOG: Set to1to enable HTTP access logs (default:0for lower log volume).
Production Release Artifacts
For non-git production units, build versioned release artifacts with:
./.venv/bin/python scripts/release_build.py --version v1.2.3 --build-web
Devices can opt into beta OTA builds from General Settings → Updates → Beta Releases.
See scripts/RELEASE.md for the current stable and beta release paths, including the tag-driven GitHub publish workflow and OTA channel behavior.
4. Architecture & Modules
Tech Stack
- OS: Raspberry Pi OS Lite (64-bit)
- Backend: Python 3.12 + FastAPI
- Frontend: React + Vite + Tailwind CSS v4
Directory Structure
paper-console/
├── app/
│   ├── main.py                 # FastAPI app, dial/button loop, print orchestration
│   ├── auth.py                 # Device-password auth and session helpers
│   ├── config.py               # Settings, channels, schedules, module models
│   ├── device_password.py      # Unified device password storage/loading
│   ├── factory_reset.py        # Factory reset helpers and welcome marker reset
│   ├── hardware.py             # Printer + dial/button singletons
│   ├── location_lookup.py      # City/timezone lookup helpers
│   ├── module_registry.py      # @register_module metadata and validation
│   ├── selection_mode.py       # Dial-driven interactive selection flows
│   ├── utils.py
│   ├── wifi_manager.py         # Setup AP and WiFi connection orchestration
│   ├── data/                   # Bundled offline content and lookup datasets
│   ├── drivers/
│   │   ├── printer_serial.py   # Thermal printer (hardware)
│   │   ├── printer_mock.py     # Console / capture (dev)
│   │   ├── dial_gpio.py / dial_mock.py
│   │   ├── button_gpio.py / button_mock.py
│   │   └── gpio_ioctl.py
│   ├── modules/                # Printable module implementations
│   │   ├── adventure.py        # Interactive CYOA (dial)
│   │   ├── astronomy.py
│   │   ├── calendar.py
│   │   ├── crossword.py
│   │   ├── email_client.py
│   │   ├── history.py
│   │   ├── journal_prompts.py
│   │   ├── maze.py
│   │   ├── news.py
│   │   ├── print_image.py
│   │   ├── qrcode_print.py
│   │   ├── quotes.py
│   │   ├── rss.py
│   │   ├── sudoku.py
│   │   ├── system_monitor.py
│   │   ├── text.py
│   │   ├── weather.py
│   │   ├── webhook.py
│   │   ├── wordsearch.py
│   │   └── wotd.py
│   └── routers/
│       └── wifi.py
├── web/                        # React + Vite + Tailwind settings UI
│   ├── src/                    # App UI, WiFi setup, shared constants/styles
│   ├── public/                 # Static icons/assets
│   ├── package.json
│   └── vite.config.js
├── scripts/
│   ├── setup_pi.sh
│   ├── wifi_ap_nmcli.sh
│   ├── release_build.py
│   ├── prepare_golden_image.sh
│   ├── deploy_automated.py
│   ├── validate_icons.py
│   └── RELEASE.md / DEPLOYMENT.md
├── testing/                    # Pytest, print/UI render helpers, snapshot galleries
│   ├── render_all_prints.py
│   ├── render_settings_ui.py
│   ├── console_raster_preview.py
│   ├── run_tests.sh
│   └── artifacts/
├── development/                # BOM, internal docs, supporting scripts
├── icons/                      # Icon source assets
├── images/                     # Product photos used in the README
├── raspberry_pi/               # Misc device imaging/install artifacts
├── .github/workflows/
├── .env.example
├── .deploy_config.example
├── AGENTS.md
├── config.json                 # Local settings (gitignored in normal use)
├── deploy.sh
├── run.sh
├── requirements.txt
├── requirements-dev.txt
├── requirements-pi.txt
└── readme.md
Module Details
News API: NewsAPI top headlines; requires API key.
RSS Feeds: Custom RSS URLs; fetches and prints article blocks with optional QR.
Weather: Open-Meteo; uses global location from settings.
Email Inbox: IMAP; configurable poll interval; prints unread messages.
Sudoku: Easy / Medium / Hard; generated puzzle printed as bitmap grid.
Maze: Easy / Medium / Hard; printable maze (bitmap) with start/end markers.
Adventure: Interactive choose-your-own-adventure; uses dial + button (prints story nodes, exits to normal channel use when done).
Astronomy: Sunrise/sunset, moon phase, sun path graphic; uses global location.
Calendar: iCal URLs; month/week/day views; recurring events, timezone-aware.
Webhook: GET/POST; headers, body, JSON path extraction for custom APIs.
QR Code: URLs, WiFi, contact, phone, SMS, email, plain text.
Text / Note: Rich text (TipTap JSON): headings, lists, bold/italic, horizontal rules.
Quotes: Offline DB of thousands of quotes; random quote per print.
Journal Prompt: Offline prompt library; random prompt per print.
History: Offline “on this day” events; optional event count in config.
System Monitor: Hostname, IP, WiFi, disk/memory bars, uptime, load, CPU temp (where available).
Word of the Day: Merriam Webster's word of the day
Crossword: Easy / Medium / Hard; generated crossword puzzle printed as bitmap grid.
Word Search: Easy / Hard; generated word search puzzle printed as bitmap grid.
5. Hardware Setup
Prerequisites
- Raspberry Pi Zero 2 W with Raspberry Pi OS Lite installed
- Thermal Printer (QR204/CSN-A2 or compatible 58mm TTL thermal printer. 30mm diameter paper roll maximum)
- 1-Pole 8-Position Rotary Switch
- Momentary Push Button (x1)
- Power Supply: 5V 5A Power Supply (Barrel Jack) -> Terminal Adapter
Complete Wiring Tables (Component-Based)
This layout organizes connections into logical groups (blocks) for easier assembly with standard connectors (DuPont or JST).
1. Power & Printer Data Block (Top)
Use a 4-pin or 5-pin connector block.
| Pin | GPIO | Function | Wire To |
|---|---|---|---|
| 2 | 5V | Power Input (+) | External PSU 5V (+) |
| 6 | GND | Power Input (-) | External PSU GND (-) |
| 8 | 14 | TX (Data) | Printer RX |
| 10 | 15 | RX (Data) | Printer TX |
| 12 | 18 | DTR (Flow) | Printer DTR |
| 14 | GND | Signal GND | Printer GND |
2. Main Button Block (Middle)
Use a 2-pin connector.
| Pin | GPIO | Function | Wire To |
|---|---|---|---|
| 20 | GND | Button GND | Button Pin 1 |
| 22 | 25 | Button Signal | Button Pin 2 |
3. Rotary Dial Block (Bottom)
Use a 12-pin (2x6) connector block.
| Pin (Left) | GPIO | Function | Pin (Right) | GPIO | Function | |
|---|---|---|---|---|---|---|
| 29 | 5 | Pos 1 | | | 30 | GND | Unused |
| 31 | 6 | Pos 2 | | | 32 | 12 | Unused |
| 33 | 13 | Pos 3 | | | 34 | GND | Unused |
| 35 | 19 | Pos 4 | | | 36 | 16 | Pos 6 |
| 37 | 26 | Pos 5 | | | 38 | 20 | Pos 7 |
| 39 | GND | Common | | | 40 | 21 | Pos 8 |
Visual Pin Layout
Legend: [X] = Used, [ ] = Empty. The header is 2 pins wide.
      (Pin 1) [ ] [X] (Pin 2)  --> Power 5V (+)
      (Pin 3) [ ] [ ] (Pin 4)
      (Pin 5) [ ] [X] (Pin 6)  --> Power GND (-)
      (Pin 7) [ ] [X] (Pin 8)  --> Printer TX
      (Pin 9) [ ] [X] (Pin 10) --> Printer RX
     (Pin 11) [ ] [X] (Pin 12) --> Printer DTR
     (Pin 13) [ ] [X] (Pin 14) --> Printer GND
     (Pin 15) [ ] [ ] (Pin 16)
     (Pin 17) [ ] [ ] (Pin 18)
     (Pin 19) [ ] [X] (Pin 20) --> Button GND
     (Pin 21) [ ] [X] (Pin 22) --> Button SIG
     (Pin 23) [ ] [ ] (Pin 24)
     (Pin 25) [ ] [ ] (Pin 26)
     (Pin 27) [ ] [ ] (Pin 28)
     (Pin 29) [X] [ ] (Pin 30) --> Dial 1
     (Pin 31) [X] [ ] (Pin 32) --> Dial 2
     (Pin 33) [X] [ ] (Pin 34) --> Dial 3
     (Pin 35) [X] [X] (Pin 36) --> Dial 4 | Dial 6
     (Pin 37) [X] [X] (Pin 38) --> Dial 5 | Dial 7
     (Pin 39) [X] [X] (Pin 40) --> Dial COM| Dial 8
Thermal Printer
TTL Serial Connection:
- Wire according to table above
- Serial port is automatically configured by
scripts/setup_pi.sh(disables console, enables hardware) - Device appears as
/dev/serial0after setup
Power Supply
Recommended Setup (Split Power):
- Source: Use a 5V 5A power supply (Barrel Jack).
- Distribution: Use a custom PCB HAT or a terminal splitter to feed power to two places simultaneously:
- To Pi: Connect to GPIO Pins 2 (5V) and 6 (GND).
- To Printer: Connect to the printer's power input cable.
- Warning: Do not plug the power supply into the Pi's USB port and try to power the printer from the Pi's GPIO pins. The printer draws too much current (up to 4A) and will crash the Pi.
6. Troubleshooting
Printer Issues
- Device Not Found:
- Check if
/dev/serial0exists:ls -l /dev/serial* - If missing, run setup script:
sudo scripts/setup_pi.sh(configures serial automatically) - Or manually:
sudo raspi-config→ Interface Options → Serial Port → Enable hardware, Disable console
- Check if
- Permission Denied:
- Ensure user is in
dialoutgroup:groups - Add user:
sudo usermod -a -G dialout $USER(then log out/in)
- Ensure user is in
- Nothing Prints:
- Verify power supply is adequate (5A minimum)
- Confirm printer is connected to correct GPIO pins using the wiring table above
- Make sure the printer is powered on (indicator lights as expected)
- Check for error/status lights or messages on the printer itself (if available)
- Test the printer with a simple echo command:
echo "test" > /dev/serial0 - Check service logs:
sudo journalctl -u pc-1.service -f - Confirm no other application is holding the serial port open (use
lsof /dev/serial0)
Service Issues
- Restart Loop:
- Service uses
run.shto handle port conflicts automatically - Restart:
sudo systemctl restart pc-1.service - Check logs:
sudo journalctl -u pc-1.service -f - Port Already in Use:
run.shautomatically kills zombie processes- If persistent, reboot:
sudo reboot - Log Storage:
- Setup script configures journald in RAM (
Storage=volatile) with a bounded budget (RuntimeMaxUse=16M). - This minimizes SD writes and prevents long-term log growth on disk.
- Setup script also installs
pc1-storage-guard.timer(runs every 6 hours) to trim journals/cache if root usage rises. - Core dumps are disabled (
/etc/systemd/coredump.conf.d/pc-1.conf) to prevent multi-megabyte crash artifacts. - Check current journal usage:
journalctl --disk-usage - Check storage guard timer:
systemctl status pc1-storage-guard.timer - Run storage guard immediately:
sudo systemctl start pc1-storage-guard.service - Temporarily enable more logs for debugging by setting:
PC1_LOG_LEVEL=INFOUVICORN_ACCESS_LOG=1
Module-Specific Issues
- NewsAPI Returns 0 Articles: Check if API key is valid and on free tier
- RSS Feeds Not Working: Ensure RSS feed URLs are valid and accessible
- Email Auth Failed: Use a Google App Password, not your main password. Ensure 2FA is enabled
- Calendar Not Showing Events: Verify iCal URL is correct. Check that events exist in the date range
- Weather Wrong: Check
config.jsonLat/Long via UI location search feature