UMI-3D SLAM and Data Processing
🌐 UMI-3D Project Homepage
| 🔧 UMI-3D Hardware | 🛰️ UMI-3D SLAM Pipeline | 🤖 UMI-3D Policy |
|
|
|
| Hardware design, BOM, CAD, 3D-print parts | SLAM, synchronization, calibration, and data processing |
Policy training, deployment, inference 📦 Dataset & Models |
Overview
UMI-3D provides a complete end-to-end pipeline, transforming raw rosbag recordings into training-ready datasets for embodied manipulation learning:
Collected rosbag Files
  ↓
Calibration
  ↓
SLAM
  ↓
Aligned Demos
  ↓
Dataset Pipeline
  ↓
Zarr Dataset (for policy training, e.g. Diffusion Policy)
0. Complete Data Collection
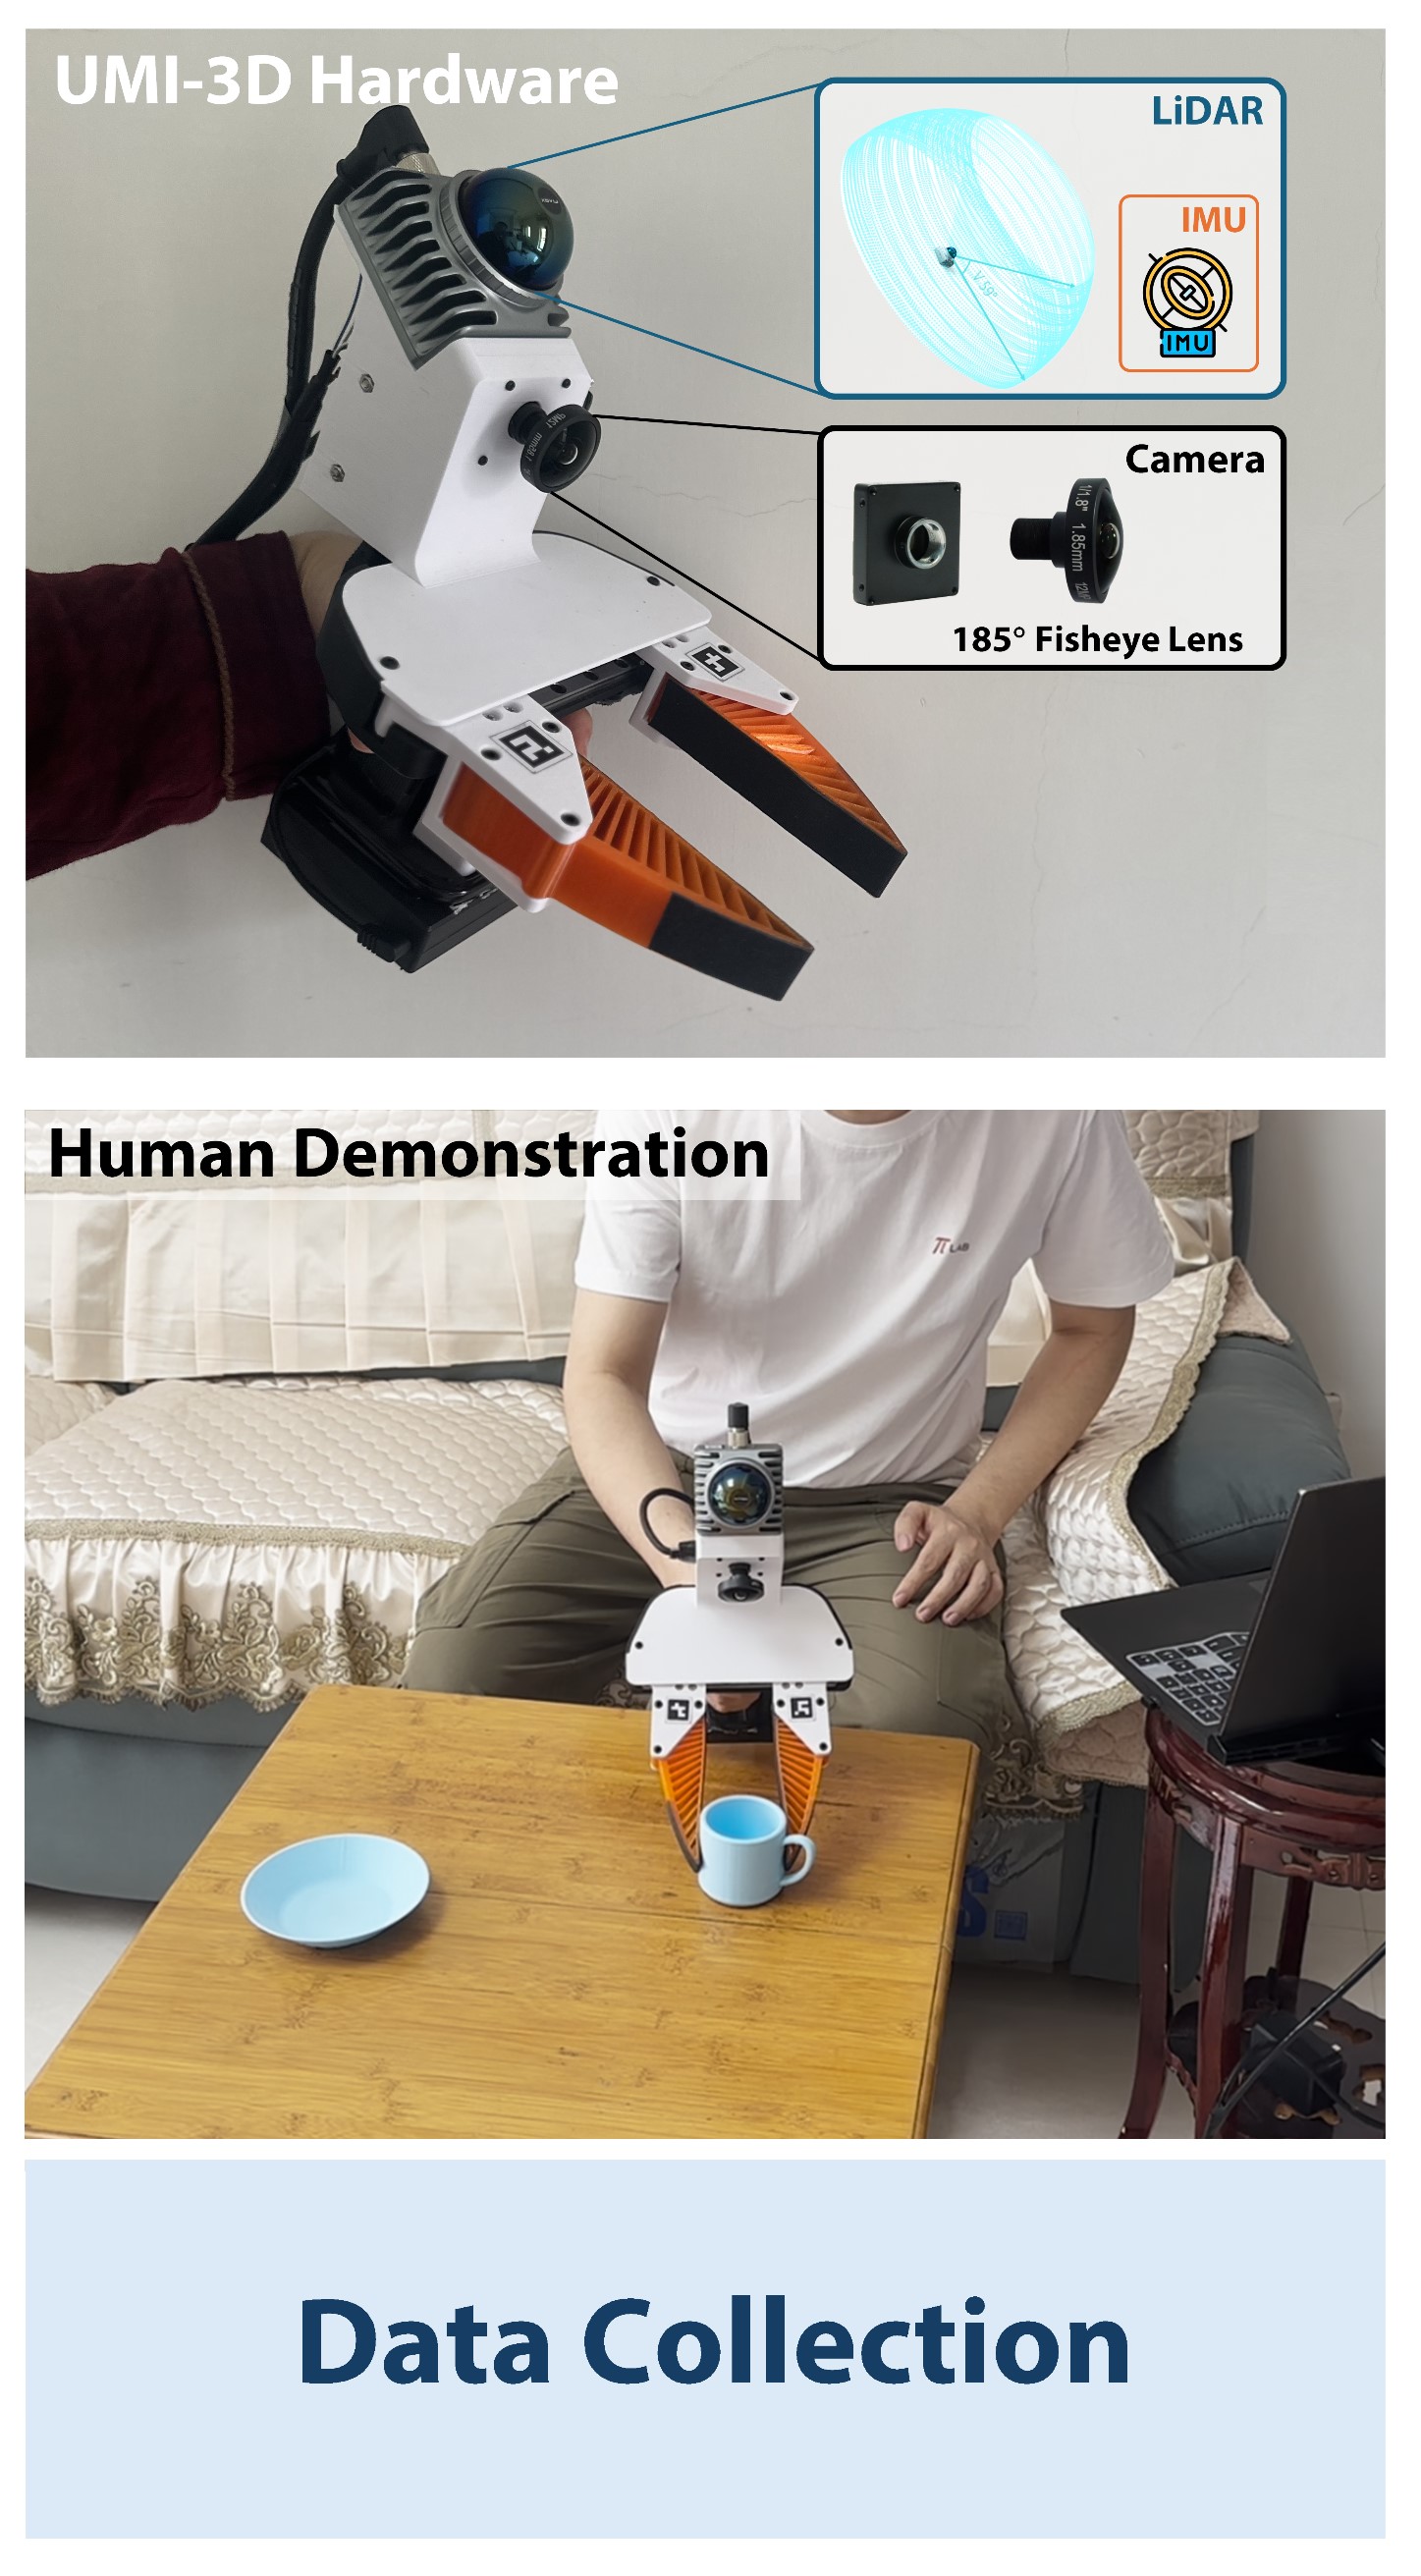
To build the UMI-3D data collection system, please follow the hardware assembly and sensor setup instructions in:
👉 https://github.com/Physical-Intelligence-Laboratory/UMI-3D-Hardware
UMI-3D collects two types of data:
-
Demonstration data
Human-guided manipulation trajectories captured during task execution. -
Gripper calibration data
Slowly open and close the gripper for approximately 5 cycles to estimate gripper motion range.
All data are recorded as rosbag files, including:
- LiDAR point clouds
- IMU measurements
- Camera images
These recordings serve as the raw input for the full UMI-3D data processing pipeline.
1. Sensors Calibration
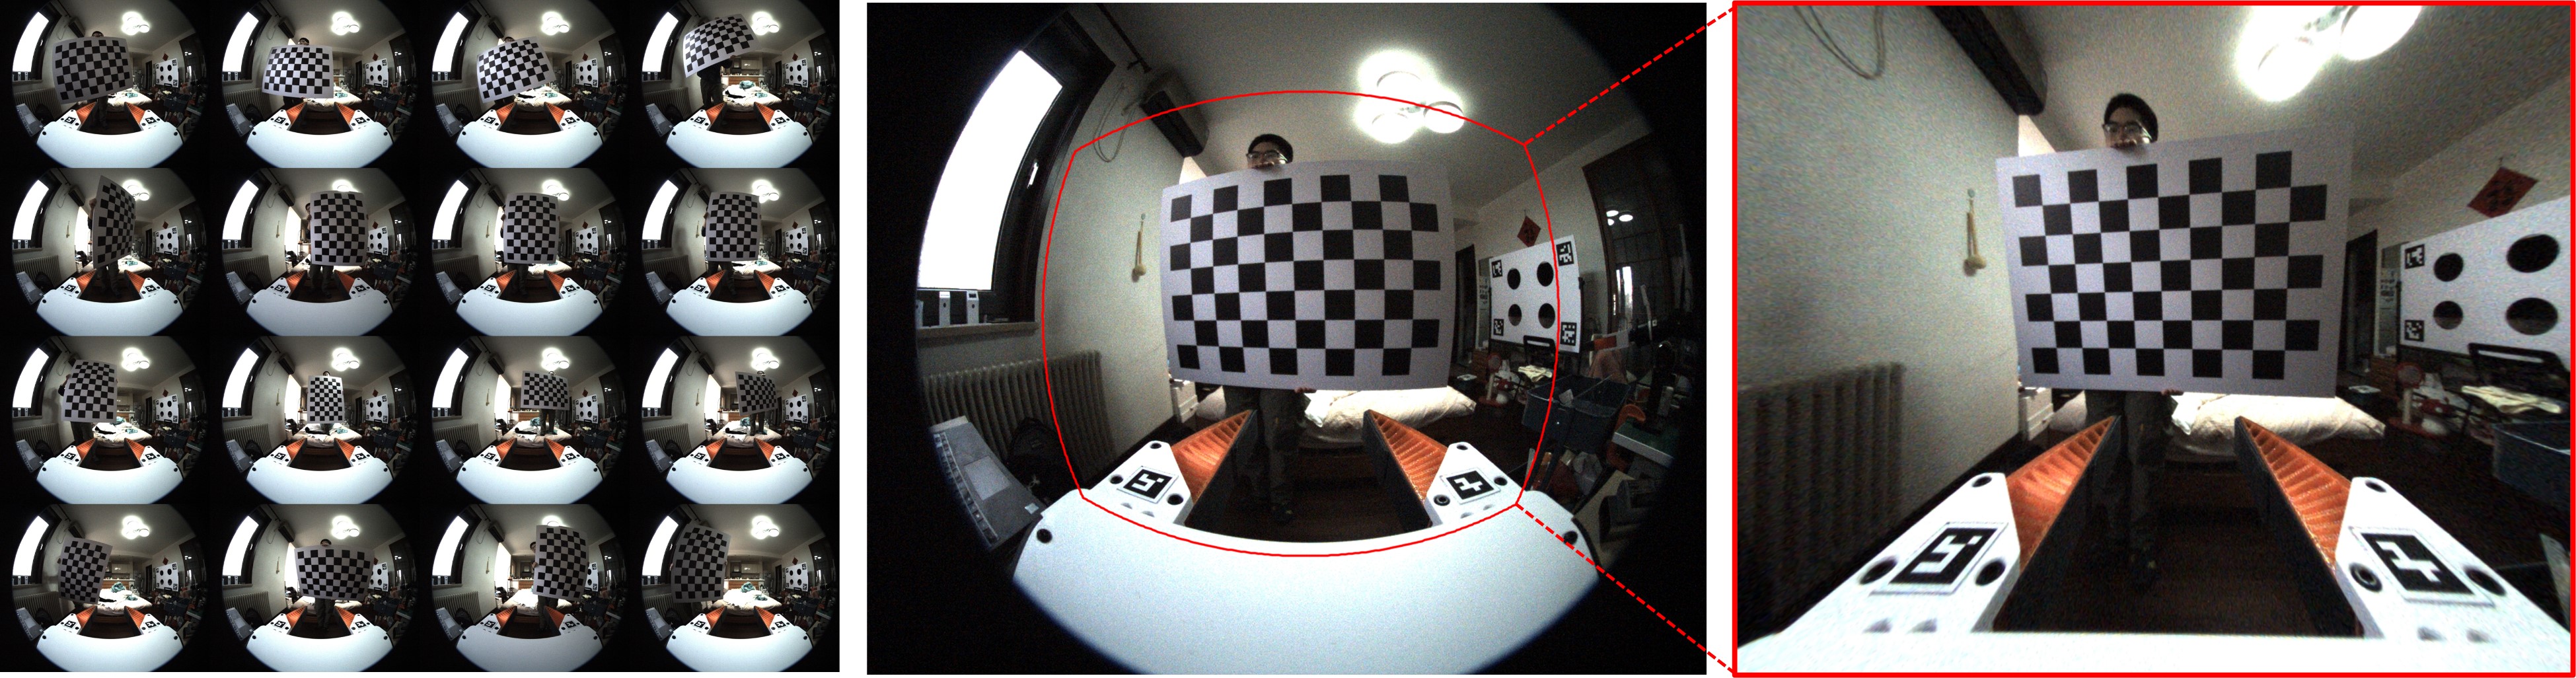
1.1 Fisheye Camera Intrinsic Calibration
Step 1 — Collect calibration images
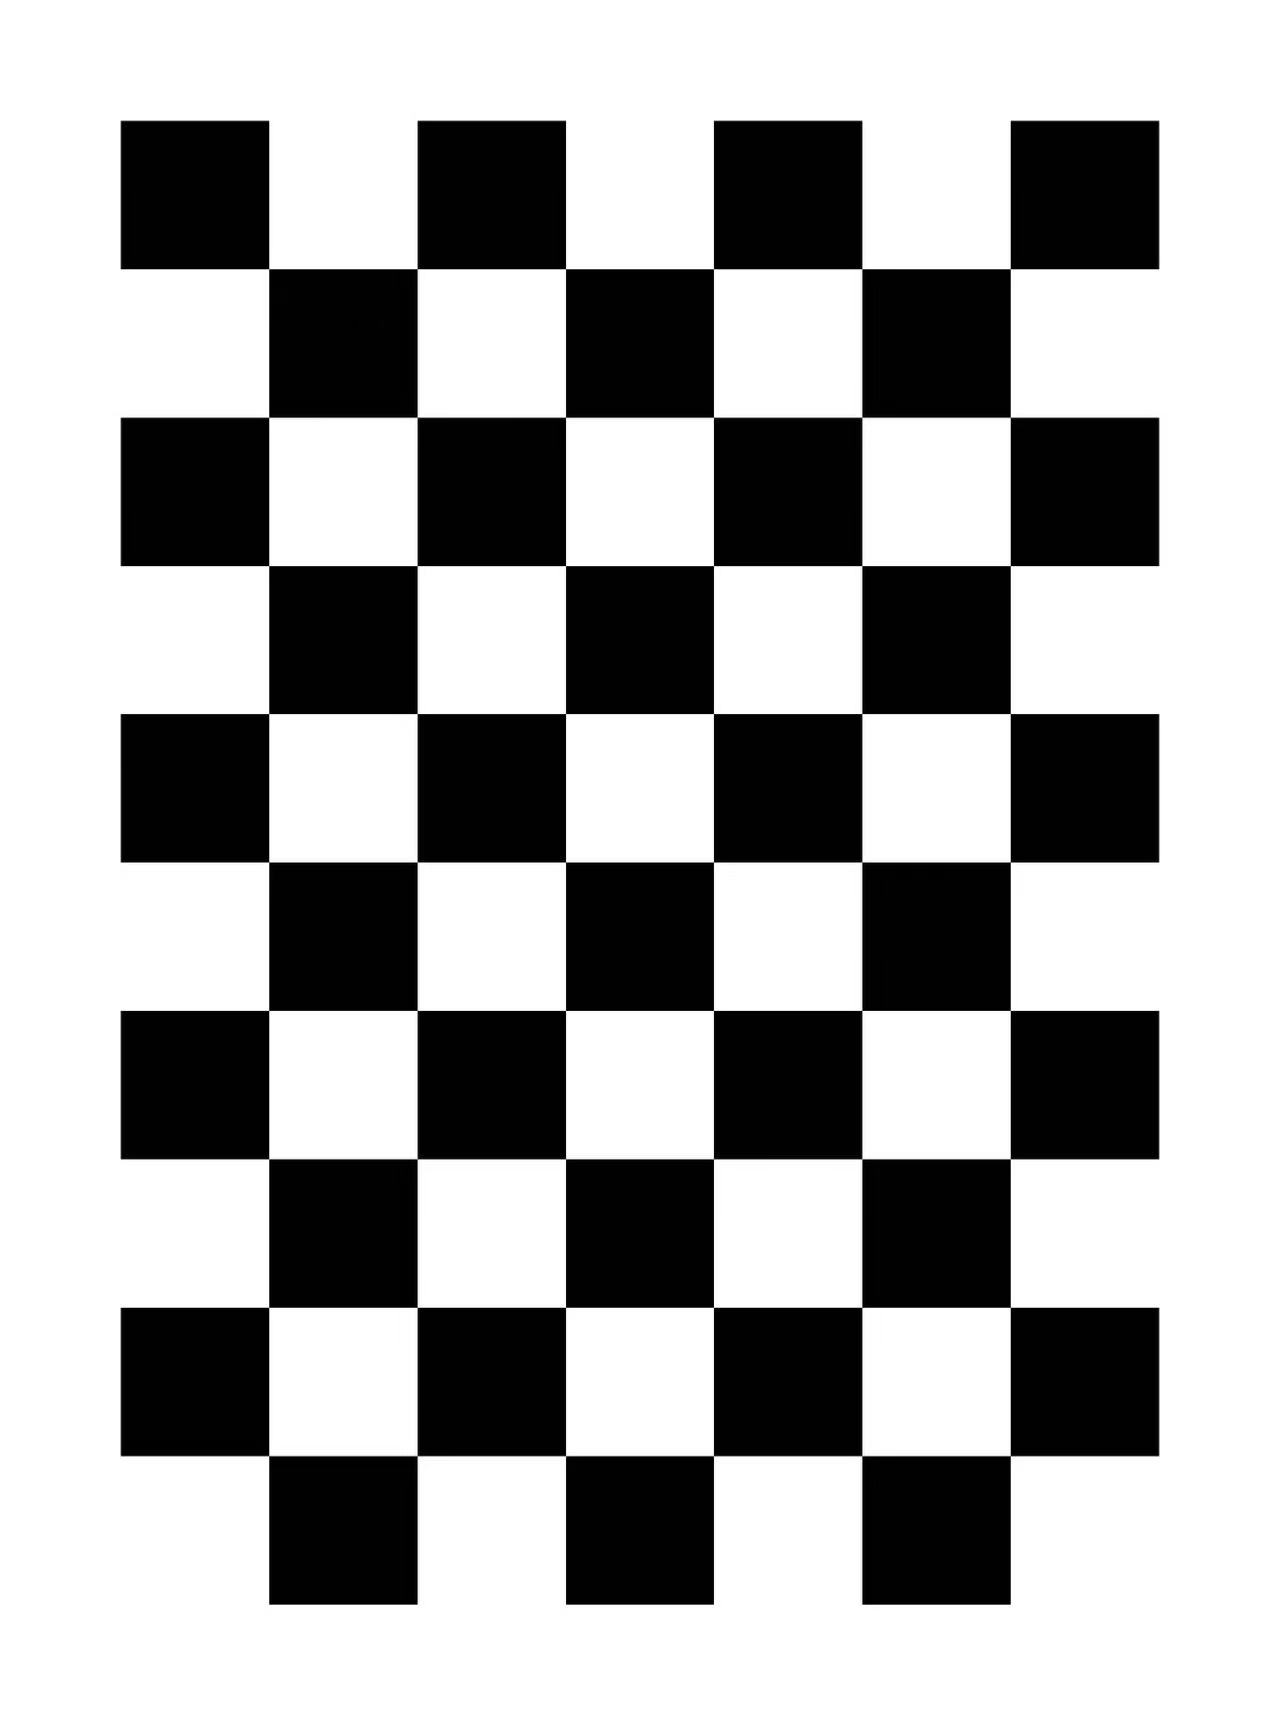
- Use a checkerboard (6 × 9 inner corners, square size = 0.10 m, configurable in script)
- Capture ≥ 100 images with different positions (center / edges / corners), orientations, and distances
- Save all images to
fisheye_intrinsics/images/
Step 2 — Run calibration
cd fisheye_intrinsics

python3 calibrate_fisheye_intrinsics.py \
    --image_glob "images/*.png" \
    --checkerboard_cols 6 \
    --checkerboard_rows 9 \
    --square_size 0.10 \
    --output_dir calib_output
Calibration results will be saved to: fisheye_intrinsics/calib_output/
1.2 LiDAR–Camera Extrinsic Calibration
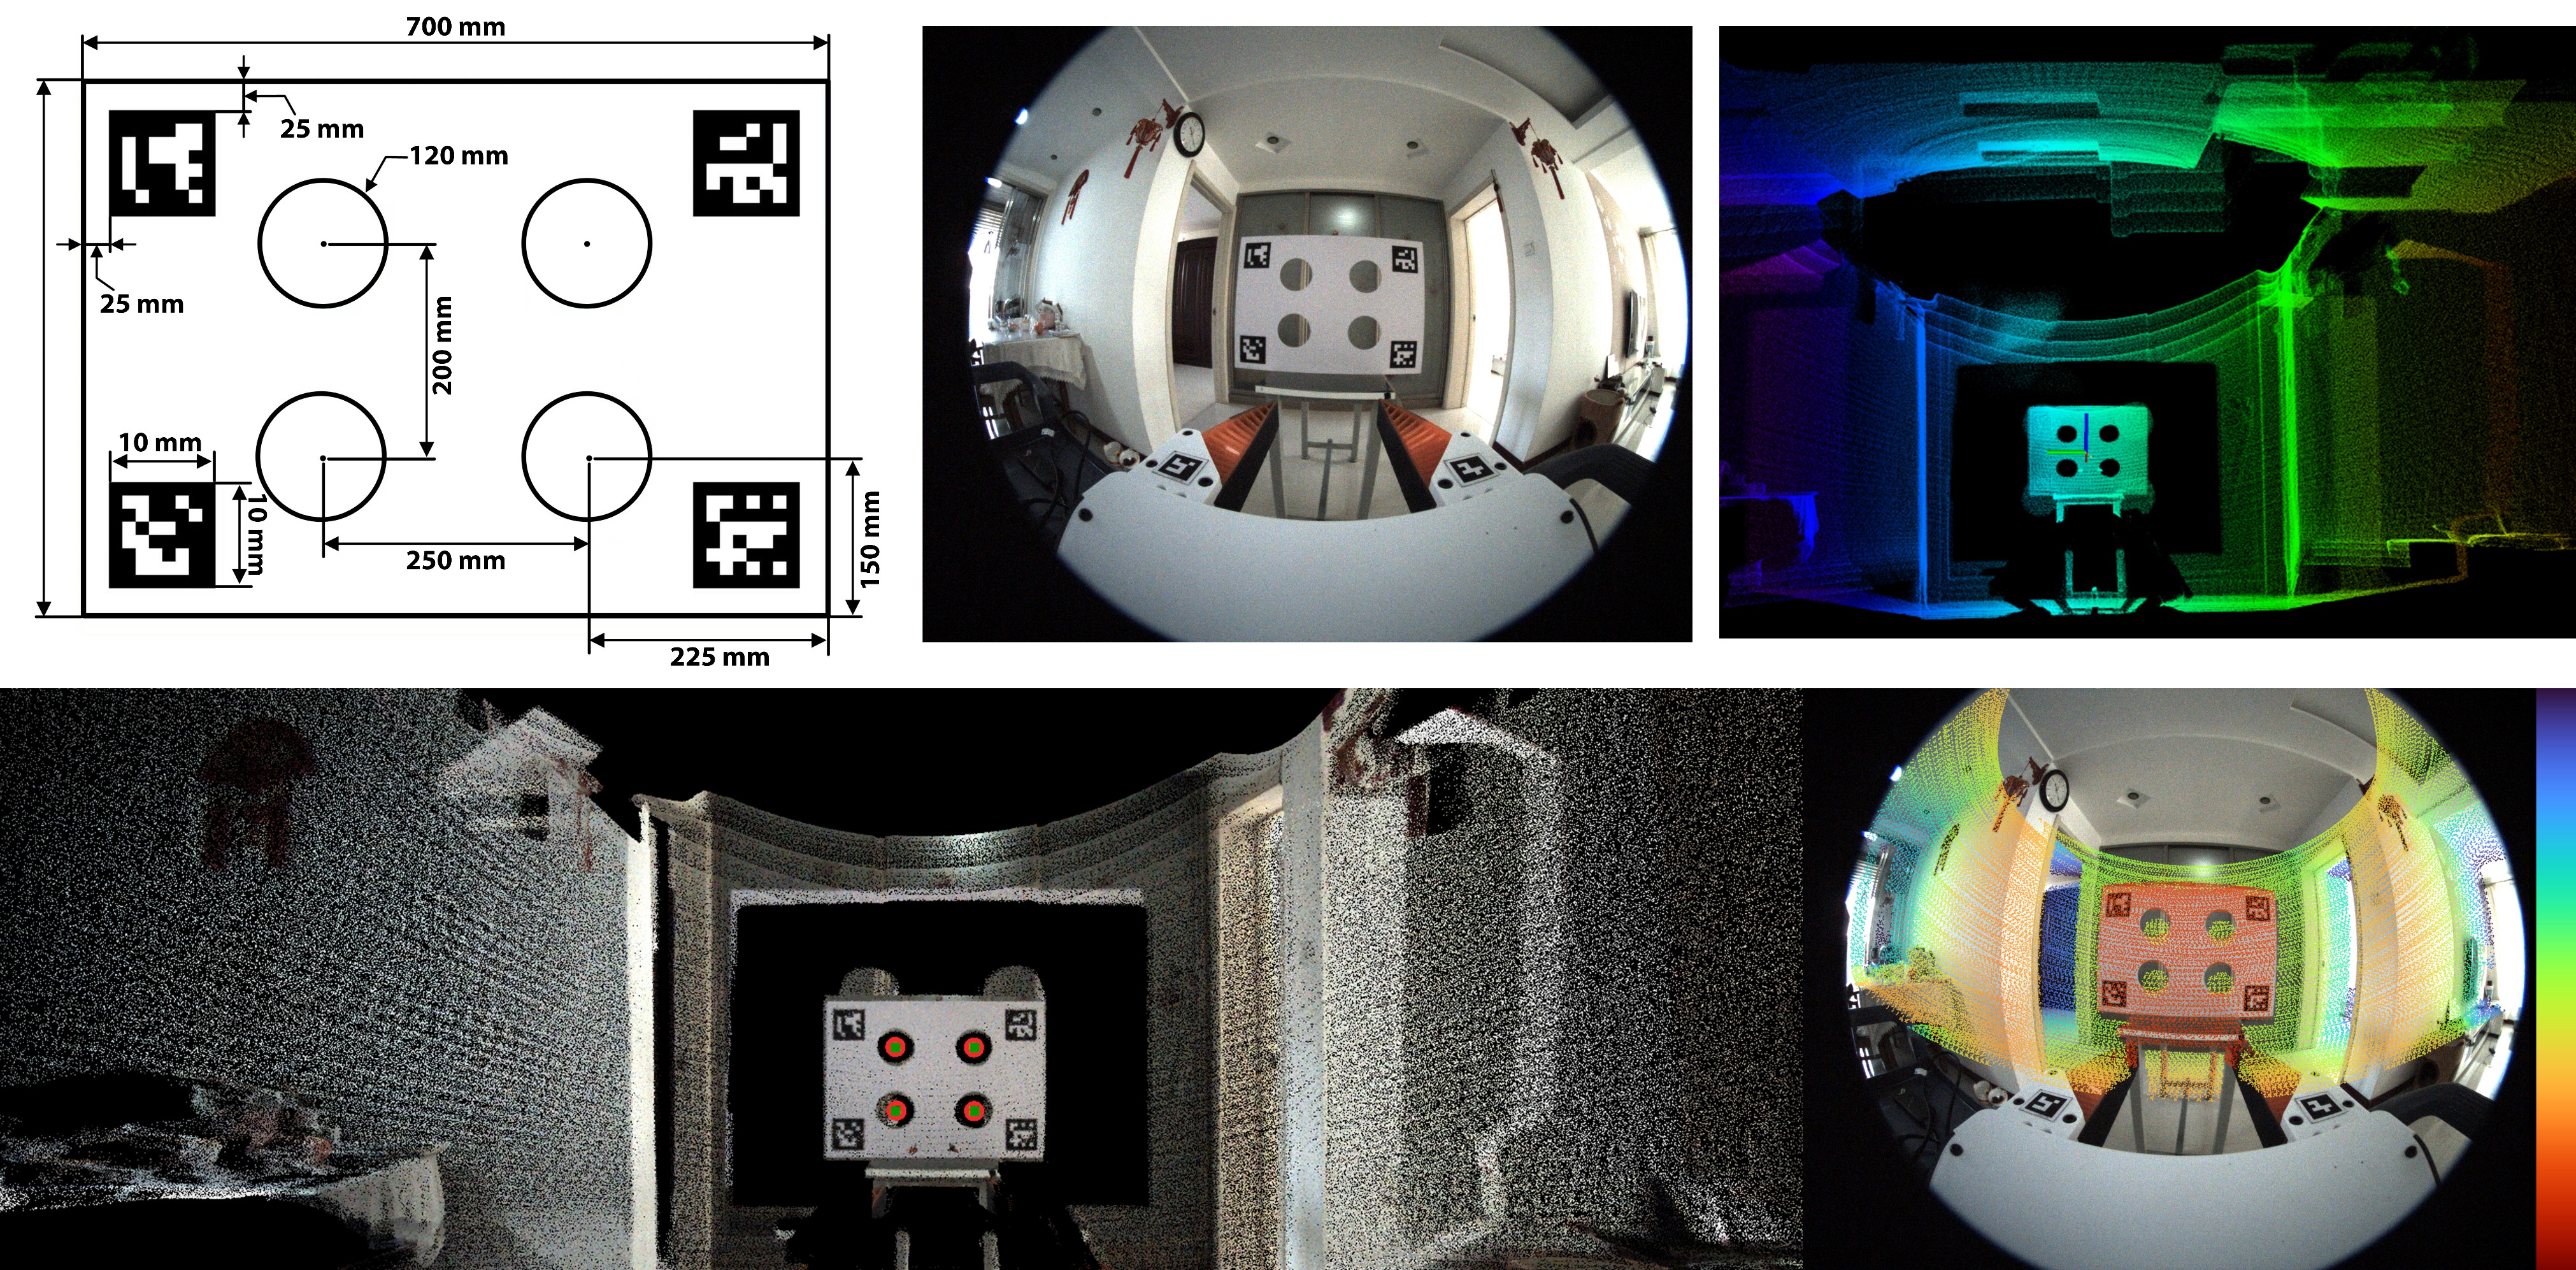
This step estimates the rigid transformation between the Livox MID-360 LiDAR and the fisheye camera.
Step 1 — Prepare calibration data
-
Record a static rosbag containing:
- Livox point cloud (
/livox/lidar) - Camera images
- Livox point cloud (
-
Place the rosbag into:
livox2cam_calibration/src/calib_data/ -
Fill in the previously calibrated camera intrinsics into:
livox2cam_calibration/src/config/qr_params.yaml -
Calibration board files are provided here: Calibration Board Files
Step 2 — Build and Run
Prerequisites:
- Ubuntu 20.04, ROS Noetic
- PCL ≥ 1.8
- OpenCV ≥ 4.0
conda deactivate

# Build
cd livox2cam_calibration
catkin_make

# Run Calibration
source devel/setup.bash
roslaunch livox2cam_calibration calib.launch
- Output: Extrinsic transformation between LiDAR and camera (rotation + translation)
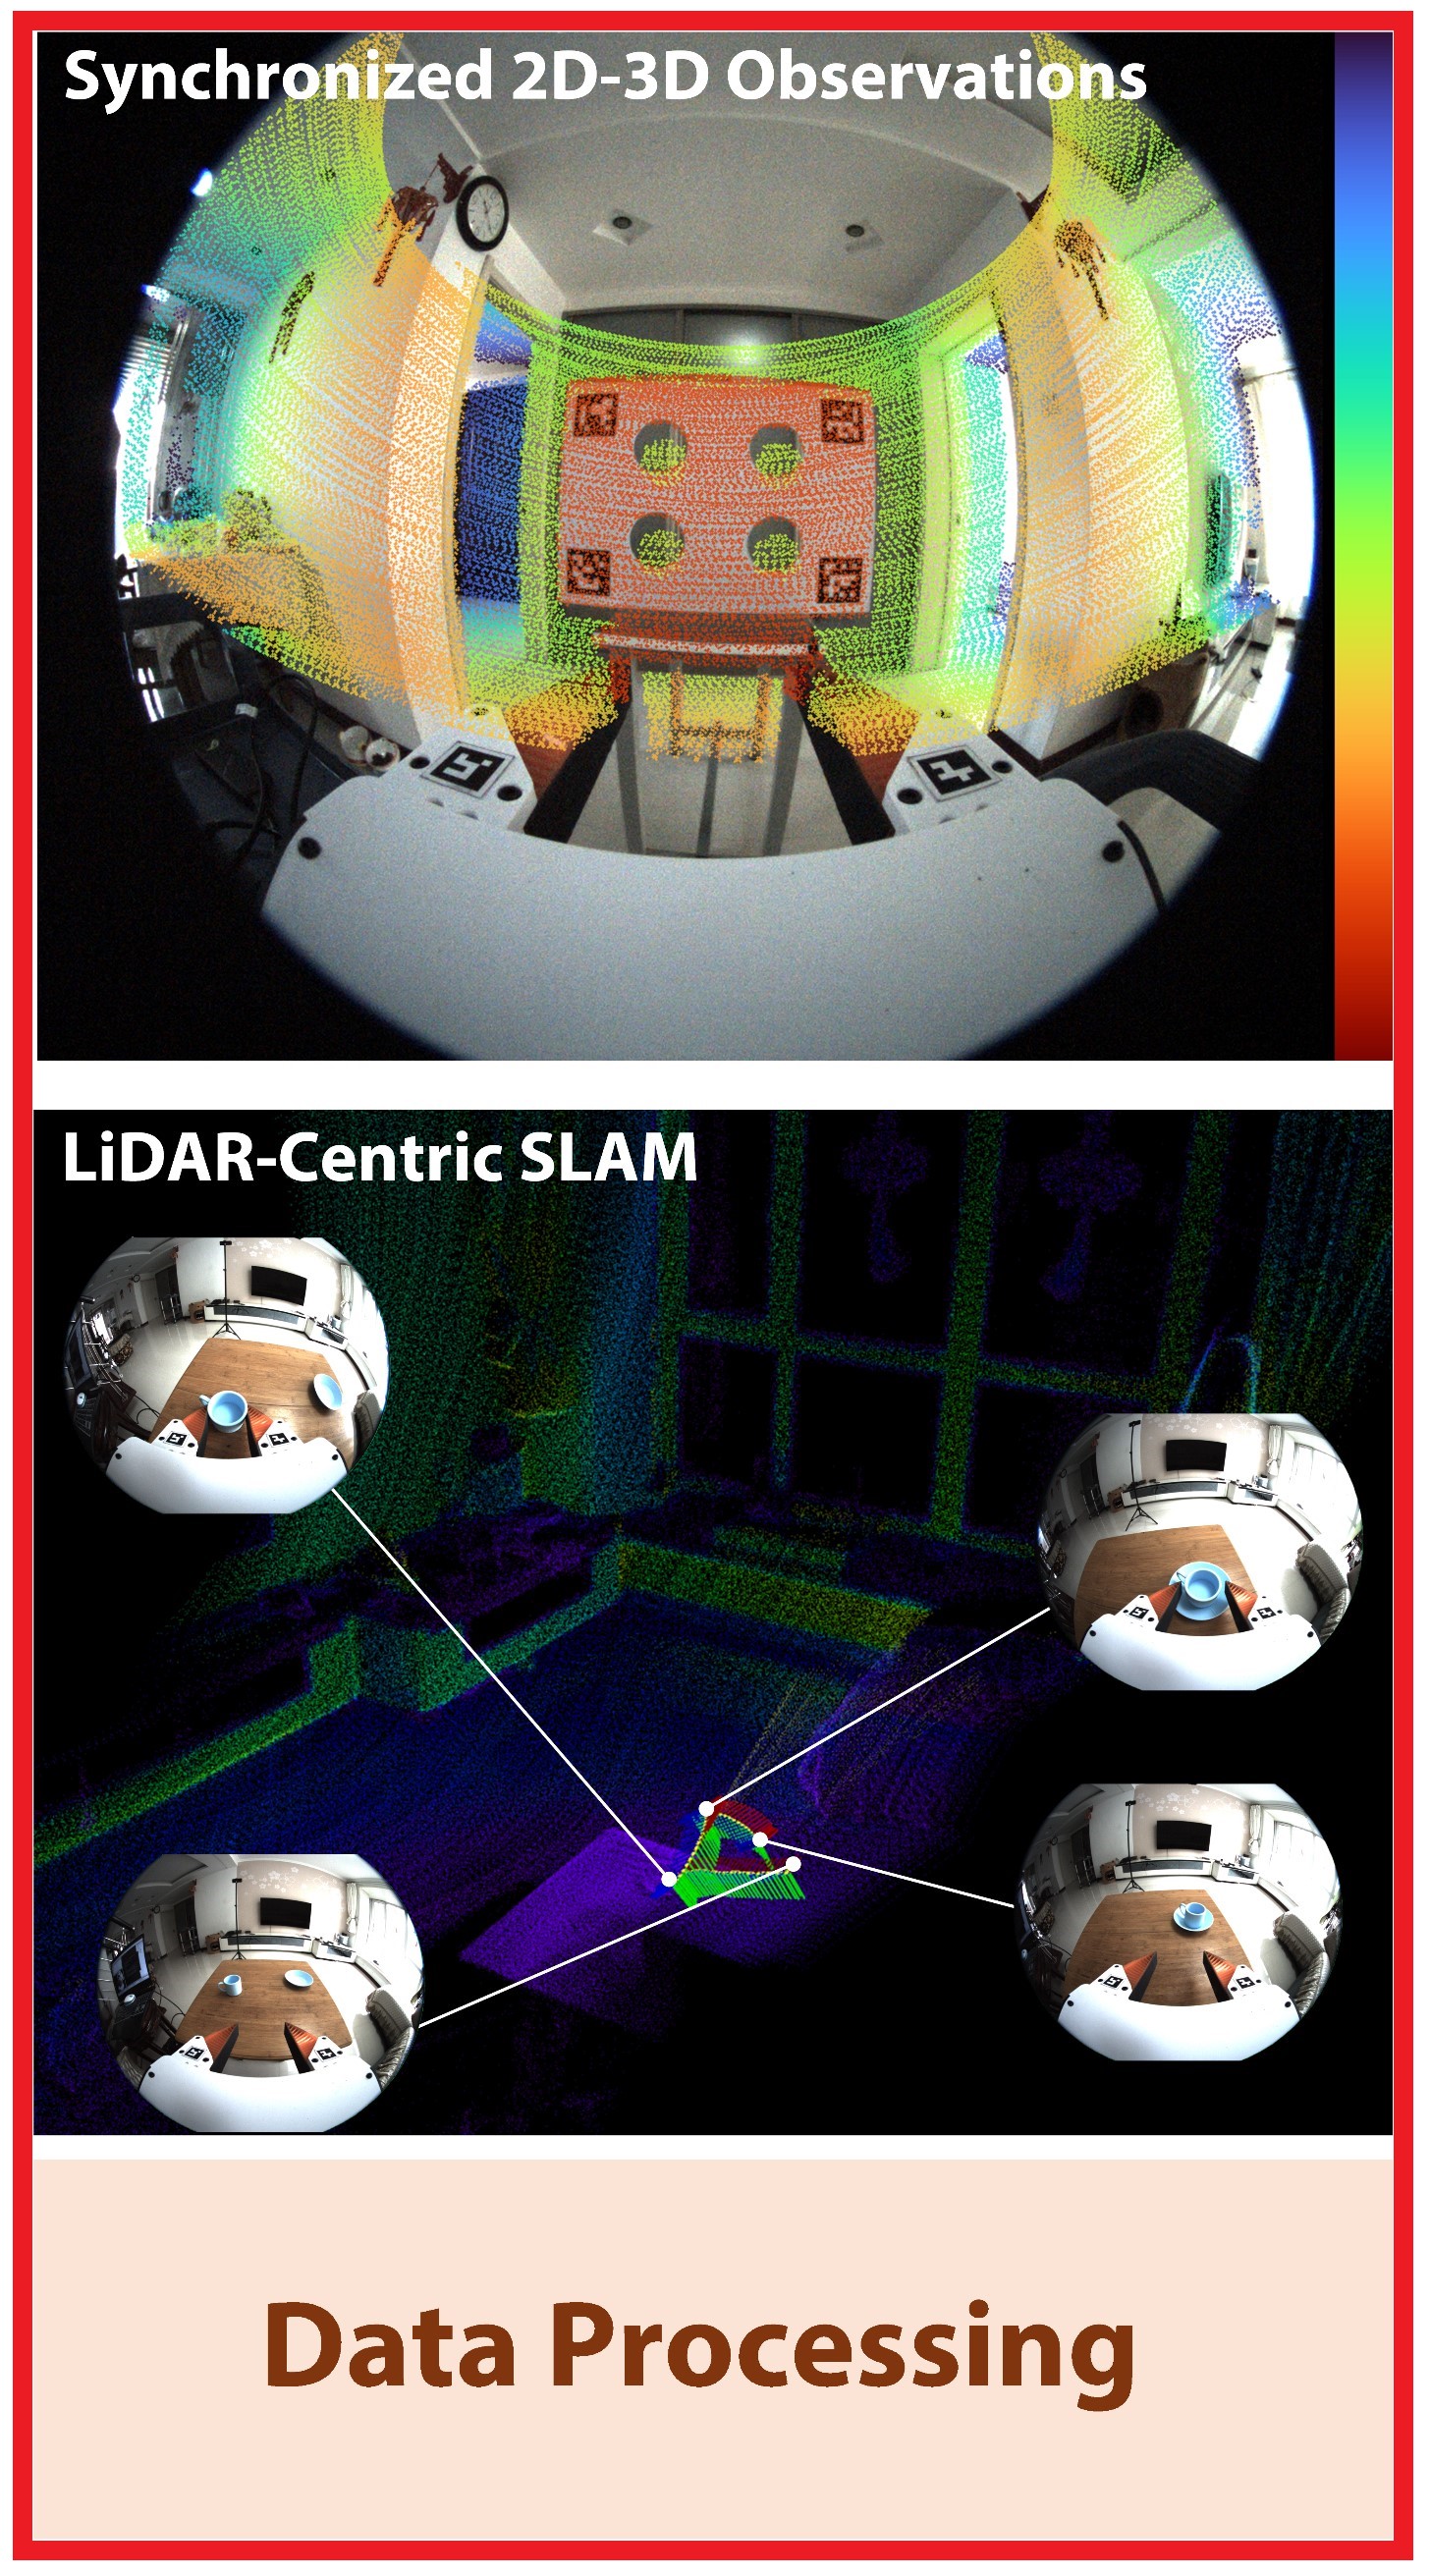
2. UMI-3D SLAM
This module performs LiDAR–inertial SLAM to estimate the camera trajectory and reconstruct the environment.
Step 1 — Configure extrinsics
Fill the calibrated LiDAR–camera extrinsic parameters into: umi_3d_slam_ws/src/umi_3d_slam/config/mid360_180.yaml
Step 2 — Install dependencies
-
Environment: Ubuntu 20.04, ROS Noetic
-
Libraries: PCL ≥ 1.8, Eigen ≥ 3.3.4, OpenCV ≥ 4.2
-
Install Sophus:
git clone https://github.com/bitcat-tech/Sophus
cd Sophus
mkdir build && cd build
cmake ..
make
sudo make install
Step 3 — Build the SLAM system
conda deactivate
cd umi_3d_slam_ws
catkin_make
Step 4 — Run SLAM Demo
source devel/setup.bash

# Start SLAM
roslaunch umi_3d_slam mapping_mid360_180.launch rviz:=true

# Play rosbag
rosbag play YOUR_DEMO.bag
- Output: Estimated camera trajectory saved in
umi_3d_slam_ws/src/umi_3d_slam/output/camera_trajectory.csv
Note: Ensure proper time synchronization between LiDAR and camera.
3. Data Processing for Training
3.1 Rosbag Preprocessing
This stage converts raw rosbag recordings into time-aligned multi-modal data, and prepares them for SLAM and dataset generation.
The pipeline consists of two main steps:
Raw rosbags
   ↓
auto_bag_to_mp4_aligned.py   (alignment + video export)
   ↓
aligned_bags/
   ├── demos/
   ├── 000000.bag ...
   ↓
auto_umi_3d_slam.sh         (trajectory estimation)
   ↓
Final demos with trajectory
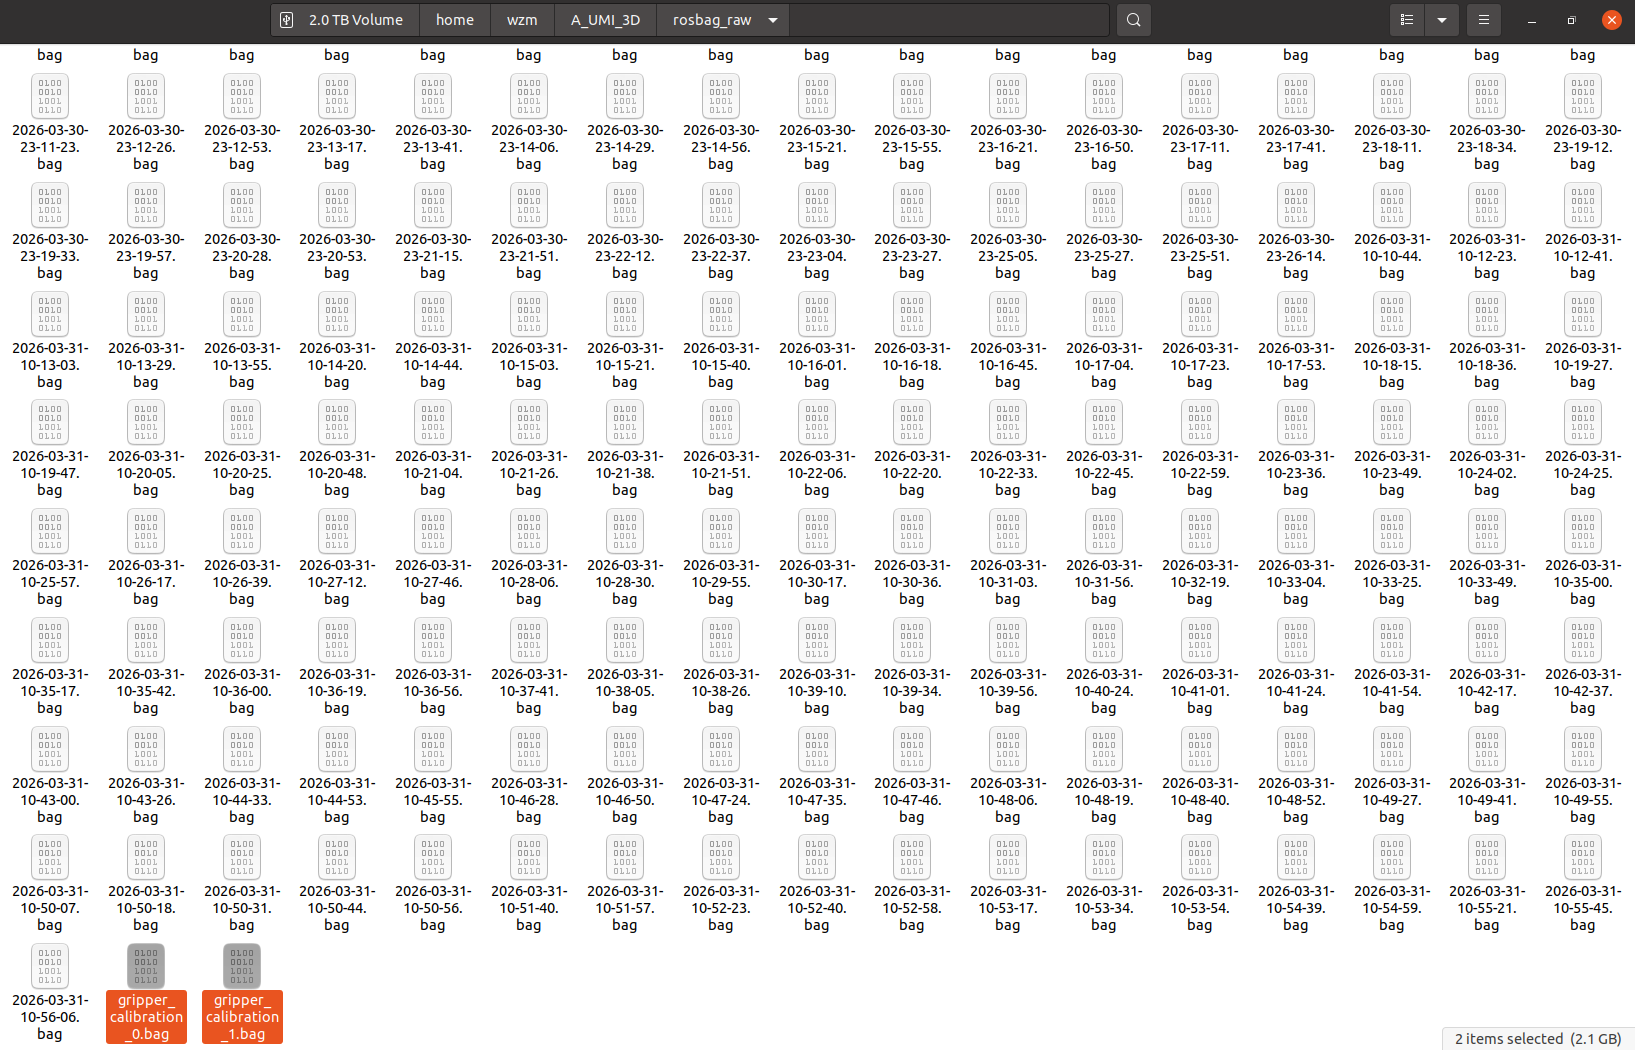
Step 1 — Prepare Raw Rosbags
Place all raw rosbags into a single directory:
/path/to/your/rosbags/
    ├── 2026-03-30-13-33-14.bag
    ├── 2026-03-30-13-33-37.bag
    ├── ...
    ├── 20xx-xx-xx-xx-xx-xx.bag
    ├── gripper_calibration*.bag
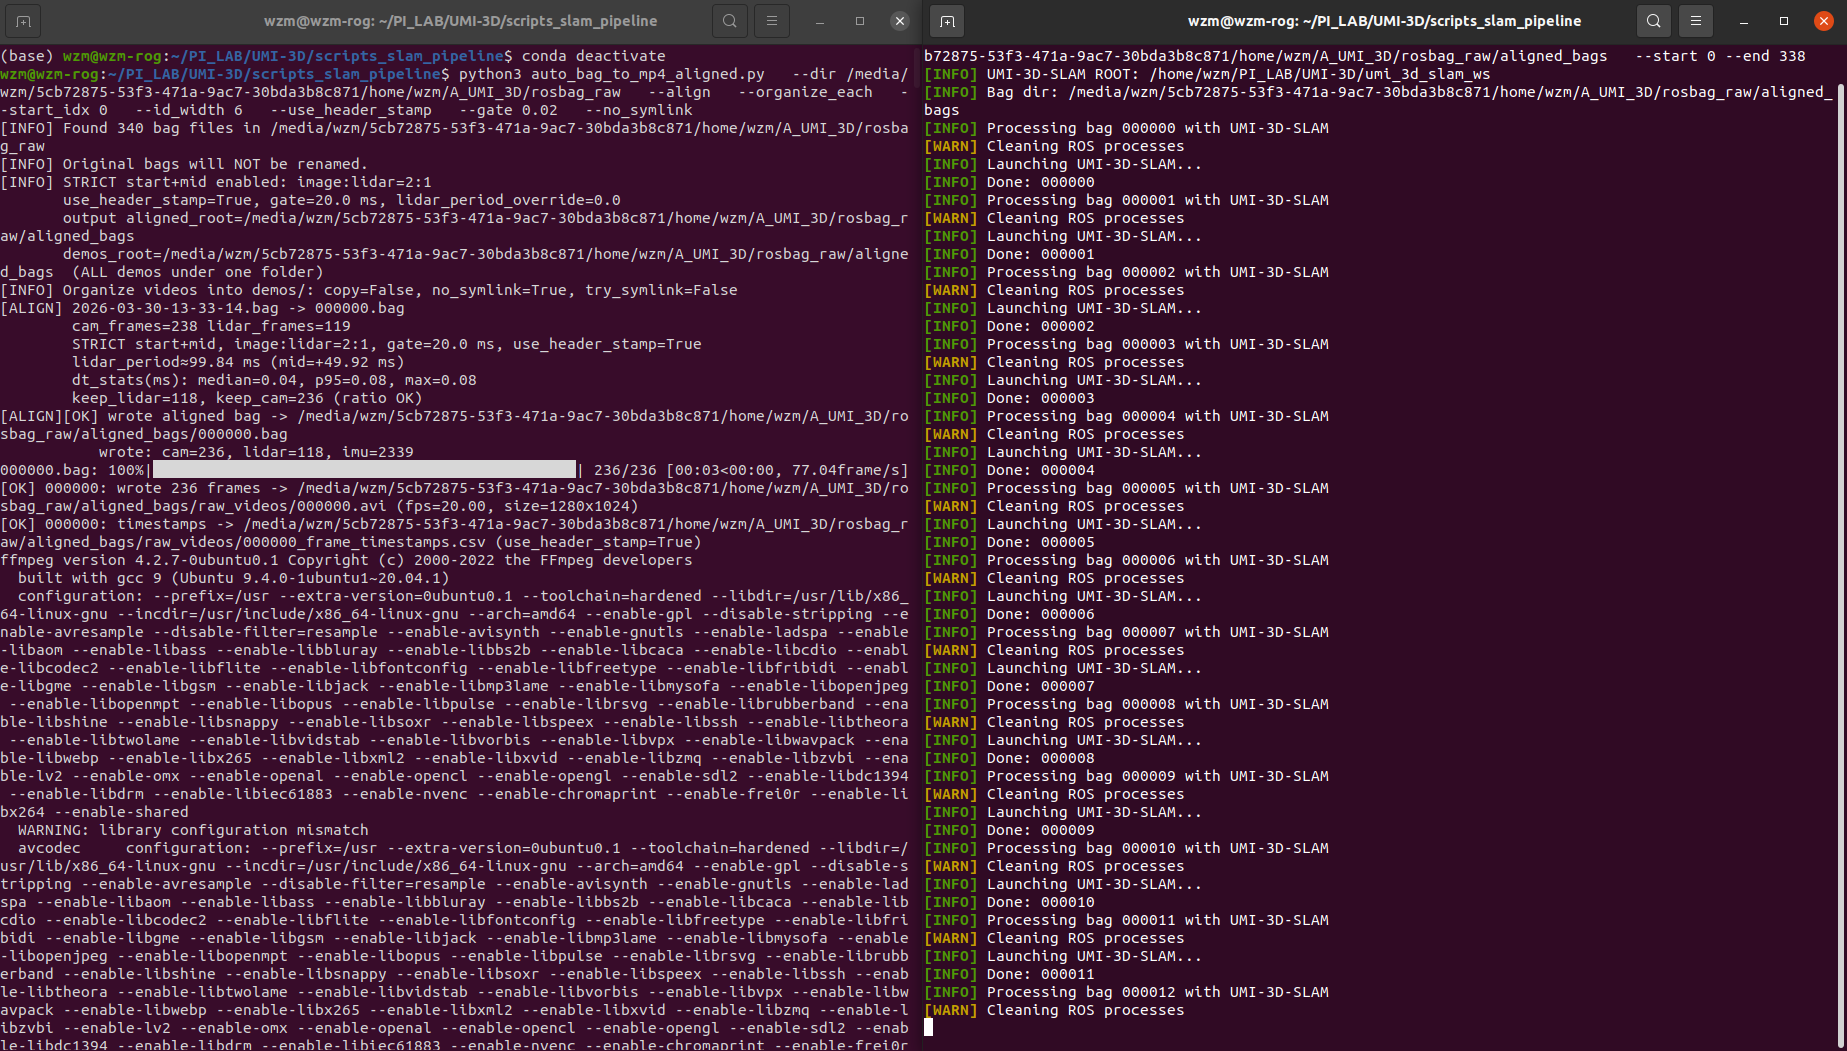
Step 2 — Multi-modal Alignment and Video Export
Run the preprocessing script:
conda deactivate

python3 scripts_slam_pipeline/auto_bag_to_mp4_aligned.py \
  --dir /path/to/your/rosbags \
  --align \
  --organize_each \
  --start_idx 0 \
  --id_width 6 \
  --use_header_stamp \
  --gate 0.02 \
  --no_symlink
🔍 What this script does
- Synchronizes:
- LiDAR (Livox)
- Camera images
- IMU
- Uses timestamp gating (
--gate 0.02) for alignment - Re-indexes all demos into consistent IDs
- Converts image streams into MP4 videos
- Outputs per-frame timestamps
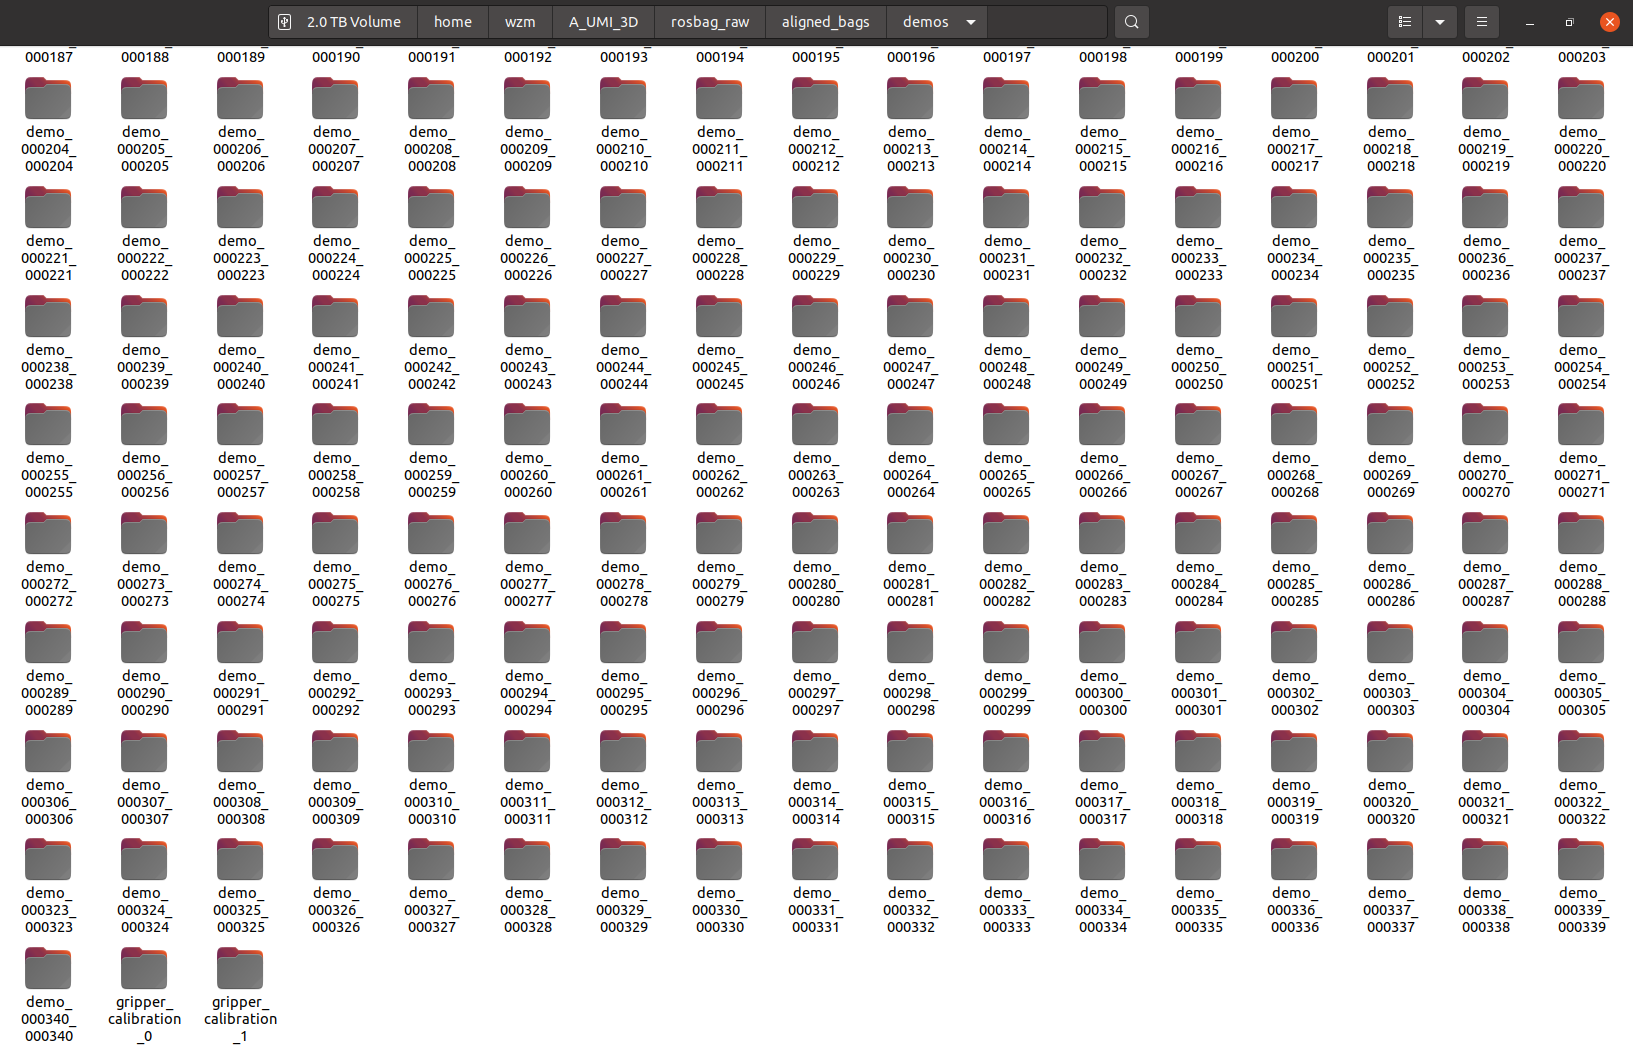
📂 Output structure
aligned_bags/
├── demos/
│   ├── demo_000000_000000/
│   │   ├── raw_video.mp4
│   │   ├── raw_video_timestamps.csv
│   │   └── source.txt
│   ├── demo_000001_000001/
│   │   ├── ...
│
├── 000000.bag
├── 000001.bag
├── ...
Each demo folder corresponds to one aligned sequence.
Step 3 — Run SLAM for Trajectory Estimation
Run batch SLAM processing:
conda deactivate

bash scripts_slam_pipeline/auto_umi_3d_slam.sh \
  --bag_dir /path/to/your/rosbags/aligned_bags \
  --start 0 \
  --end YOUR_BAG_NUMBER
🔍 What this script does
Based on the implementation :contentReference[oaicite:0]{index=0}:
- Iterates over each indexed bag (
000000.bag,000001.bag, ...) - For each bag:
- Launches UMI-3D SLAM system
- Plays rosbag
- Waits for trajectory output
- Moves result to corresponding demo folder:
demos/demo_xxxxxx_xxxxxx/camera_trajectory.csv - Optionally deletes processed bag to save disk space
📂 Final Output
aligned_bags/
├── demos/
│   ├── demo_000000_000000/
│   │   ├── raw_video.mp4
│   │   ├── raw_video_timestamps.csv
│   │   ├── camera_trajectory.csv   ← SLAM output
│   │   └── source.txt
│
├── ...
3.2 UMI-format Training Data Packaging
This stage converts the preprocessed aligned demos into a UMI-format replay buffer for policy training.
The full pipeline is wrapped by:
python run_dataset_pipeline.py \
  --session_dir /path/to/aligned_bags \
  --output /path/to/aligned_bags/DATASET_NAME.zarr.zip
The pipeline runs four stages in order:
aligned_bags/
   └── demos/
        ├── demo_xxxxxx_xxxxxx/
        │    ├── raw_video.mp4
        │    ├── raw_video_timestamps.csv
        │    ├── camera_trajectory.csv
        │    └── source.txt
        ├── gripper_calibration*/
        │    ├── raw_video.mp4
        │    ├── raw_video_timestamps.csv
        │    └── tag_detection.pkl
   ↓
00_detect_aruco.py
   ↓
01_run_calibrations.py
   ↓
02_generate_dataset_plan.py
   ↓
03_generate_replay_buffer.py
   ↓
DATASET_NAME.zarr.zip
Step 1 — Install environment
System dependencies
sudo apt install -y libosmesa6-dev libgl1-mesa-glx libglfw3 patchelf
Conda environment
We recommend using Miniforge instead of the standard Anaconda distribution.
mamba env create -f conda_environment.yaml
conda activate umi
Step 2 — Prepare inputs
Before running the dataset pipeline, make sure your session directory already contains:
demos/demo_*/raw_video.mp4demos/demo_*/raw_video_timestamps.csvdemos/demo_*/camera_trajectory.csvdemos/gripper_calibration*/raw_video.mp4
You also need:
- camera intrinsics:
example/calibration/fisheye.json - ArUco configuration:
example/calibration/aruco_config.yaml
If needed, you can override them with:
--camera_intrinsics /path/to/custom_fisheye.json
--aruco_config /path/to/custom_aruco_config.yaml
Step 3 — Run the full dataset pipeline
conda activate umi

python run_dataset_pipeline.py \
  --session_dir /path/to/aligned_bags \
  --output /path/to/aligned_bags/DATASET_NAME.zarr.zip
Output Summary
After the full pipeline finishes, the main outputs are:
aligned_bags/
├── demos/
│   ├── demo_000000_000000/
│   │   ├── raw_video.mp4
│   │   ├── raw_video_timestamps.csv
│   │   ├── camera_trajectory.csv
│   │   ├── tag_detection.pkl
│   │   └── source.txt
│   ├── ...
│   ├── gripper_calibration*/
│   │   ├── raw_video.mp4
│   │   ├── raw_video_timestamps.csv
│   │   ├── tag_detection.pkl
│   │   └── gripper_range.json
│
├── dataset_plan.pkl
└── DATASET_NAME.zarr.zip
Note: This version is currently designed for the single-gripper UMI-3D setup, where
camera_idxis fixed to 0.
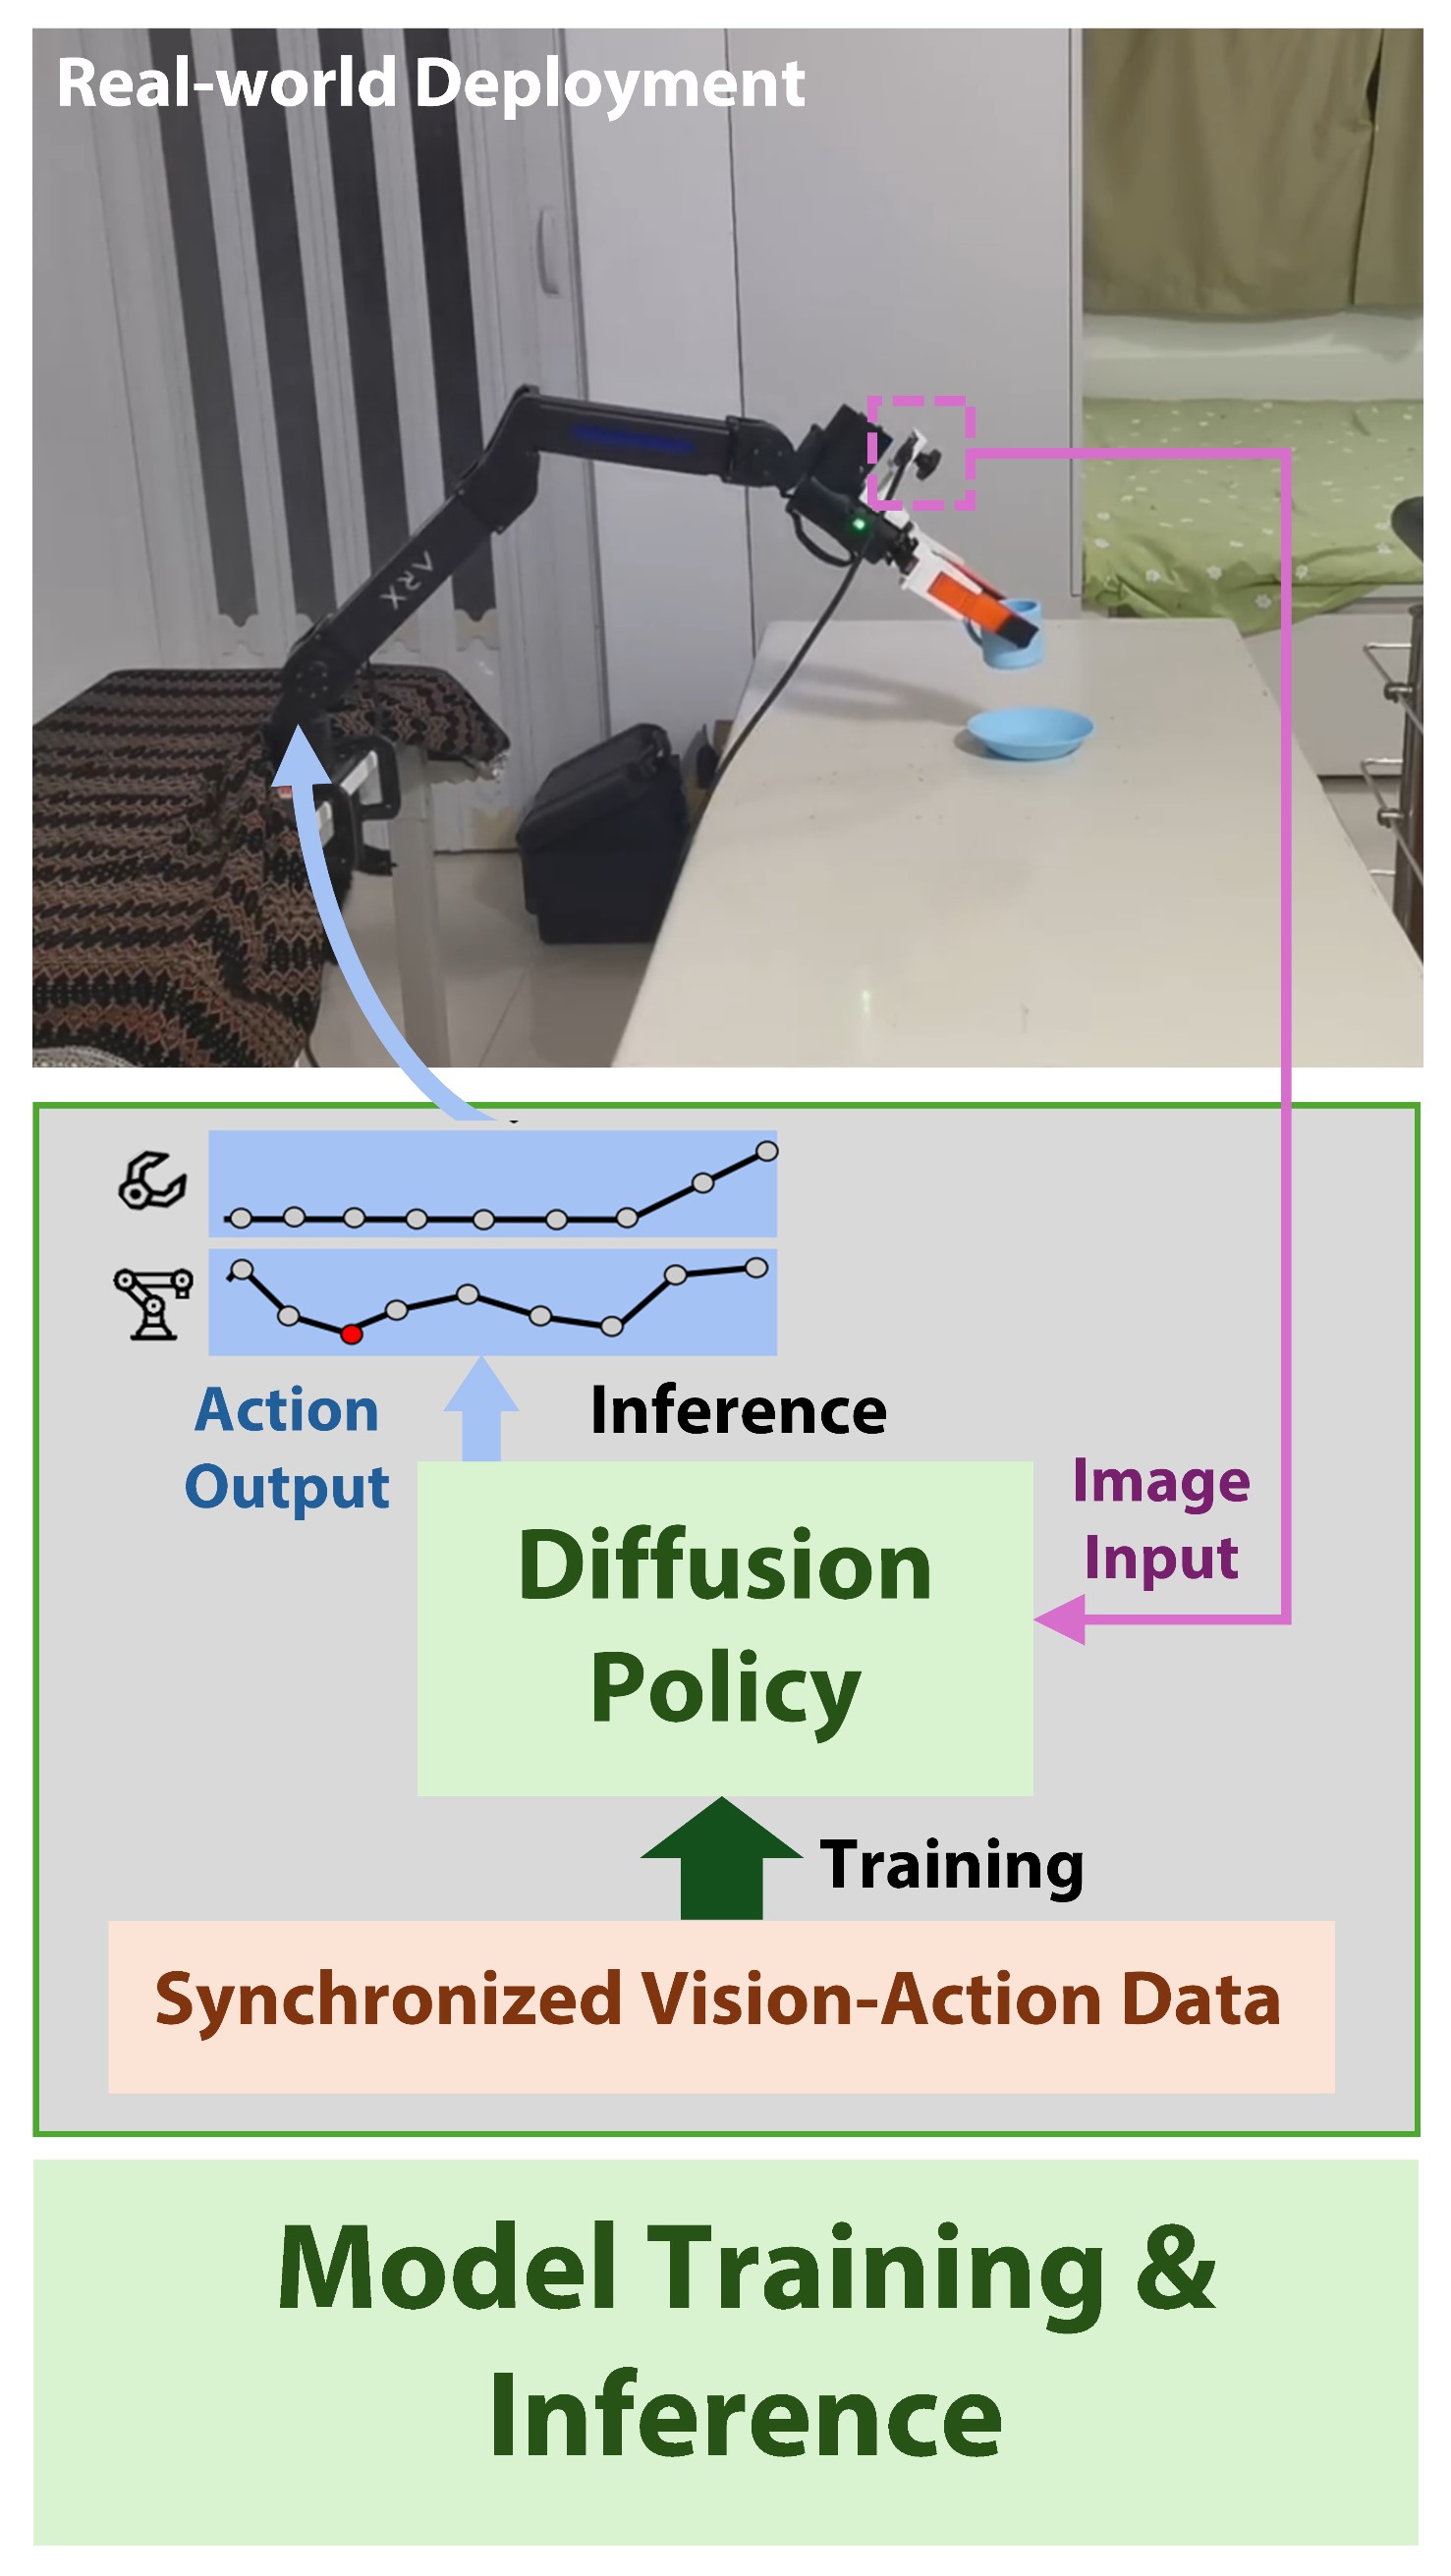
4. Next Step: Policy Training and Deployment
After obtaining the final dataset:
DATASET_NAME.zarr.zip
you can proceed to policy training and real-world deployment using the UMI-3D Policy framework:
👉 https://github.com/Physical-Intelligence-Laboratory/UMI-3D-Policy
This repository provides:
- Diffusion policy training
- Real-world deployment on robotic platforms
Citation
If you find this work useful for your research, please consider citing:
@misc{wang2026umi3dextendinguniversalmanipulation,
  title={UMI-3D: Extending Universal Manipulation Interface from Vision-Limited to 3D Spatial Perception},
  author={Ziming Wang},
  year={2026},
  eprint={2604.14089},
  archivePrefix={arXiv},
  primaryClass={cs.RO},
  url={https://arxiv.org/abs/2604.14089}
}
Acknowledgements
This project builds upon a number of outstanding open-source works in LiDAR SLAM, calibration, and embodied perception, including: UMI, VoxelMap, FAST-LIVO2, FAST-LIO, IKFoM, velo2cam_calibration, FAST-Calib. We sincerely thank the authors and contributors of these projects for their pioneering work and valuable contributions to the community, which have greatly inspired and enabled the development of UMI-3D.